Can someone tell me the best way to discharge my 52v battery for winter storage? The bike is burried in my shed and the battery is in my basement. I've been leaving the green power light on hoping this paracidic drain will discharge it, but it's taking forever. I need an inexpensive and quick discharge method. Any help would be appreciated.
You are using an out of date browser. It may not display this or other websites correctly.
You should upgrade or use an alternative browser.
You should upgrade or use an alternative browser.
HOW DO I DISCHARGE FOR STORAGE
- Thread starter Guitartec
- Start date
6zfshdb
Well-Known Member
- Region
- USA
- City
- Northeast Pennsylvania
I made this test / discharge rig for about $25. It uses these bulbs to discharge batteries when necessary. They come in a two pack:

They are rated at 12 - 48 volts but I doubt 52 will harm them.
I screw them into this standard (medium base) bulb test socket:

I use the alligator clips on the socket wires to connect it to the battery lugs. The process is simpler if you can find a connector for your battery and just plug it in.
The bulbs draw less than 10 watts so discharge may take a few hours.
You can speed it up a bit by using the second bulb and this "Y" adapter:
(Link Removed - No Longer Exists)
Low Voltage led Light Bulbs AC/DC12-48V E26 White 6000K 9W 720lm for Off Grid Solar Lighting Marine Boat RV 12v Interior Lighting 2 Pack for Camper - - Amazon.com
Low Voltage led Light Bulbs AC/DC12-48V E26 White 6000K 9W 720lm for Off Grid Solar Lighting Marine Boat RV 12v Interior Lighting 2 Pack for Camper - - Amazon.com
www.amazon.com
They are rated at 12 - 48 volts but I doubt 52 will harm them.
I screw them into this standard (medium base) bulb test socket:
I use the alligator clips on the socket wires to connect it to the battery lugs. The process is simpler if you can find a connector for your battery and just plug it in.
The bulbs draw less than 10 watts so discharge may take a few hours.
You can speed it up a bit by using the second bulb and this "Y" adapter:
(Link Removed - No Longer Exists)
Last edited:
I didn't know you were supposed to discharge the battery to store it : Good to know : Kinda curious why thoughCan someone tell me the best way to discharge my 52v battery for winter storage? The bike is burried in my shed and the battery is in my basement. I've been leaving the green power light on hoping this paracidic drain will discharge it, but it's taking forever. I need an inexpensive and quick discharge method. Any help would be appreciated.
I'm wondering if you should even bother to discharge past 80%? I remember seeing that somewhere.
Well, if you want to get the most from a LiPo battery you really shouldn't leave it fully charged for months at a time. Most battery-savy people leave it at about 50% SOC and give it a charge to about 80% once a month or so, then discharge it back down to around 50% (54.4V for a 52V LiPo) so you keep it somewhat active while keeping it around 50% most of the time while in storage. Of course, the other train of thought says, if you're not an avid rider, by the time you see a significant performance loss from improper storage, battery tech will be bringing you a better, lighter, smaller battery that charges in 10 minutes.
Terry Lesh
New Member
I made this test / discharge rig for about $25. It uses these bulbs to discharge batteries when necessary. They come in a two pack:
View attachment 46497
Low Voltage led Light Bulbs AC/DC12-48V E26 White 6000K 9W 720lm for Off Grid Solar Lighting Marine Boat RV 12v Interior Lighting 2 Pack for Camper - - Amazon.com
Low Voltage led Light Bulbs AC/DC12-48V E26 White 6000K 9W 720lm for Off Grid Solar Lighting Marine Boat RV 12v Interior Lighting 2 Pack for Camper - - Amazon.comwww.amazon.com
They are rated at 12 - 48 volts but I doubt 52 will harm them.
I screw them into this standard (medium base) bulb test socket:
View attachment 46496
I use the alligator clips on the socket wires to connect it to the battery lugs. The process is simpler if you can find a connector for your battery and just plug it in.
The bulbs draw less than 10 watts so discharge may take a few hours.
You can speed it up a bit by using the second bulb and this "Y" adapter:

SUNLITE E186 Medium Base Y Socket Adapter Splitter
Sunlite's Medium (E26) base light bulb Y socket adapter is the ideal tool for the professional photographer and artist in need of that extra bit of illumination on a subject. Not only will it work perfectly for professional usage but it also works fantastically for general purpose lighting in...www.bulbamerica.com
I actually figured out how to discharge a different way. I have a really durable Park PC10 bicycle stand. It can hold the bike’s entire weight. I simply turn the bike on and turn on the cruise control while pedaling with my hand. I also turn on the headlight. This brings the battery down to 50% SOC pretty darn quick.
I'm considering making your bulb battery drainer for the long cold months ahead. I sourced a dual e26 socket, because the sockets you sited are no longer available, but I'd like to go a step further and add an auto shut-off curcuit so it shuts off at like 25% soc. That way I can charge and discharge the battery a bit every month or so just to keep it active. Any idea where I can buy an already made circuit like that, or will I need to use my multimeter?I made this test / discharge rig for about $25. It uses these bulbs to discharge batteries when necessary. They come in a two pack:
View attachment 46497
Low Voltage led Light Bulbs AC/DC12-48V E26 White 6000K 9W 720lm for Off Grid Solar Lighting Marine Boat RV 12v Interior Lighting 2 Pack for Camper - - Amazon.com
Low Voltage led Light Bulbs AC/DC12-48V E26 White 6000K 9W 720lm for Off Grid Solar Lighting Marine Boat RV 12v Interior Lighting 2 Pack for Camper - - Amazon.comwww.amazon.com
They are rated at 12 - 48 volts but I doubt 52 will harm them.
I screw them into this standard (medium base) bulb test socket:
View attachment 46496
I use the alligator clips on the socket wires to connect it to the battery lugs. The process is simpler if you can find a connector for your battery and just plug it in.
The bulbs draw less than 10 watts so discharge may take a few hours.
You can speed it up a bit by using the second bulb and this "Y" adapter:
(Link Removed - No Longer Exists)
6zfshdb
Well-Known Member
- Region
- USA
- City
- Northeast Pennsylvania
Such a voltage regulation device may exist but I'm not aware of one. I think something like this would have to be a custom build. You could do it however with a simple timer. With a little experimentation, you could determine how long to charge / discharge your battery to get the percent charge you want.I'm considering making your bulb battery drainer for the long cold months ahead. I sourced a dual e26 socket, because the sockets you sited are no longer available, but I'd like to go a step further and add an auto shut-off curcuit so it shuts off at like 25% soc. That way I can charge and discharge the battery a bit every month or so just to keep it active. Any idea where I can buy an already made circuit like that, or will I need to use my multimeter?
Gionnirocket
Well-Known Member
- Region
- USA
- City
- Y. O.
I think my little hack using a CD60 Solar Charge Controller can accomplish this though I believe that you would need two to do it somewhat automatically... One for charging and one for discharging as it doesn't switch between modes automatically and doesn't have connection points for all 3, just 2 of your choice. But even then without some type of timer that could count long periods such as 14 days + it would just continually cycle.I'm considering making your bulb battery drainer for the long cold months ahead. I sourced a dual e26 socket, because the sockets you sited are no longer available, but I'd like to go a step further and add an auto shut-off curcuit so it shuts off at like 25% soc. That way I can charge and discharge the battery a bit every month or so just to keep it active. Any idea where I can buy an already made circuit like that, or will I need to use my multimeter?
A few other details and some of my opinion.. We are talking Lithium ion here, not lithium polymer. I don't believe that you need to cycle the battery during storage. Storage voltage is higher than 25% SOC and even a little more than 50% and is typically somewhere just under nominal voltage or at around 62%
Last edited:
AHicks
Well-Known Member
- Region
- USA
- City
- Snow Bird - Summer S.E. Michigan, Winter Gulf Coast North Central Fl.
I think maybe most of us can just go for a short ride to knock the battery down from it's 100% status. Unless you want to be really anal about it, there's no rocket science or exact percentages required here. If you know the bike is going to be put away at some point soon, just stop charging it when you get back from a ride! Then, if you do decide to go, charge it up and go. Just don't charge it up when you get back - unless you've managed to drain it completely. Then charge it up for a few hours and forget it. You're good to go for months if necessary! KISS!
The thing I like about the bulbs is it's cheap and pretty simple. My bike came with an expensive Grin 8A charger, so putting a lot more $$$ into discharging is killing me, if you know what I mean? Even so, I'll go look at the CD60s now and see if I can see how they'd work for this. Thanks!I think my little hack using a CD60 Solar Charge Controller can accomplish this though I believe that you would need two to do it somewhat automatically... One for charging and one for discharging as it doesn't switch between modes automatically and doesn't have connection points for all 3, just 2 of your choice. But even then without some type of timer that could count long periods such as 14 days + it would just continually cycle.
A few other details and some of my opinion.. We are talking Lithium ion here, not lithium polymer. I don't believe that you need to cycle the battery during storage. Storage voltage is higher than 25% SOC and even a little more than 50% and is typically somewhere just under nominal voltage or at around 62%
Oh they're cheap... just looked at it. Cool.
I read your hack. I'm not quite that wiring savvy when it comes to charging/discharging of batteries. I was wonderin' if you can do me (and the world) a favor and make a video of exactly how you hook this up with the procedural stuff to make it work. I know it's sort of a tall order, but this is the best/most accurate way I've seen to get the battery where you want it. Just hoping, no biggie if you don't want to.I think my little hack using a CD60 Solar Charge Controller can accomplish this though I believe that you would need two to do it somewhat automatically... One for charging and one for discharging as it doesn't switch between modes automatically and doesn't have connection points for all 3, just 2 of your choice. But even then without some type of timer that could count long periods such as 14 days + it would just continually cycle.
A few other details and some of my opinion.. We are talking Lithium ion here, not lithium polymer. I don't believe that you need to cycle the battery during storage. Storage voltage is higher than 25% SOC and even a little more than 50% and is typically somewhere just under nominal voltage or at around 62%
I can discharge all riding season long by just going for a ride, but when it comes to the end of season battery discharge, I have failed to be able to simply go for a ride at the end of riding season since I got my RCS 2 years ago. Between work, family, holidays and New England weather coming on so stupid-fast, I have been stuck at 58.8v enough times to make a cheap discharger. Sounds like I'm BSin, but this is my story and I'm stickin' to it!I think maybe most of us can just go for a short ride to knock the battery down from it's 100% status. Unless you want to be really anal about it, there's no rocket science or exact percentages required here. If you know the bike is going to be put away at some point soon, just stop charging it when you get back from a ride! Then, if you do decide to go, charge it up and go. Just don't charge it up when you get back - unless you've managed to drain it completely. Then charge it up for a few hours and forget it. You're good to go for months if necessary! KISS!
Gionnirocket
Well-Known Member
- Region
- USA
- City
- Y. O.
I read your hack. I'm not quite that wiring savvy when it comes to charging/discharging of batteries. I was wonderin' if you can do me (and the world) a favor and make a video of exactly how you hook this up with the procedural stuff to make it work. I know it's sort of a tall order, but this is the best/most accurate way I've seen to get the battery where you want it. Just hoping, no biggie if you don't want to.
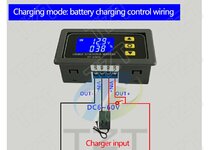
The wiring is very straight forward.
Two wires IN +/- and two wires OUT +/-
For charging the battery is the OUT (Prefered) but can be placed on the IN if your charger doesn't provide an output without a load
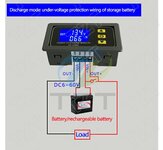
For discharging the battery is the IN
If you decide to go forward with this... Please feel free to contact me here or via personal message if you have any questions
Attachments
Gionnirocket
Well-Known Member
- Region
- USA
- City
- Y. O.
I'm in Southern NY so I know riding can be a little rough when it gets cold... though not to your extremes.I can discharge all riding season long by just going for a ride, but when it comes to the end of season battery discharge, I have failed to be able to simply go for a ride at the end of riding season since I got my RCS 2 years ago. Between work, family, holidays and New England weather coming on so stupid-fast, I have been stuck at 58.8v enough times to make a cheap discharger. Sounds like I'm BSin, but this is my story and I'm stickin' to it!
I've found that for me it is doable to 40°f without having to wear too much clothing that then make me uncomfortable. I try to wear thin easy to shed layers and most importantly something that breaks the wind while riding at the warmest part of the day. Sunshine on my shoulders makes me happy.
Good news is that NOAA released a warmer than normal forecast for this winter for the NE
I could use a warmer winter, fo sho!I'm in Southern NY so I know riding can be a little rough when it gets cold... though not to your extremes.
I've found that for me it is doable to 40°f without having to wear too much clothing that then make me uncomfortable. I try to wear thin easy to shed layers and most importantly something that breaks the wind while riding at the warmest part of the day. Sunshine on my shoulders makes me happy.
Good news is that NOAA released a warmer than normal forecast for this winter for the NE
My Grin charger has a male XLR connector output with 3 conductors (+,- and signal), so I'll need to buy a female XLR and solder in a 2 conductor speaker wire because I don't want any chance of aligator clips shorting at the XLR pins. According to your diagrams, I won't need the signal output, or do I? Also, just for clarification, the "load" is just the charger, right? You can see, I'm not confident and am trying getting fried and causing a big mushroom cloud over RI.The wiring is very straight forward.
Two wires IN +/- and two wires OUT +/-
For charging the battery is the OUT (Prefered) but can be placed on the IN if your charger doesn't provide an output without a load
For discharging the battery is the IN
If you decide to go forward with this... Please feel free to contact me here or via personal message if you have any questions
Gionnirocket
Well-Known Member
- Region
- USA
- City
- Y. O.
No worries...My Grin charger has a male XLR connector output with 3 conductors (+,- and signal), so I'll need to buy a female XLR and solder in a 2 conductor speaker wire because I don't want any chance of aligator clips shorting at the XLR pins. According to your diagrams, I won't need the signal output, or do I? Also, just for clarification, the "load" is just the charger, right? You can see, I'm not confident and am trying getting fried and causing a big mushroom cloud over RI.
The load is the device ultimately using the electricity... so when charging it is the battery. When discharging it would be the motor or the light bulbs for the purpose discussed above. Take note in the two previous diagrams that they are different and one shows it wired for charging and the other shows it wired for discharging. The battery is the output (load)when charging and the input (line) when discharging
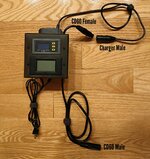
You will need both a male and female XLR for each CD60 as it will sit in line between the charger and battery like an extension cord.
I prefer to use a PC power cord as it will be round and have properly sized conductors... but 16ga - 14ga speaker wire can be used. My signal wire tested to have no function and is typically not used in eBike applications. You will see it used in situations like a golf cart to inhibit someone from driving it away while charging.
The CD60 works as a simple switch so as long as you don't cross + and - nothing can go wrong. If it malfunctions for any reason it will either charge the battery as if it wasn't there or not allow charging. So no mushroom clouds.
In the pic you can see what how it will plug in. I cut the ends off of the PC power cord and then cut a short piece to plug into the charger and the remaining longer piece to plug into the battery with the Male XLR. This makes it very easy to remove it from use by just unplugging it
Attachments
Last edited:
6zfshdb
Well-Known Member
- Region
- USA
- City
- Northeast Pennsylvania
The XLR connector is rated at 10 amps max per pin. You won't overload it with your Grin charger but be careful what you use for a load on the discharge cycle. The bulbs mentioned above are fine but using the bike's motor for a fast discharge could be a problem.My Grin charger has a male XLR connector output with 3 conductors (+,- and signal), so I'll need to buy a female XLR and solder in a 2 conductor speaker wire because I don't want any chance of aligator clips shorting at the XLR pins. According to your diagrams, I won't need the signal output, or do I? Also, just for clarification, the "load" is just the charger, right? You can see, I'm not confident and am trying getting fried and causing a big mushroom cloud over RI.
Similar threads
- Replies
- 12
- Views
- 1K
- Replies
- 10
- Views
- 911
- Replies
- 1
- Views
- 3K
- Replies
- 22
- Views
- 6K