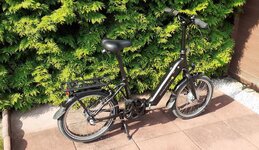
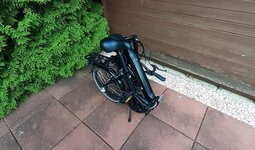
Greetings from Switzerland - New SFM Saxonette Compact Comfort Plus eBike Owner

SwissJetPilot

Member
Region
Europe
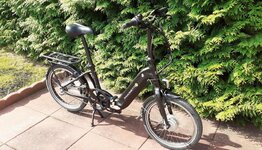
As the title says, I am the owner of a SFM eBike and wanted to see if there are any other SFM eBike owners in this forum. I've had the bike about a month and have managed to put a little over 100km on it. So far, so good! I would be interested to hear from other SFM eBike owners regarding their experiences and over all impression as this is my first eBike so we'll see how this works out.
 

Attachments

  • Bike--1.jpg
    Bike--1.jpg
    291 KB · Views: 476
  • Bike--2.jpg
    Bike--2.jpg
    271.8 KB · Views: 418
  • Bike--3.jpg
    Bike--3.jpg
    209.3 KB · Views: 267
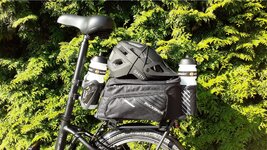
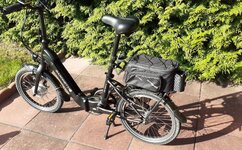
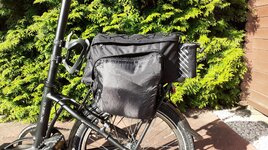
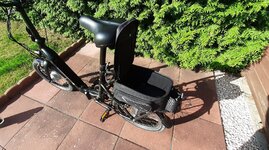
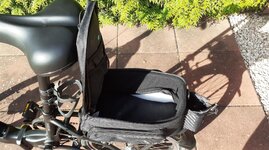
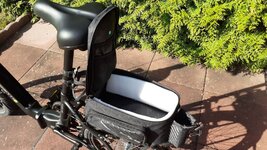
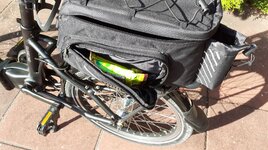
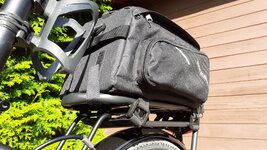
Yeah, it's not a bad little bike for around €1,300. :) I just picked up this 9-12 liter Rockbros carrier bag from Amazon for €32.99 which is a perfect addition. The side Pockets fold out for extra storage and it included a rain cover. Nice sturdy Velcro straps keep it in place. The extra water bottle carrier is a bonus!
 

Attachments

  • BikeBag--1.JPG
    BikeBag--1.JPG
    616.2 KB · Views: 195
  • BikeBag--2.JPG
    BikeBag--2.JPG
    568 KB · Views: 207
  • BikeBag--3.JPG
    BikeBag--3.JPG
    558 KB · Views: 193
Last edited:
Welcome. Are you a commuter? That bag has large side bags that come down. I lined mine with mylar bubble wrap insulation. It holds its shape better and is insulated for food items. Nice helmet.
 
@ PedalUma - No, just a pleasure rider so it's more for fun than work. This bag comes with a piece of 10mm thick foam in the sides and rear wall and another inside the floor which would be really good for protecting camera or video equipment. Since it easy to access with an internal zipper, I removed it to gain some additional space since I'm just carrying my rain jacket, tools, pump, repair kit, gloves, etc. The side pockets can still be used even if not folded down which is handy for snacks and/or power bars or other small items.

@ vincent - Here's the spec's and the SFM website. I've done a little of my own research just to see where all the components come from. Technically this is classified as a pedelec or EPAC (Electronically Power Assisted Cycle). While the logo on this bike states "Designed in Germany" pretty much all the components are made in China or Taiwan.

I've tested the range and it's an honest 60km per charge over flat and low hilly terrain. It's really a flat-lander bike and not an Alpine climber by any means! Recharge time to 80% is about 2.5 hours, 100% around 4 hours.

• Frame shape: Folding frame with low entry and safety lock.
• Frame material: Aluminum. (Probably produced by Changzhou Green Pedel Co., Ltd)
• Fork: Aluminum rigid fork.
• Rear derailleur: Shimano Nexus SG-3C41, 3-speed hub gears with back pedal brake (not freewheel) 16 tooth sprocket.
• Gearshift: Shimano Nexus twist shifter and SM-BC06 bell crank.
• Motor: SFM* branded front hub motor. 250 W, 25 km/h to 45 Nm (MXUS, China)
• Battery: 36 Volt, 10 Ah, 360 Wh Li-Ion battery integrated into the down tube and secured with built-in lock. Can be charged in the bike or removed. Weight: 3 kg. (BAK New Power, China)
• Controller Display**: SFM branded LDC display with 3-buttons; Mode, power "+" and "-".
• Controller Display Functions: Power setting (0-5), battery level, trip, ODO, max km, watts, time, average speed. Light control back-lights the controller when the lights are on.
• Power Settings: 1=10km/h, 2=14km/h, 3=18km/h, 4=22km/h, 5=25km/h.
• Tires: 20" tires with puncture protection and reflective stripes.
• Front brake: V-brake, (Probably Tektro, China).
• Rear brake: Coaster brake and an additional V-brake. (Probably Tektro, China)
• Brake Levers: (Probably Tektro, China)
• Front light: 5 lux, 'Uni LED' (Buchel, Germany)
• Rear light: 'Tivoli' (Buchel, Germany)
• Bottom Bracket: Unknown.
• Crank: 52 tooth alloy sprocket and plastic cover with 170 mm aluminum forged crank arms (Pro Wheel under Haomeng Bicycle Co.,Ltd.,)
• Pedals: VP-F55 folding. (VP Components, Taiwan)
• Chain (KMC Chain Industrial Co., Ltd., Taiwan)
• Bike weight: approx. 21.5 kg without battery, 24.5 kg with battery
• Overall dimensions: 1580 x 620 x 830-1010 (seat post)
• Folded dimensions: 820 x 620 x 770

*The motor has the SFM logo on it, but I looked up the code on the side of the hub (CE XF07 2012 0341) which turns out to be manufactured by Changzhou MXUS Import & Export Co., Ltd. (http://www.mxusebikekit.com).

**The controller display and the DC controller module are probably manufactured by Kunray. (Yiwu Kunray E-Commerce Co., Ltd)

A little research into the SFM Bike company revealed that in 2013 SFM declared insolvency. SFM GmbH’s new parent company is Zweiradunion Fahrzeugtechnik GmbH based in Germany and is owned by two shareholders: Sunrise New Energy Co. Ltd. and Rising International Holding Co. Ltd out of Hongkong. Since then, Ms. Wang Tao is the new Geschäftsführer for SFM GmbH.

SFM website -

Owner's manual (Sorry, it's only available in German) -
 

Attachments

  • SFM Compact Comfort Plus Owners Manual.pdf
    3 MB · Views: 368
  • BikeBag--3.JPG
    BikeBag--3.JPG
    549.9 KB · Views: 276
  • BikeBag--4.JPG
    BikeBag--4.JPG
    442.9 KB · Views: 179
  • BikeBag--5.JPG
    BikeBag--5.JPG
    496.4 KB · Views: 190
  • BikeBag--6.JPG
    BikeBag--6.JPG
    463.6 KB · Views: 177
Last edited:
The black on black zipper that held the foam is highly concealed. I have kept an ID there or some money for lunch. Just incase my back is turned when I a taking a break or while taking a bike on a train.
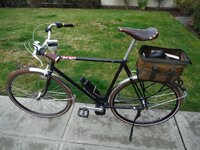
Here is a plumber's bag I often use these days on one of my electric bikes. It is a Polish three-speed with a coaster brake that I converted to 350W.
 

Attachments

  • UnionJack06.JPG
    UnionJack06.JPG
    406.9 KB · Views: 176
  • UnionJack08.JPG
    UnionJack08.JPG
    297.7 KB · Views: 173
The only other additions at this point is the seat post mounted water bottle and a smartphone holder on the handle bars.

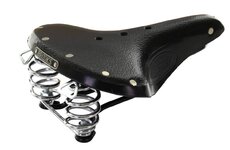
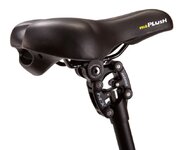
Since there's no suspension at all, I'm currently looking into replacing the factory seat with either a Suntour suspension seat post or possibly a spring supported saddle like the Brooks B67. The factory seat post is an odd size (34Ø/500mm) and I'm having trouble finding a suspension post that matches the length.
 

Attachments

  • BrooksB67.JPG
    BrooksB67.JPG
    77.9 KB · Views: 169
  • Suntour SP12NCX.JPG
    Suntour SP12NCX.JPG
    43.4 KB · Views: 165
Last edited:
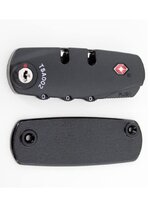
@ PedalUma - Nice bike! 👍 I've thought about locking the bag too. I didn't want the hassle of a little padlock and key, so I'm considering this TSA combination suitcase lock from Amazon. This would be relatively easy retrofit and permanently mount on the side of the bag to secure the dual zippers. With the padding removed the zippered walls offer an additional place to hide valuables or stow maps, guide books, etc.
 

Attachments

  • TSASuitcaseLock.JPG
    TSASuitcaseLock.JPG
    106.9 KB · Views: 178
Last edited:
Firstly. look for 34 x 600 suspension seat posts. It is 10cm longer. And may be more readily available.
Next, you can melt holes through the bottom of the bag, with for example a soldering iron. Use these to fasten the bag to the rack with zip ties or wire. This can be done under the discussed zippered floor. You can also drill then screw the quick release mechanism, making it non-operational. This will help avoid a quick grab situation. At the start of Covid, I took out a lib balm from my back pocket to sit down on a bench. It was quickly grabbed by a kleptomaniac.
If you go for the Brooks treat the underside with equestrian leather products and get a rain cover. Or you can use one of these shower caps?
1634425547591.jpeg
 
Great ideas! Actually, the two large Velcro straps that hold the bag to the bike rack are remarkably sturdy and secure so it's not going anywhere in a hurry. But I do like the idea of securing it with zip ties. I have a piece of 3mm thick corrugated plastic sheet that I can use to replace the foam padding in the bottom. I'll use your soldering iron idea to make holes in the side when I install the TSA lock. The shower cap idea is a good one too. Sure beats paying €12.00 for an over priced Brooks cover.
 

Attachments

  • bikebag--7.JPG
    bikebag--7.JPG
    418.6 KB · Views: 171
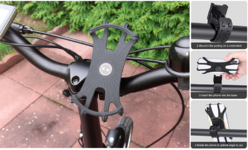
If you need a smart phone holder for the handle bars, this is a universal fit from Amazon. You can rotate it in any orientation. It fits well and is a nice low cost solution at only €9.99. The only real downside is the mount is secured by a rubber strap so it could be easily stolen. But over pavement, cobble stone roads and off-road gravel roads, it stays put and keep the phone right where I want it.
 

Attachments

  • 1634464391885.png
    1634464391885.png
    1.2 MB · Views: 191
Last edited:
For anyone who wants to try and program their controller, I found this for the Kunray controller. Not sure if this works with all their units, but it might be worth a try -

Controller
Motor Style: Brushless
Rated Voltage: 24v 36v 48v
Rated Power: 250w 350w 500w
Current: 13th 1st 1st (250w), 15th 1st 1st (350w), 25th 1st 1st (500w)
Controller Size: 86mm * 53mm * 30mm (250w, 350w), 121mm x 50mm x 30mm(500w)
Use for: electric tricycle, ebike, e-scooter, e-car, e-golf car etc.

How to use self-study:
When using the controller and motor to work for the first time, you must first use the self-study string.
Step 1. Connect motor wire, hall wire, battery wire, and other function wires.
Step 2, connect self-study lead, motor rotates forward, let it learn automatically for 10-20 seconds, disconnect self-study lead, connect to other function wires, complete self-study, and don't need to use it in the future.

How to define p07:
1. if your motor has speed sensor wire (some is white wiring in hall), the p07 set to 1.
2. if your motor speed sensor wireless (hall is 5 wiring) then you should know your motor magnet number and motor gear ratio.
P07 = magnet * gear ratio (eg magnet = 20, gear ratio = 1:4.5, so p07 set to 20*4.5 = 90

Display beacon
(Power lights on) Press and hold button 3 + 3 3 seconds to turn on/off;

Configure the operation (just need to define p03, p06, p07, p10, p13)
◆ Press “+” and “-” button together 3 seconds to enter setup interface;
Press press mm button to enter setting item; press the up and down button to select the parameter;
P01: meter backlight;
P02: unit mileage, 0: km; 1: mile;
P03: voltage level, low operating voltage;
P04: sleep time, 0: sleepless, unit: min
P05: assistance position, 0:3,1:5, mode;
P06: wheel diameter, unit: inch; precision: 0.1;
P07: number of speed magnets, range: 1-100; (note: here for set speed display only, does not affect actual speed)
P08: speed limit, range: 0-50km/h,50: means unlimited speed; (when speed big than setting speed, turn off pwm output)
P09: zero or non-zero start, 0:zero start; 1: not zero start;
P10: start mode setting: 0: power on, invalid throttle; (assist power)
1: electric throttle movement mode, invalid auxiliary;
2: assistance and accelerator are effective;
P11: impulse sensitivity adjustment, range: 1-24;
P12: push start force adjustment, range: 1-5;
P13: definition of the type of assistance pas. (5/8/12) single hall pas: set to 5/8 double hall pas: set to 12
P14: p15: functions not open;
P16: clear anode; long press button 5 seconds to clean;
 
Back