Brian's CCX Journal

Miles: 170

- 1/20/2019: Filed support ticket for degrading battery connector.
- 1/21/2019: Juiced suggests replacing the battery citing a paragraph from: https://support.juicedbikes.com/hc/...-Battery-Discharge-Port-Socket-Pins-pushed-in
- 1/23/2019: I send back battery to Juiced.
- 1/25/2019: Juiced sends new battery.
- 1/28/2019: I receive the new battery.
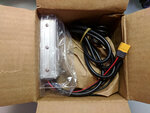
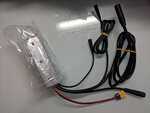
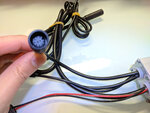
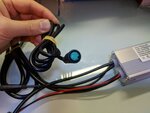
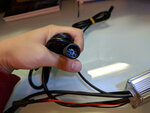
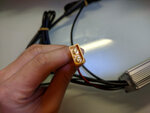
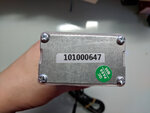
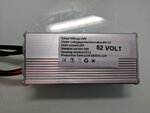
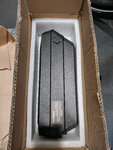
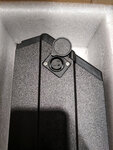
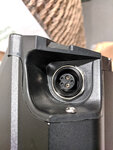
- 1/29/2019: Installed new battery. Connector was different as shown in the pictures. Battery tight. Crushed my finger trying to install it. Suddenly, the battery slipped in smoothly... Sign of better connection? :-D Charging socket not tight like previous one. Female connector is definitely different with three dimples. Added back saran wrap (raining tomorrow) and two velcro straps.
 

Attachments

  • new-battery-box.jpg
    new-battery-box.jpg
    4.7 MB · Views: 610
  • new-battery-charge-port.jpg
    new-battery-charge-port.jpg
    5.6 MB · Views: 571
  • new-battery-female-connector.jpg
    new-battery-female-connector.jpg
    3.3 MB · Views: 583
  • new-battery-female-connector-2.jpg
    new-battery-female-connector-2.jpg
    3.5 MB · Views: 618
  • new-battery-female-connector-3.jpg
    new-battery-female-connector-3.jpg
    3.5 MB · Views: 593
  • new-battery-female-connector-4.jpg
    new-battery-female-connector-4.jpg
    3.2 MB · Views: 571
Last edited:
Thanks for this Brian. I'll look but I don't think my battery has those indentations so they are obviously working on a better connection method. My battery always went in buttery smooth and connects the entire ride. Yours might have just been off right from the get-go.
 
Hah! Your video reminded me of something when I first opened up my CCX. There were two keys and when I cut their tie-strap and put them on the table I notice one was sticking up about 45 degrees. My first thought was "What did I get myself into. These yahoos send me a bent key and this is going to be a sign of how this bike is put together". Imagine my surprise (and embarrassment) when I picked the key up and noticed that they swivel 90 degrees each way!
The pins don't hold into the swivel too good and they tend to slip out.
 
The pins don't hold into the swivel too good and they tend to slip out.

Those key pins dropped out when I was trying to install the new battery! Cracked me up so hard... :D what's next I thought... :eek:

I temporarily pushed them back in to get the job done. I'll probably hit them with a hammer to knock them out again, coat them with crazy glue, and then pound them back in. :cool:
 
Do you have a picture of the CCX controller? Some of us are wondering if it would fit in the narrower CC/CCS downtube.

@Dunbar Here are some photos I took of the controller I received from Juiced Bikes to fix my CCX. Haven't verified that it is the correct CCX controller yet. Hope it helps.
 

Attachments

  • new-controller-box.jpg
    new-controller-box.jpg
    3.7 MB · Views: 571
  • new-controller-box-2.jpg
    new-controller-box-2.jpg
    2.9 MB · Views: 581
  • new-controller-cable.jpg
    new-controller-cable.jpg
    2.7 MB · Views: 580
  • new-controller-cable-2.jpg
    new-controller-cable-2.jpg
    2.6 MB · Views: 562
  • new-controller-cable-3.jpg
    new-controller-cable-3.jpg
    2.8 MB · Views: 555
  • new-controller-cable-4.jpg
    new-controller-cable-4.jpg
    2.8 MB · Views: 552
  • new-controller-cable-5.jpg
    new-controller-cable-5.jpg
    2.4 MB · Views: 558
  • new-controller-dim-height.jpg
    new-controller-dim-height.jpg
    3.7 MB · Views: 551
  • new-controller-dim-length.jpg
    new-controller-dim-length.jpg
    3.3 MB · Views: 573
  • new-controller-dim-width.jpg
    new-controller-dim-width.jpg
    4 MB · Views: 561
  • new-controller-number.jpg
    new-controller-number.jpg
    2.5 MB · Views: 553
  • new-controller-specs.jpg
    new-controller-specs.jpg
    3 MB · Views: 556
@Dunbar Here are some photos I took of the controller I received from Juiced Bikes to fix my CCX. Haven't verified that it is the correct CCX controller yet. Hope it helps.

How odd. Yours didn't come with that abominable metal plate tacked on poorly with thermal "tape". Mine fell off during the installation. A Juiced representative here explained that it was an additional heat sink. I thought the whole thing was weird.

I don't believe you can tell if it's the CCS or CCX controller until you install it and try it out. They are the same physical unit just with different firmware in my opinion. Maybe I'm wrong.

Please let us know how the installation goes. Mine took about an hour and was - interesting. Good luck to you on those black rubber strips!
 
@Dunbar Here are some photos I took of the controller I received from Juiced Bikes to fix my CCX. Haven't verified that it is the correct CCX controller yet. Hope it helps.

Thanks, yeah that looks identical to the size of the CCS controller. But I’m just now realizing that there’s no way to measure my CCS controller now that it’s installed. I’m a little confused by the label showing the limit current at 20A. I thought the CCX was supposed to peak at 25A. I guess you can check on the display in R mode and see if it’s giving you ~1250-1300W peak with the battery topped off which would be consistent with 25A (vs 20A in the CCS.)
 
Thanks, yeah that looks identical to the size of the CCS controller. But I’m just now realizing that there’s no way to measure my CCS controller now that it’s installed. I’m a little confused by the label showing the limit current at 20A. I thought the CCX was supposed to peak at 25A. I guess you can check on the display in R mode and see if it’s giving you ~1250-1300W peak with the battery topped off which would be consistent with 25A (vs 20A in the CCS.)

Right, my CCS has a 20W controller.
 
Miles: 185

- 1/10/2019: Filed support ticket for degraded Race Mode as noted in https://electricbikereview.com/foru...offers-less-assistance-than-sport-mode.26498/
- 1/11/2019: Juiced responds and confirms shipping address to send controller.
- 1/15/2019: Juiced sends controller to wrong address.
- 1/26/2019: Picked up the controller. Worked on replacing battery issue in #21.
- 2/3/2019: Installed the controller. Thanks andyraf, SirJohnathan, jom, and others. Tested it and it seems fine...but heavy rain...so didn't go full out in Race Mode.

I took apart the battery enclosure to swap the ECU. The lock nut for the male connector was loose when I pushed the connector from the other side. I tightened that nut and got a few more threads, so I think the connection may be improved now. After sending back the old ECU to Juiced, I think I won't have anymore support tickets open...

Juiced Bikes CrossCurrent X Replacing the Motor ECU Controller

Juiced Bikes CrossCurrent X Rear Tailight Battery Replacement

Juiced Bikes CrossCurrent X Fixing Chainstay Paint
 
I think (hope?) the CCX controller is just a CCS controller with updated firmware. Why? When Juiced sent me a replacement controller, the date code was from way back in early 2018, so my guess was they sent me an old/refurbed CCS controller with new CCX firmware. There was also no heatsink. Seems to work fine though.
 
Hey that's awesome! Thanks for doing that video. I sure wish I had something like that to view before undertaking this project.

I didn't understand why you weren't just using wire cutters on those zip ties and being done with them in about 10 seconds until I saw that you were reusing them! I wouldn't take on this project without a handful of zip ties readily available. Juiced sends you something like 3 or 4 and it's just not enough. I actually zip tied more contact points than originally were used by Juiced and am very happy with how clean the bike looks now.

Made me laugh when you popped on the controller casing and the screws kept falling. That's the stuff that happens to me a thousand times whenever I put something together. You are a very calm and methodical person whereas I usually swear like crazy and step away so that I don't throw the whole bike into the wall!

Interestingly enough I don't believe there was a heat sink on my original controller. The replacement shipped with one. And I installed it on the opposite side that you installed yours. Perhaps it doesn't matter and it just dissipates heat from the whole unit. It's an afterthought for sure and should be attached more securely it if is an important and integral part of the design.

As long as we have this forum and people like you making instructional videos we're going to be able to resolve most problems that crop up. Thank you for taking the time to do this!
 
Last edited:
I had a hell of a time with those headlight connectors too! They should have a special tool for those connectors. My mouth was shooting
"F" bombs trying to disconnect those things. :p
 
As I removed my fenders tonight I took off the rear tail light, took out those batteries and popped in some new fresh AAAs. It's probably just perception but when I saw those batteries with Chinese writing on them it just reminded of the ones that you would get when you buy some cheap $2 toy. They could all be sourced from the same company and it's just a label but I felt better just throwing them out and replacing them.
 
@andyraf Yeah, I agree that the controllers probably just differ in firmware. My production date codes are nearly the same with just the different suffixes of "-001" vs "-134". So it seems I got a battery put together on the same day... :)

@SirJonathan Thanks for the kind words. :D Yeah, I was wondering where the included zip ties you mentioned were! I replaced the tail light batteries but left them on all night... but I still have steady on mode, so those included batteries must have been weak on arrival.

@KLee Those were super hard to pull apart. Funny, how they are easy to put back together though. :D
 
I noticed that the wire gauge from the battery connector to the controller is very thin. I'm surprised that it was not thicker to carry the current load that the battery pack can deliver.
 
Miles: 238

After watching the Park Tool video about Hydraulic Brake Pistons, I went through the cleaning procedure and adjusted the brake pads. It engages much sooner now! Much better! Glad I didn't go too far and push out the pistons and create a mess...

I wanted to try using the Relive.cc app after I saw the Area Code Range Test video on the Juiced Bikes channel. Gave it a shot with a quick test ride. Enjoy!


Thanks for the info on the relive app, thats pretty impressive, I will have to play with that.

I lived in the bay area (San Mateo, Palo Alto & mountain view) from 1988 to 1998. I did do montebello-stevens creek loop ALOT on my MTBs. Some of the stream crossings would be a nightmare on an eBike.
 
Last edited:
Brian,

I have the following suggestions, to make the battery connection more reliable. Knowing that the connection is intermittent is telling us that the mechanical engagement of the connectors is marginal. In your video you show the lower pin is a little shorter; the same in my bike:

1. First, keep the bike. All bikes have some problem, and this is a minor one you can solve until a more permanent solution is found.
2. Remove the battery.
3. Remove the frame lock assembly by removing the first allen screw shown in your pic "male-connector.jpg"; then remove the philips screw that barely can be seen in the same pic, on the upper left, and detach the piece of plastic used only for cosmetic purpose. Under it, remove the second allen screw.
4. Remove the plastic piece that holds the male connector and the lock mechanism. Detach the cable assembly from the controller, detaching the yellow connector.
5. Remove the 2-pin black connector by unscrewing the silver large nut. You will notice two o-rings: one smaller in the front -on the side of the silver nut- and one larger in the back side.
6. Remove the larger o-ring that is installed between the connector and the plastic piece. This step will move the connector farther out of the plastic piece so that the pins will insert a little better in the battery connector. In my bike this made the difference between an intermittent connection and a solid connection. Keep in place the smaller o-ring on the front of the connector.
7. Assembly following the reverse order. Tighten the connector with the silver nut being careful to lock it in the right position: there is a tab on the back side that controls the exact rotational position. Reconnect the yellow connector. Be careful not to pinch the wires when you re-assemble. Be very careful when installing the two allen screws because they are engaging in threaded holes in the aluminum frame. Don't over-tighten or you may damage the threads.
8. Once the battery is re-attached, properly locked in place, power on the bike. Using your right hand tap the battery on the right to see if power is preserved. This is a test that my bike did not pass before I removed the o-ring, and it passed OK after the o-ring was removed. Same test you did in your video. After removing the o-ring, I did about 150 miles, some of them on moderately rough dirt road, without any more power glitches.
9. Use one or two straps as tightly as you can. Re-tighten from time to time. I ordered from Amazon (24 x 2 Inch Cinch Straps - 5 pack, Secure Cable Ties.)
10. Using the bike in wet conditions require that the battery be protected. This is not a well designed assembly.

Removing the o-ring could possibly make the entry of water a possibility, but in reality the whole battery needs to be protected as you did with some plastic wrap if exposed to rain, so the role of the o-ring is not that relevant.

It is important not to use the bike if you have power glitches, because with the large currents the degradation of the copper sleeves in the battery female connector happens very quickly.
Hope this helps.


RE: #10, is this really true? And is this an issue specific to Juiced? I want to ride all seasons in Seattle, and this gives me serious pause.
 
Hi @Captain Walnut,

I like your username! :D

There have been some posts of CCX problems after rain, but I am not sure it is specifically due to the battery design:

https://electricbikereview.com/forums/threads/error-30-after-ride-in-the-rain.25809/
https://electricbikereview.com/forums/threads/on-going-error-30-on-ccs.26942/

Juiced has a support article about this topic. I would say don't ride in heavy drenching rain?

https://support.juicedbikes.com/hc/en-us/articles/360010950271-Can-the-battery-be-used-in-the-rain-

My thoughts not speaking for @jom:

1. I would protect any e-bike's battery connection regardless of maker from the rain.

2. Battery moves on some CCX bikes causing power to go on and off. Therefore, the battery can move. If it moves, then it seems water could get into that gap.

3. Battery assembly is plastic which will change shape over time due to sun exposure, and the lock ring nut will get loose with prolonged vibration. As the plastic contorts and the ring nut gets loose, the battery will eventually move eventually leading to potential rain to slip in.

4. Battery is mounted sideways, so I think rain has better chance of getting in the side. I would guess this is a potential issue for almost all e-bikes except for ones with batteries sitting on the rear rack that could be totally covered and not at some angle where rain could get in due to gravity?

5. Reention makes the battery assembly. Any bike that uses this assembly has chance of problems.

6. I put Saran Wrap as a preventative measure and use the velcro straps to keep the wrap in place (and doubly stop battery movement).

In short, I think you can workaround this rain issue... :cool:
 
Back