Bafang G062-1000W VESC (controller) Retrofit

Region
USA
Alrighty, here we go again. More and more of my parts are showing up so I keep shifting gears a bit.
Eventually I will get the Stock Bafang Control Working with the Eggrider. I planned to use this VESC in the end so rather than wasting more time on the stock controller that I only want working for testing I am moving on to this. Don't worry I will finish the other thread.

Ok so VESC is a type of BLDC Controller that has OPEN SOURCE software meaning we can tune program modify each and every last function that the circuit is capable of.
With this power comes risk, remember that, this VESC can put out enough power to fry your motor in seconds and probably could fry your battery too if you don't have a BMS in your battery.
Most importantly start out with low AMP settings and everything at low power. Test it, monitor the motor temp the Vesc temp and the battery temp. As long as nothing is getting too hot increase the power a little at a time until things start to get hot. Don't let it overheat though. I wouldn't go over 100c to 120c. Once you find that power level where things are getting hotter than you want, back it off maybe 10%. Call that your max safe power. Everyone has a different setup so this will be different for everyone. So Just don't copy someone Elses settings. Things like the size and length of the phase wires changes things.

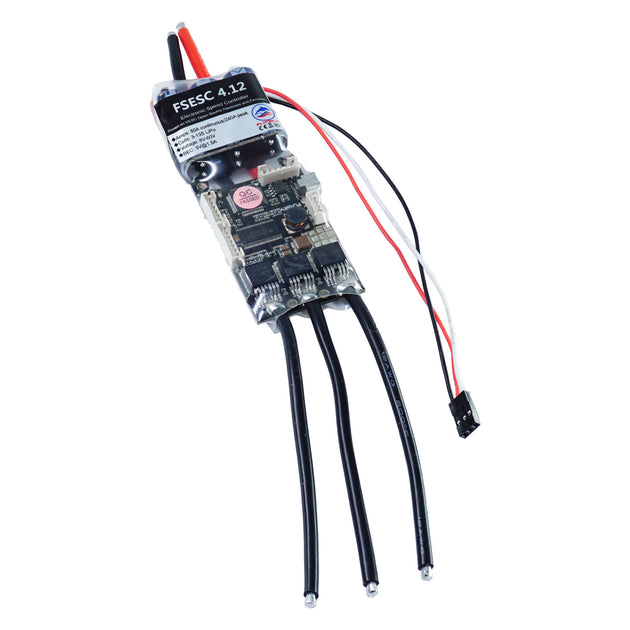
This is the VESC I bought.
https://tronicsystems.com/products/tronic-250r-bare-board-no-enclosure

VESC-Tronix-250R.png


The cable headers are 2mm JST Connectors.
So it's easy to make the wiring harness. I plan to take any 1T4 EB Bus Cable and put the JST Connectors on the end that connects to the motor.
Just have to cut the end off and attach the JST Connectors.

For a Display I am pretty sure the EggRider will work. There are settings for VESC Protocol in the EggRider.
But really you don't have to have a display with this if you don't need one.
The Board is Bluetooth so it connects to a app and shows more data than I have seen on any other display.


Check it out.

Screenshot_20240530-070606.jpg


Screenshot_20240530-070634.jpg


Mann I am excited !!
It's gonna take a little bit to get it all going but I can't wait.
YeeeeeeHawwwww

LINKS !!

VESC WEBSITE

VESC CALCULATORS

VESC DOCS

VESC Hardware
 
Last edited:
It's time to get started.
The VESC is looking really good. It is super high quality. You can tell it is built to put out some power.

For now I have a test bench set up to get everything hooked up and tested. I have to make the heatsink for the Tronix 250R but anyway my rear rack holding my battery broke and I need to make a strong rack so I plan to make the Rack the Heatsink for the Tronix 250R and to hold my battery. I can make a nice clean setup this way.

Here's some pics of The Tronix 250R VESC.
20240531_094433.jpg

20240531_094701.jpg
20240531_094807.jpg


Mofsets
20240531_132557[1].jpg


Test Setup

20240531_131535.jpg


The fist step in the process for me is to pin out the 1T4 Cable. That way I have a cable to hook up the Brakes, the Throttle, and the Eggrider if I can get it to work.
This is the cable I have.

It did not fit the Stock Bafang Controller for the G062. It lists compatible with bafang. The 8 pin connector is much smaller than the 8 pin connector on the Bafang Controller. The right style almost but the wrong size. I never did find the right cable. Everything is for the mid-drives. I cut off the end that goes to the controller so now I can put on the 2.0 MM JST Connectors for the Tronix 250R. Even at that rate I am still at a loss Because the brake Line Hi-Go connectors on the 1T4 cable are Male Pins and of course the Hi-Go connectors on the Brake levers I bought are Male Also. But the 1T4 has the right display connector so at least that is good. It isn't pinned out right. It dont match the Bafang BSSHD Pinout. So that's part of the reason why I got to pin out the cable.

By pin out I mean connect the colored wire to one side of multimeter, Connect other side of multimeter to hi-go connector Individual Pin. Write down what color goes to what connector and to what pin in that connector.

I am going to steal the L1019 Cable from the stock Bafang Controller and use that as well to hook up the Tronix 250R to the Motor. It will have to be pinned out as well.
So i suppose when i'm done doing this I will post the pinout diagrams in case anyone out there needs the info.
 
This is really cool. I remember reading a thread that argued why VESC isn’t good for an ebike application. I think I read this about a year ago so I don’t remember the exact argument. It’s probably what you already know. VESC are build for high discharge rate. I was looking at a VESC as well, for its form factor and feature set, but for my commuter ebike, it’s too expensive and too high current output. I just can’t justify the expense. I’m excited to see what your project looks like in the end. Good luck on your project, it’s forming very nicely.
 
The high power top top quality VESC like the Tronix 250 R cats me $250.

If you don't want that much power there are lower power VESC that are much cheaper.


The second thing is just because some vesc can push tremendous power doesn't mean you should, or that you have to use it all.

That's the beauty of the VESC Software. You can set the power level anywhere you want within the limits of the VESC you buy.

The software is open source so there isn't a single thing you can't program. Even if it hasn't been invented yet you could invent it.

I think the benefits are the following.
Totally universal no matter what motor or bike you have.
The VESC works with any BLDC.

It is fully programmable.
Compatible with UART, CAN, and analog inputs. Meaning compatible with any kind of throttle, brake levers ect.

They use the VESC on skateboards so I don't think there too much for a Ebike.

They even run electric cars off of these.

I'm going to try to research any downsides

Glad your enjoying the project.
That's why I share.
It takes extra time to document all my test.
So I'm happy to hear it is not a waste
 
Ok It has been a fun day so far.
I went on a scavenging hunt this morning. I needed a heatsink to put the Tronix 250R on before I could test it. Not only that but I needed the screws and the little white insulators for the mosfets. To mount them. You also need Thermal Paste like for CPU. You put it between the mosfet and the heatsink to get good heat transfer. I already spent enough money this week so it was time to round up the rest from junk and leftover project stuff. Now I got a huge mess but I have a Treasure Trove of stuff to work with. FREE !!!

Including a electric skateboard that my daughter rode once and it died. It would never charge. So I took it apart, it was almost put in the trash by my wife but I kept it. I knew id use it for something. From trash to treasure. It's absolutely perfect to set up the Tronix and do some testing without RISKING my $500 Bafang G062 Hub Motor. This way I can get a feel for the software and play with anything and only risk trashing something that was already headed for the bin.

Upon my diagnosis I can determine that the controller board of the skateboard has a short in the charging circuit. I pulled the battery out and plug it into the charger without being attached to the board and it charges fine. So that's totally awesome. I got a free 18650-7S2P 4AH Battery. With a matching charger. And the charging port is attached directly to the battery. So I didn't have to modify anything. And it even has a XT-60 cable on it. Wow I got lucky. So the pack is 25.2V Nominal. The Tronix VESC is 24 - 100V. So I can run this with the Tronix. And using the included battery. Plus the skateboard itself makes for a good base to mount everything.

Win Win Win.

I found a good heatsink and even a fan to go with it. There is also a thin insulator that goes between the mosfet and the heatsink. I stole those out of a old computer power supply. Plus thats where I got the other insulators for the screws and the screws. I had thermal paste also in my box of electronic surplus. I also found my Infared Thermometer.
Out of the power supply came a few different Thermistors also. Plus I have one from a previous project. So i have a couple ways to measure temps.

Then I found a old motor controller and a shunt and a wattmeter. So Ill be using those too. The shunt and wattmeter. The old controller probably has other parts too I can use. So Im gonna go put this all together. I'll be back with a update later. Heres some pics.

20240601_112353.jpg
20240601_101623.jpg
20240601_085349.jpg
20240601_114235.jpg


YeeeeeeeHaaaaawwwwwwWWW
 
All in all I am very happy with todays results.
I have a pretty solid build now. It turned out great. And it didn't cost me a dime. other than The Tronix 250R VESC. Hell I even got fancy Lights. Anyway I need a break for a bit. Just got to make some connections now and she will be ready to run.

Heres the Rig.

20240601_162742.jpg
20240601_162750.jpg

20240601_162758.jpg

20240601_162807.jpg
20240601_162957.jpg


Yeeeeeee!!!!! HHHHAAAAAAAAWWWWWWW
 
Ok quick update and I will be back when I have time to post all my data.

The Tronix 250R is up and running both the skateboard and the Bafang Hub Motor.
I had to use my 48V battery because that 29V I got out of the skateboard is shot. It will charge up and reads good voltage but as soon as you put a load on it it's over.

So Both motors are detected automatically and run ok on the bench.
The EggRider is connected and yes it is compatible. It is working without errors.
There are some settings that the EggRider can control on the VESC.

The wiring is actually really simple. You only need 5 wires to the Hall Sensor Board and the 3 Phase wires to the motor.
The throttle is 3 wires and easy to connect.
The eggrider is 5 wires that are easy to connect.
It is super nice having documentation telling you where to connect stuff.

I have to work on the PAS.
The Pas sensor will have to be added as a Second Throttle. Then the PAS sensor will have to be configured to output to the motor the amount of power you want based on your pedaling speed. As pedal speed increases the voltage of the PAS increases just like the thumb throttle works.
I may end up not using the PAS because I need a throttle input for Regen Braking.

I am going to actually make a Brake Lever that has a switch in it to control the level of Braking. I do have the option to run a digital throttle rather than analog and then I can use the other analog inputs for regen and pas. I haven't decided yet. I am thinking about getting a E-Skate Remote (Digital Throttle) and pulling all the guts out of it. Then I can machine a handlebar mounted Thumb Throttle or Wheel Throttle and put all the guts inside. Then I would have both Throttle and Regen on one Device.

So there is lots of excitement to come.
Right now I am somewhat at a standstill until a machine opens up. I need to make a strong enough rear rack to hold my battery. It will also double as the VESC heatsink. I need the heatsink before I can mount it to the bike. Just have to find time to design program and machine it.

Other than that I am putting together the necessary calculations to determine the values needed for configuring the VESC.
I will post how to make all the calculations and where to input the data into VESC.

You defiantly don't want to miss this.
 
Last edited:
I am going to actually make a Brake Lever that has a switch in it to control the level of Braking.

I have a question about that.
My old DD e-bike has brake switches that activate regeneration,..

IMG_20220831_155517.jpg
IMG_20220923_190448.jpg


My brake switches are just on and off and not progressive.

Are you installing brake levers with a Hall sensor like a throttle?
 
Last edited:
,.. The wiring is actually really simple. You only need 5 wires to the Hall Sensor Board and the 3 Phase wires to the motor.

I notice that you don't need the white speed sensor wire.

Does that mean that the EggRider or VESC calculates speed based on Hall sensor data ?
 
What i plan to do is use a hall sensor and magnet out of a throttle. Put them inside a little case so that the brake cable attaches to it and activates the sensor. This way when you pull on the brake lever it reacts like a throttle. A large spring can be attached inside to create resistance to make the brake lever less touchy and more natural.

This also will allow the use of the front brake switch. It can be programmed so that if the front brake is pressed it engages full regen braking on emergency stopping situations.

I need regen to do most of my braking. I plan to remove the disk mount from the bafang hub motor to make room for a larger bearing on that side. This way I can make room to get 8 gage phase leads and water cooling lines inside the motor.

The front disk has most of the stopping power anyway.

My second thought is to take a flipsky remote that has both fwd and reverse for the throttle. Wire forward motion for regen and reverse for drive. The other good thing is that it has a built in display that reads out all the VESC data. So it's a throttle / display in 1.

To get it on the handelbars I plan to machine a mount for the remote. If I don't like how that works out I'll take the guts out and machine a new shell to put things where I want the.
 
Just make sure if you use the VESC that you use the 3.3V line for the switches and throttle. Not 5v. 5v will damage the pull down resistors on the board.

The white wire currently is used as speed sensor for bafang control. I'm going to use it to install a temp sensor in the motor.

The VESC reads the hall sensor pulses to output speed and rpm. It's ok on Direct Drives but on a clutched geared motor when you let off the throttle the speed n rpm go to zero. The motor isn't turning. In this case u use GPS for speed or retrofit a system.

If you wanted you could use the current motor speed sensor. It's just a hall system. So if you wired it to ADC you could read it and program it to display the speed.

I'm replacing the nylon gears and making a 1 piece clutch so I have regen. Due to that my speed will display properly.

The Eggrider simply reads out the data from the VESC. The VESC calculates everything and outputs the data to it.

The disadvantage of the eggrider is it only has a few settings out of the hundreds available. But I'm sure the code can be modified to add whatever we want.

The Eggrider is simply an Audrino board. So yea its open source too. My guess is eggrider may have the code locked so that it's difficult for someone else to modify. But then again they might not. They might think no ebiker would try to re write the code.

Then I came along. Lol.
At any rate I gotta do some research on that one. It depends on what type of code it takes.

From my past experience it could be simple Lunux shell script. If it is it would be very easy for me to write custom firmware.

I'm a shell script master. Looking real quick it is programmable with script but most likely there using Python.

I believe python is compiled so we would need their source code to make changes.

Or the code needs written from scratch. But we could do that. All and all we don't need to with VESC. Just use the VESC app for a display.

Unless your like me and you love burning money you don't have. I pre-ordered a Microsoft surface pro with AI to use as a Display on my bike.


It comes on the 18th. Microsoft claims it's the fastest most powerful supercomputer they ever built.

So that will interface with my Tronix 250R and my BMS and any other hardware I add to the system. Everything is open source. Even the AI chip. So I will have the ability to 100 percent control every component at any time even with voice control.

Right now including the computer I've got several grand into this bike. Still have a few more things to buy. So this is certainly an expensive build.

It is not necessary to go to these extremes. To do the testing I want to do, and have control of the system right down to the code yea you gotta go this far.

Some more cables and stuff came yesterday. I'm getting ready to get it together but currently I'm designing the parts that I have to machine.

Once I have everything I need I'll get it on the bike. The computer don't come till the 18th so I figure I got till then to design and machine the parts I need.
 
Ok I've been thinking about good ways to leverage the VESC control system. I got a great Idea. They make gyroscopes that hook to the VESC for controlling the One Wheel operation. It measures movement in every direction. If I attach one I can program it to be a bike alarm. If the bike gets moved it sends signal to the VESC which then Turns on the most obnoxious alarm I can find. Not only that but the vesc being coupled to a computer can trigger the computer to fire off a text to my phone. Or email. or both.

Going even further the sensor can be used to determine inclines and declines and then set motor output based on that data to adjust climbing speed / efficiency, and even automatically engage regen to a set value on downhill cruises. It will automatically adjust power output based on riding conditions.

And I'm sure there's a ton more I haven't thought of yet.
 
And were back.
I'm just thinking about all of the Bafang RM G062.1000.D 6T (H550) motor specifications and getting ready to do the calculations for some of the Tronix 250R VESC settings. I suppose it wouldn't hurt to put the information here, so we will. I should be hooking it up soon, just need a chance to make the heatsink / rear rack.

Some basic data.

Rated voltage (DCV) 48
No-load speed (Rpm) 400
Rated power (W) 750 /1000
Load speed (Rpm) 350
Maximum torque 85 N.m
Efficiency (%) ≥ 80
6T winding

RPM Speed Voltage Current Torque Turns Power:
• Motors are specified as having a number of turns T in their windings.
An 8T motor has a higher speed than a 12T motor at the same voltage.
A 12T motor has a higher torque than an 8T motor at the same current.
RPM/V and Nm/A are quoted with no load on the motor and the loaded values will be about 20% less due to efficiency losses.

• Motor speed & torque vs voltage & current:
Motor torque = Kt × Current through motor
Motor speed = Kv × Voltage across the motor
Kt × Kv = 60 ÷ 2 ÷ π = 9.55
∴ 8rpm/V = 1.2Nm/A


• Calculations if you know actual number of turns:
Turns × Kv = Constant
Turns ÷ Kt = Constant
Kv(new) = Kv(old) × Turns(old) ÷ Turns(new)
Kt(new) = Kt(old) × Turns(new) ÷ Turns(old)
Rdc(new) = Rdc(old) × Turns²(new) ÷ Turns²(old)
The above direct current resistance calculation assumes a constant coil cross-section.


• Power vs torque and speed:
KW = Nm × RPM ÷ (60 ÷ 2 ÷ π) = Nm × RPM ÷ 9.55
• Tire speed vs motor RPM:
KPH = RPM × (D" × 25.4 × π × 60 ÷ 10⁶)
RPM = KPH ÷ (D" × 25.4 × π × 60 ÷ 10⁶)
KPH = RPM × 0.1245 for 26"
RPM = KPH ÷ 0.1245 for 26"
 
Yea I need to run through all this so we can figure out what we got going and what the VESC Settings need to be.
I've been super busy the past few days so i haven't had the time to finish this up. We will though.

I have my Surface Pro 11 now. So i need to make the mount for that. And most importantly I need to make the rear rack / heatsink for the VESC.
I haven't been able to get any machine time so its holding me up. But I should be able to get things done next week some time I hope.
 
Back