[#4] bottom bracket/fenders/thumb throttle/rear hitch carrier stuff..
It seems that my previous threads are getting some decent views, so I may as well keep on keeping on. Plus, my 4th floor condo's elevator is OTS for awhile, so I am basically being held hostage.. Or not.. As always, it will be to your advantage to first scroll down to the photos at the end of this thread. That way my info will make more sense from the get-go.
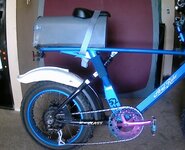
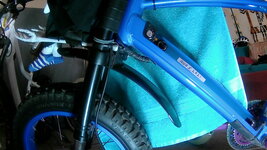
Bottom Bracket: If you can get a glimpse at the numerous cables passing under the bottom bracket area of your ebike (any ebike), you'll see just how exposed/vulnerable they are. And lets face it, dealing with broken/sliced/frayed electrical wires is not going to be a fun time. Therefore, I have come up with the following item to protect that area:
https://www.amazon.com/Bicycle-Adju...r/dp/B08FJ7466D/ref=rvi_4/130-4243677-8292514?
Either of these curved fenders, cut to length, work like as charm.
Plus, the guard is only being held in place by this: https://www.amazon.com/Durable-Adjustable-Tensile-Strength-Resistant/dp/B083M871FQ/ref=sr_1_7_sspa? Make sure that, prior to locking in the zip tie, that no cables are being grabbed/tightened, too. Case-in-point; on the left side of the bottom bracket is the cable running from the cadence sensor unit. Finally, should you ever need to remove the zip tie, it is a simple matter of doing a quick “snip”.
Thumb throttle options: [Update on Jan 7th] I am including this thread because it has pertinent info: https://electricbikereview.com/forums/threads/thumb-throttle-attachment.8952/#post-69837
Since I'm on the large zip tie subject, here are a few modifications that an ebiker using the grip-twist throttle option might be interested in. The first one: https://1859-northwest.myshopify.com/products/e-bike-thumb-throttle-attachment . To me, this item is overpriced by about $13.00.
However, you can also check out the second option: Those large zip tie bands use a decent sized “ locker” device. It can serve as the “thumb nub” for your twister grip. Overall, only about 6” of tie is actually needed. Prior to installing the zip tie, you should probably do 2 things: 1). get some dual sticky sided foam tape and cut it to the width of that zip tie. Figure out where you want the zip tie to be on the twisty grip. 2). Get a small nail and lock it into some vise grips (or, just use a power drill.). Find a couple of locations to “drill” holes along the zip tie. Heat up the nail and press it thru the zip tie. Discard the nail, etc. Find a couple small wood/metal screws (I get them from all the electronic crappy doodle parts/items that I have laying around). Go ahead and securely attach/install the zip tie around the grip/foam tape. Now screw in those two little screws just far enough to grab on to the grip. Those 2 screws, plus the sticky tape, will keep the zip tie from “walking” along the twist grip.
In regards to the above-items, when I ordered my X52 beast in May 2021, there were internet forum/YouTube reports of thumb throttles or twist grip throttles being installed on new shipments. Since a 50-mile daily ride is my “normal”, and since I am 70 years old, and since all of my other ebikes were thumb throttle equipped, I had to have a Plan B for just in case twisty grips were installed. Keeping my wrists jammed in a particular bent position for 4+ hours of riding on a daily basis was totally unacceptable. That is also the reason each of my bikes (e and otherwise) are equipped with bar ends-- a multitude of hand positions are available.. Therefore, I came up with the 2 aforementioned options.
Fender options: As for fenders on your X52 lil' beastie, how about a set of these puppies to really personalize said ride: https://www.ebay.co.uk/itm/133867671389?hash=item1f2b228f5d:g:h9AAAOSwlxpgZCc- That's right, your own mini-Harley Bobber. And, since they are so inexpensive, ya may as well order 2. In my photo, the item is painted white (I figured that it would photograph better). And the best thing is that the original rear fender does not even need to be removed. A couple of carefully centered holes (again, a heated nail and some vise grips) along the top spline of that stock X52 unit will allow you to just mount this Harley fender right on top of the original fender. I just have it resting there for the photo. The photo will also give you an idea of how far rearward the new fender will extend.
Another option would be to also use the Harley Bobber fender on the front wheel. The mounting “L” brackets, etc, which came stock with the aforementioned sacrificial bottom bracket guard (fender set), will work like a charm to securely install it.
I have also enclosed a photo(actually 2) of my front fender options. I wasn't impressed by the X52 original unit, so I never installed it. I even saw that some YouTubers were mounting it backward: not an improvement in my humble opinion. So, when I was hunting down my Harley Bobber fenders, I stumbled across this black fender item. It came stock on my 2019 M2S (brand) R750(model) 26”x4” tire fat tire ebike. So, it may behoove you to think outside the box when considering alternatives.
Since I have already mentioned electrical cables, you might want to inspect the power cable running from the left side of the rear wheel. That thick cable actually contains 9 separate wires; 3 large easy to see, and 6 very small (and delicate) perimeter wires. So, how close is it to the disc brake plate?? That plate is very sharp and it gets very hot during use. If the power cable were to come in contact, you would be in for a very prolonged and unhappy non-riding experience.
I just secured a few nylon zip ties tightly enough around the cable to insure that contact would not occur. Just remember that, whenever you need to remove the rear wheel unit, you 1st need to cut those zip ties.
As far as cutting/adapting cables, etc are concerned, I stumbled across this “soldering” device:
https://www.amazon.com/Paddsun-Second-Plastic-Welding-Compound/dp/B078V45GYY/ref=sr_1_25? I have used this stuff on numerous electrical ebike “adventures” and it sure works great. Its really a nice item to have around. Unlike old-school soldering, which requires a hot gun,solder, flux, etc. this clear goo stuff can be adjusted/manipulated to your hearts content. Nothing bonds until you put the light beam to it. Easy Breezy. As an additional safeguard, I also use “shrink wrap” tubing, when/if practical, to the connection.
Motorcycle rear hitch rack info: There is much ado in ebike world in regards to how best to transport these heavy beasts from place to place. Ebikes such as the X52 are very heavy, even when compared to either of my 26”x4” fat tire M2S(brand) ebikes. Though I do not use any sort of transportation vehicle to haul my many toys, I recently stumbled across this awesome rear hitch motorcycle rack: https://www.amazon.com/ECOTRIC-Motorcycle-Carrier-Loading-Superior/dp/B07NP82M1T/ref=sr_1_5?
You can see (website photo's) how this carrier handles 500 pound motorcycles. That being the case, a sub-100 pound ebike, like the X52, will be a piece of cake. I know that it is kind of expensive, but “the prove is in the puddin' (so to speak)” . Plus, if you have multiple ebikes to haul, it shouldn't be much of a hassle to modify this carrier to hold 2 ebikes. What really caught my attention was a). The 6' long loading ramp (shallower angle when compared to a 4' long ramp). b). The solid floor. You might want to install some rubber flooring to negate tire slippage. I'd even suggest the bathtub anti-slip mats (cut to size) that I mentioned in my [#1] thread. They are very inexpensive and also easy to mount/remove (suction cups).
And then, there is a dual motorcycle rear rack option https://www.discountramps.com/double-motorcycle-carrier/p/AMC-600-2/
Finally, so that your carrier rack is not left dangling “down and out” when not in use: https://www.amazon.com/Black-Widow-HC-FA-Folding-Adapter/dp/B00RCJ0F7A/ref=sr_1_23?
I know it is kind of an expensive item, but these stand- alone “foldable” hitches are hard to find on da web.
I know the following is redundant but, what the hey, more info: It is copy/paste from my thread over on the M2S forum..
The 70+ pound fat tire ebike, is best used in conjunction with a rear hitch rack intended for a motorcycle: https://www.discountramps.com/foldi...6cn8UVoFaBzHALPo8NlVHHuejG_MwE-waAiLYEALw_wcB
Or, maybe this one https://www.discountramps.com/motor...K-Qk3JX7T4W1lXgVofaLygOZRqiVuxSAaAmM9EALw_wcB .
All motorcycle racks also include a loading ramp so you can roll your beast onto/off of the rack. Remember: the longer the loading ramp, (say, 6') the shallower the angle (a good thing).. In addition, most ebikes have a "walk" mode that will greatly ease the pushing factor. Just remember to really stay focused on the task at hand or you might roll the ebike off the side of the ramp/rack. Bummer deal, fer sure.
You will also want to consider buying this item so that you can have "fold up" capability for the rack : https://www.discountramps.com/hitch..._o8heHbzke61obrfJre8pb_4xoVATQgIaAmtpEALw_wcB .. If you're really feeling adventurous, consider mating one (or more) of these to the motorcycle rack for added stability/piece of mind (also google "motorcycle wheel chock" ): https://www.bing.com/shop?q=motorcycle+wheel+chock&FORM=SHOPTB
Sometimes ya just gotta think outside the box.
And if you need to haul 2 ebikes, mating two of this carrier should be an easy enough project-- after all, one rack is rated for 400 pounds-- that equals 5+ fat tire ebikes. Ya just have to “think outside the box” a little to make it/them work. Also, if your ebikes front fork has lockout capability (full rigid), use it because compressing the forks during transport is extra hard on the internal hydraulics.
And Finally, here are some cool tire options for your Lil beastie:
https://classic-cycle.com/wheel-and-tire/tires-tubes-parts/tires/20-inch-tire/
All in all, too dang much fun.. Happy Holidays.
It seems that my previous threads are getting some decent views, so I may as well keep on keeping on. Plus, my 4th floor condo's elevator is OTS for awhile, so I am basically being held hostage.. Or not.. As always, it will be to your advantage to first scroll down to the photos at the end of this thread. That way my info will make more sense from the get-go.
Bottom Bracket: If you can get a glimpse at the numerous cables passing under the bottom bracket area of your ebike (any ebike), you'll see just how exposed/vulnerable they are. And lets face it, dealing with broken/sliced/frayed electrical wires is not going to be a fun time. Therefore, I have come up with the following item to protect that area:
https://www.amazon.com/Bicycle-Adju...r/dp/B08FJ7466D/ref=rvi_4/130-4243677-8292514?
Either of these curved fenders, cut to length, work like as charm.
Plus, the guard is only being held in place by this: https://www.amazon.com/Durable-Adjustable-Tensile-Strength-Resistant/dp/B083M871FQ/ref=sr_1_7_sspa? Make sure that, prior to locking in the zip tie, that no cables are being grabbed/tightened, too. Case-in-point; on the left side of the bottom bracket is the cable running from the cadence sensor unit. Finally, should you ever need to remove the zip tie, it is a simple matter of doing a quick “snip”.
Thumb throttle options: [Update on Jan 7th] I am including this thread because it has pertinent info: https://electricbikereview.com/forums/threads/thumb-throttle-attachment.8952/#post-69837
Since I'm on the large zip tie subject, here are a few modifications that an ebiker using the grip-twist throttle option might be interested in. The first one: https://1859-northwest.myshopify.com/products/e-bike-thumb-throttle-attachment . To me, this item is overpriced by about $13.00.
However, you can also check out the second option: Those large zip tie bands use a decent sized “ locker” device. It can serve as the “thumb nub” for your twister grip. Overall, only about 6” of tie is actually needed. Prior to installing the zip tie, you should probably do 2 things: 1). get some dual sticky sided foam tape and cut it to the width of that zip tie. Figure out where you want the zip tie to be on the twisty grip. 2). Get a small nail and lock it into some vise grips (or, just use a power drill.). Find a couple of locations to “drill” holes along the zip tie. Heat up the nail and press it thru the zip tie. Discard the nail, etc. Find a couple small wood/metal screws (I get them from all the electronic crappy doodle parts/items that I have laying around). Go ahead and securely attach/install the zip tie around the grip/foam tape. Now screw in those two little screws just far enough to grab on to the grip. Those 2 screws, plus the sticky tape, will keep the zip tie from “walking” along the twist grip.
In regards to the above-items, when I ordered my X52 beast in May 2021, there were internet forum/YouTube reports of thumb throttles or twist grip throttles being installed on new shipments. Since a 50-mile daily ride is my “normal”, and since I am 70 years old, and since all of my other ebikes were thumb throttle equipped, I had to have a Plan B for just in case twisty grips were installed. Keeping my wrists jammed in a particular bent position for 4+ hours of riding on a daily basis was totally unacceptable. That is also the reason each of my bikes (e and otherwise) are equipped with bar ends-- a multitude of hand positions are available.. Therefore, I came up with the 2 aforementioned options.
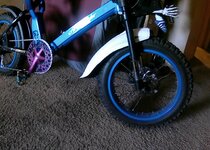
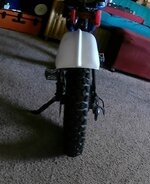
Fender options: As for fenders on your X52 lil' beastie, how about a set of these puppies to really personalize said ride: https://www.ebay.co.uk/itm/133867671389?hash=item1f2b228f5d:g:h9AAAOSwlxpgZCc- That's right, your own mini-Harley Bobber. And, since they are so inexpensive, ya may as well order 2. In my photo, the item is painted white (I figured that it would photograph better). And the best thing is that the original rear fender does not even need to be removed. A couple of carefully centered holes (again, a heated nail and some vise grips) along the top spline of that stock X52 unit will allow you to just mount this Harley fender right on top of the original fender. I just have it resting there for the photo. The photo will also give you an idea of how far rearward the new fender will extend.
Another option would be to also use the Harley Bobber fender on the front wheel. The mounting “L” brackets, etc, which came stock with the aforementioned sacrificial bottom bracket guard (fender set), will work like a charm to securely install it.
I have also enclosed a photo(actually 2) of my front fender options. I wasn't impressed by the X52 original unit, so I never installed it. I even saw that some YouTubers were mounting it backward: not an improvement in my humble opinion. So, when I was hunting down my Harley Bobber fenders, I stumbled across this black fender item. It came stock on my 2019 M2S (brand) R750(model) 26”x4” tire fat tire ebike. So, it may behoove you to think outside the box when considering alternatives.
Since I have already mentioned electrical cables, you might want to inspect the power cable running from the left side of the rear wheel. That thick cable actually contains 9 separate wires; 3 large easy to see, and 6 very small (and delicate) perimeter wires. So, how close is it to the disc brake plate?? That plate is very sharp and it gets very hot during use. If the power cable were to come in contact, you would be in for a very prolonged and unhappy non-riding experience.
I just secured a few nylon zip ties tightly enough around the cable to insure that contact would not occur. Just remember that, whenever you need to remove the rear wheel unit, you 1st need to cut those zip ties.
As far as cutting/adapting cables, etc are concerned, I stumbled across this “soldering” device:
https://www.amazon.com/Paddsun-Second-Plastic-Welding-Compound/dp/B078V45GYY/ref=sr_1_25? I have used this stuff on numerous electrical ebike “adventures” and it sure works great. Its really a nice item to have around. Unlike old-school soldering, which requires a hot gun,solder, flux, etc. this clear goo stuff can be adjusted/manipulated to your hearts content. Nothing bonds until you put the light beam to it. Easy Breezy. As an additional safeguard, I also use “shrink wrap” tubing, when/if practical, to the connection.
Motorcycle rear hitch rack info: There is much ado in ebike world in regards to how best to transport these heavy beasts from place to place. Ebikes such as the X52 are very heavy, even when compared to either of my 26”x4” fat tire M2S(brand) ebikes. Though I do not use any sort of transportation vehicle to haul my many toys, I recently stumbled across this awesome rear hitch motorcycle rack: https://www.amazon.com/ECOTRIC-Motorcycle-Carrier-Loading-Superior/dp/B07NP82M1T/ref=sr_1_5?
You can see (website photo's) how this carrier handles 500 pound motorcycles. That being the case, a sub-100 pound ebike, like the X52, will be a piece of cake. I know that it is kind of expensive, but “the prove is in the puddin' (so to speak)” . Plus, if you have multiple ebikes to haul, it shouldn't be much of a hassle to modify this carrier to hold 2 ebikes. What really caught my attention was a). The 6' long loading ramp (shallower angle when compared to a 4' long ramp). b). The solid floor. You might want to install some rubber flooring to negate tire slippage. I'd even suggest the bathtub anti-slip mats (cut to size) that I mentioned in my [#1] thread. They are very inexpensive and also easy to mount/remove (suction cups).
And then, there is a dual motorcycle rear rack option https://www.discountramps.com/double-motorcycle-carrier/p/AMC-600-2/
Finally, so that your carrier rack is not left dangling “down and out” when not in use: https://www.amazon.com/Black-Widow-HC-FA-Folding-Adapter/dp/B00RCJ0F7A/ref=sr_1_23?
I know it is kind of an expensive item, but these stand- alone “foldable” hitches are hard to find on da web.
I know the following is redundant but, what the hey, more info: It is copy/paste from my thread over on the M2S forum..
The 70+ pound fat tire ebike, is best used in conjunction with a rear hitch rack intended for a motorcycle: https://www.discountramps.com/foldi...6cn8UVoFaBzHALPo8NlVHHuejG_MwE-waAiLYEALw_wcB
Or, maybe this one https://www.discountramps.com/motor...K-Qk3JX7T4W1lXgVofaLygOZRqiVuxSAaAmM9EALw_wcB .
All motorcycle racks also include a loading ramp so you can roll your beast onto/off of the rack. Remember: the longer the loading ramp, (say, 6') the shallower the angle (a good thing).. In addition, most ebikes have a "walk" mode that will greatly ease the pushing factor. Just remember to really stay focused on the task at hand or you might roll the ebike off the side of the ramp/rack. Bummer deal, fer sure.
You will also want to consider buying this item so that you can have "fold up" capability for the rack : https://www.discountramps.com/hitch..._o8heHbzke61obrfJre8pb_4xoVATQgIaAmtpEALw_wcB .. If you're really feeling adventurous, consider mating one (or more) of these to the motorcycle rack for added stability/piece of mind (also google "motorcycle wheel chock" ): https://www.bing.com/shop?q=motorcycle+wheel+chock&FORM=SHOPTB
Sometimes ya just gotta think outside the box.
And if you need to haul 2 ebikes, mating two of this carrier should be an easy enough project-- after all, one rack is rated for 400 pounds-- that equals 5+ fat tire ebikes. Ya just have to “think outside the box” a little to make it/them work. Also, if your ebikes front fork has lockout capability (full rigid), use it because compressing the forks during transport is extra hard on the internal hydraulics.
And Finally, here are some cool tire options for your Lil beastie:
https://classic-cycle.com/wheel-and-tire/tires-tubes-parts/tires/20-inch-tire/
All in all, too dang much fun.. Happy Holidays.
Attachments

Last edited: