$10 DIY Smart Charger Alternative / Ver. 2.0

Gionnirocket

Well-Known Member
Region
USA
City
Y. O.
I've been experimenting with an easier way to achieve a 70% - 90% charge or a storage charge for my battery other than just timing it and I came across an inexpensive solar charge controller that I thought I might be able to adapt. In the end I am able to achieve my goal, but it didn't end up exactly as planned.

The skinny on how it works is that you wire this in between the charger and the battery and it will disconnect the two when a certain voltage is reached and/or amount of time has elapsed.

In my particular case an issue that arose was that my charger is somewhat intelligent and it varies voltage on start up as it reads battery voltage and will cycle on/off until a constant voltage is read for a few seconds. This in turn would cause the controller to cycle as well and open its contacts.
The solution I came up with was to reverse the input and output of the controller so that I connected the constant voltage of the battery to the input. Since the controller works as a simple on/off switch, this is not a problem. The downside being that there is an extra step plugging it in.
So how it works....
I plug the battery into the the controller and turn on the battery to power it up. I set my battery's Bottom End Voltage as a reference point. I used 34.5V.
I then set the Shut-off Voltage to my desired voltage... say 80% _ 50.5v
Once set these remain in memory even after unplugging and ready for future charges. The controller is easily adjusted in .1v increments from 6V to 60V
I then set the Timed Forced Off on the controller to 2 - 4 hours depending how far I ran the battery down. Then set the Delayed Restart between charges to its maximum 999 seconds ( about 16 minutes) These are also set once and are saved for future use and/or easily changed if need be.
Then I plug the charger in to electrical outlet and give it a few seconds to read battery V and start.
Once it starts I turn OFF the power switch on the battery. If not it will short cycle at the end of the charge always trying to add .1v after the 999 seconds times out and up to the Timed Forced Off.
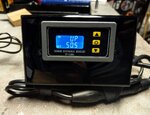
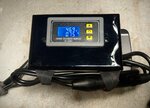
While charging it will display either the percentage of charge it is currently at, 100% being the Shut-off Voltage set, or you can toggle to a countdown of the Forced Timed Off set. If you do not set a Forced Time Off it will display an elapsed Charge Time.


Now those with a more basic charger... you should be able to do this without swapping the input/output.

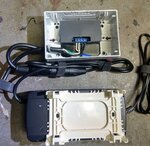
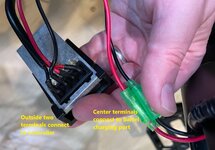
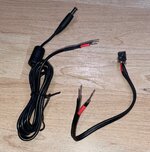
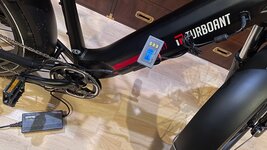
I mounted the controller in a plastic single gang electrical box and nano taped it to the top of my charger. I didn't want to hack up my charger output cable to put the controller in the line so I made an extension cable out of an old 16 gauge PC power cord and some solder XLR connectors. This also makes it easy to take the controller out of the line if need be. Careful purchasing an XLR cable for this use as in general these are used for audio signals and the conductors can be quite small.

So once set up it's a few extra seconds added to plugging things in than the charger alone and I have to say that it has been working quite well.
I will add that sometimes it is off by a tenth of a volt or two, but that's really hard to quantify as the battery voltage can fluctuate by that amount on its own. Since I usually burn through 1V or less on a typical 20 mile daily ride, only charging to 80% is not a hassle for me.


For someone with only one battery, this is a hell of a lot cheaper than the ready made alternatives while utilizing the charger you already have.
 

Attachments

  • IMAG0270.jpg
    IMAG0270.jpg
    594.1 KB · Views: 794
  • IMAG0275.jpg
    IMAG0275.jpg
    540.1 KB · Views: 844
  • IMAG0266.jpg
    IMAG0266.jpg
    544.7 KB · Views: 754
Last edited:
I've been experimenting with an easier way to achieve a 70% - 90% charge or a storage charge for my battery other than just timing it and I came across an inexpensive solar charge controller that I thought I might be able to adapt. In the end I am able to achieve my goal, but it didn't end up exactly as planned.

The skinny on how it works is that you wire this in between the charger and the battery and it will disconnect the two when a certain voltage is reached and/or amount of time has elapsed.

In my particular case an issue that arose was that my charger is somewhat intelligent and it varies voltage on start up as it reads battery voltage and will cycle on/off until a constant voltage is read for a few seconds. This in turn would cause the controller to cycle as well and open its contacts.
The solution I came up with was to reverse the input and output of the controller so that I connected the constant voltage of the battery to the input. Since the controller works as a simple on/off switch, this is not a problem. The downside being that there is an extra step plugging it in.

So how it works....
I plug the battery into the the controller and turn on the battery to power it up. I set my battery's Bottom End Voltage as a reference point. I used 34.5V.
I then set the Shut-off Voltage to my desired voltage... say 80% _ 50.5v
Once set these remain in memory even after unplugging and ready for future charges. The controller is easily adjusted in .1v increments from 6V to 60V
I then set the Timed Forced Off on the controller to 2 - 4 hours depending how far I ran the battery down. Then set the Delayed Restart between charges to its maximum 999 seconds ( about 16 minutes) These are also set once and are saved for future use and/or easily changed if need be.
Then I plug the charger in to electrical outlet and give it a few seconds to read battery V and start.
Once it starts I turn OFF the power switch on the battery. If not it will short cycle at the end of the charge always trying to add .1v after the 999 seconds times out and up to the Timed Forced Off.
While charging it will display either the percentage of charge it is currently at, 100% being the Shut-off Voltage set, or you can toggle to a countdown of the Forced Timed Off set. If you do not set a Forced Time Off it will display an elapsed Charge Time.

Now those with a more basic charger... you should be able to do this without swapping the input/output.

I mounted the controller in a plastic single gang electrical box and nano taped it to the top of my charger. I didn't want to hack up my charger output cable to put the controller in the line so I made an extension cable out of an old 16 gauge PC power cord and some solder XLR connectors. This also makes it easy to take the controller out of the line if need be. Careful purchasing an XLR cable for this use as in general these are used for audio signals and the conductors can be quite small.

So once set up it's a few extra seconds added to plugging things in than the charger alone and I have to say that it has been working quite well.
I will add that sometimes it is off by a tenth of a volt or two, but that's really hard to quantify as the battery voltage can fluctuate by that amount on its own. Since I usually burn through 1V or less on a typical 20-mile daily ride, only charging to 80% is not a hassle for me.

For someone with only one battery, this is a hell of a lot cheaper than the ready-made alternatives while utilizing the charger you already have.

Well done... you should consider offering these to EBR members for a nice price! ;)
 
Well done... you should consider offering these to EBR members for a nice price! ;)


Since you posted this twice I thought it necessary to copy my answer from the other thread so anyone not seeing the two wouldn't think I was ignoring you and/or a 💩 🙃

Thanks!
. . . but taking into account that there seems to be zero interest in this... coupled with the fact that there are so many different chargers, connectors and battery BMS's it would be hard for me to test before sending it out. That would make me uncomfortable possibly wasting people's time.
That said if anyone would like to try it... I'm more than happy to help.

Funny... I've also kept a large aquarium for years and have built my own wet/dry filter along with heat and pump controllers and I'm often told the same... That I should sell my little inventions. It sounds tempting at first, but then I realize that though I enjoy doing these things, doing them on any scale will become work. 🙃

Thanks for your reply... I will have to stick with my smart plug and timer system. ;)
 
Do you have a link for the $10 solar charge controller?
Not $10 but I think it's the same controller.
 
Coolio!
Just keep in mind that it won't be very accurate in this application as most chargers and especially cheap ones will have power loss due to their inefficiency. You can expect a 5 - 25% power loss with a charger. A quality charger should provide specs and have an Efficiency Rating of 85 to 95%
 
Not $10 but I think it's the same controller.
Yes.. It will show up on Amazon, eBay, Aliexpress and other if you search CD60
 
I've been bored... and also was wanting to know the current flow during the charging process, especially as it reaches full charge.. so I've updated my little project with a watt meter.
This does increase the price to $25...but that was well worth it for keeping me out of trouble on a rainy day.


IMAG0463.jpg
 
Last edited:
Since you posted this twice I thought it necessary to copy my answer from the other thread so anyone not seeing the two wouldn't think I was ignoring you and/or a 💩 🙃

Thanks!
. . . but taking into account that there seems to be zero interest in this... coupled with the fact that there are so many different chargers, connectors and battery BMS's it would be hard for me to test before sending it out. That would make me uncomfortable possibly wasting people's time.
That said if anyone would like to try it... I'm more than happy to help.

Funny... I've also kept a large aquarium for years and have built my own wet/dry filter along with heat and pump controllers and I'm often told the same... That I should sell my little inventions. It sounds tempting at first, but then I realize that though I enjoy doing these things, doing them on any scale will become work. 🙃
I expect there actually is interest and quite a bit of it b/c everyone worries about their first, one, and only expensive battery right after they get it. But the marketing costs to reach them at that exact time would be impossible even B.C.. But I am very interested.
 
With the most basic of electrical skills it really is easy to assemble.
The hardest part is cutting the plate to mount them and soldering up an XLR cable..which both are easy enough with a little patience.
The wiring is quite simple
 
I literally don't know anything about bike electronics yet. I didn't even use a timer, Just walk by and unplug it when I guess it's about time, but if I'm charging it from my campervan battery, it's a different story. And soon travel will return.
 
Well the timer is easy enough to implement even if it's not automatic and just a reminder on your phone. The amount of time for a battery to gain a volt is usually pretty consistent.
I'm not too worried about my battery and though this does serve a purpose and is working well, it's as much an exercise in tinkering and staying busy with things that I enjoy doing and learning about. The interface is a bit on the tech/crude side and requires being versed in Chinglish, though not hard at all if you have a base understanding.
I've got a new charger arriving that I'm interested in seeing if it will solve the minor input issue in my initial post and then I'm going to try it with a bench top power supply once I gather a bit more information on the charging profile.

IMG_20200929_065527_345.JPG
 
One of the reasons I just joined this forum is to say thanks for this Gionnirocket. My CD60 is arriving today.

I'm a bit worried about implementing this on my battery, but that adds to the fun. I'm totally new to e-bikes so here goes.

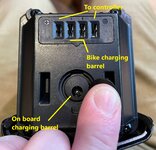
My battery seems strange as it has just four connection terminals; I'm assuming two for charging and two for powering the bike. The bike has a barrel connector (not XLR) on its down tube for charging that leads directly down to the two center terminals on the battery pack. There is also a separate barrel connector on the battery its self so that it can be removed from the bike and charged remotely. The terminals on the far ends of the battery go to the controller which is located where the seat tube and down tube meet.

battery.jpg terminals.jpg

The voltages are what I find odd. Right now the battery has quite a bit of use since last charge and the two terminals that lead to the controller are reading 46.54 volts which makes perfect sense to me. What's strange is that the voltage between the two charging terminals is only reading 27.20 volts (same as barrel connector on down tube as it should). Why is the voltage for the charging terminals on the battery so low? Furthermore, the barrel connector voltage on the battery its self is reading differently than the center two terminals at ~24.80 volts, but continuously and slowly increases as I hold my DMM to it. Shouldn't both the charging terminals on the battery and the barrel connector on the batter read the same voltage?

(In case it isn't clear, the barrel connector on the battery its self is never connected unless the battery is removed from the bike and connected to the charger)

Anyway, when I connect my SANS charger which does read 54.47 volts, will the center two battery terminals increase in voltage while charging the battery? Do I need to setup my CD60 to different voltages than say 51.9 volts to get about a 90% charge? Am I missing something?

Thanks for any pointers,
craigr
 
OK weird. When I plug the charger into the battery on board barrel connector, the center two battery terminals jump up to charging voltage and the controller terminals drop to low voltage. I guess this is all related to the battery protection circuit. How complex is this battery? It says QB-48V14Ah-Ebike-B.

I really want to open it up, but that would break the warranty stickers.
 
Looks like your battery's charge input is a little more intelligent than others. It's probably offline and looking for a charger voltage to activate, And when it does activate, it cuts off voltage to the controller. Good design. Why charge the battery if there's a possible load on it.

The simple charger inputs are always active, unless there's a battery fault. You'll always get full voltage across the terminals on these cheaper designs. If you plug in a charger that is unplugged, you might get a spark as the battery zaps the output capacitors in the charger. Over the long term, that spark could damage circuitry on either side. To get around it, you must plug in the charger first so it's also at full battery voltage.

Gionnirocket has a similar interface where he also sees no voltage on the charger input, and stuff has to happen before it starts charging. All but one of my batteries are dumb.
 
Thank you.
Harry is correct.. and understand that battery charging and protection can be implemented using many various but basically similar methods.
I should have more time later... But the quick answer is that this is a bit of a hack and will need to be adjusted according to your particular battery and charger. When setting up the CD60 you'll have to adjust the actual finish voltage to get your desired charge. This number will more than likely be higher than the actual voltage when everything is disconnected afterwards. Also don't worry about the voltages you're reading now because in the end they will be irrelevant. I've been using this on every charge since putting it together and it has repeatedly given me the same results.
Are you adding the wattage meter to the build?
Yeah I get that it's a hack and that's one of the things I love about it. With some trial and error it should work. I considered being a normal person for once and just getting the 48v 3amp Luna Mini Charger. But then, if I ever get a 52 volt battery in the future I'd have to get a different charger all together. With the CD60 I should be able to adjust the charging for about any e-bike battery voltage.

This is a proof of concept for me that I'm building. No case yet, just using parts on hand, and of course the CD60. That's all at this point. I figured I'd need to set the CD60 to a higher voltage than desired so I'm planning to start at 52 volts and experiment from there. Ultimately, I'd like to have the bike always charged between 80-90%. I have soldered together a female barrel connector from an old modem to a cord, and cut another barrel cable off an old wall wart. This way if I need to charge to 100% I can just unplug from the CD60 and go directly into the bike. If everything works I'll put it all in a case and maybe even get better parts ;)

IMG_2531.jpg

If you have time for other tips I'm all ears.

Thanks,
craigr
 
IMG_2539.jpg

Yes, with just a bit of tinkering this will do nicely. Much smaller and lighter than I expected somehow.

Can't wait to get it dialed in. What settings do you use?

craigr
 
Back