(Jan 2021 update: I am attaching the following link to my posting(s) located over at the BikTrix ebike companys' EBReviewforum site:
https://electricbikereview.com/foru...-sensor-bottom-bracket-price-is-200-00.40097/
As of today, Jan 5th, it is a work-in-progress. It should make current M2S ebike owners really appreciate their very correct ebike purchase. I also realize that many potential ebike buyers cruise these forums as an aid in their search for the ideal ebike at the most practical price. They also need to be made aware of “brand service after the sale”, or lack/deception thereof. After all, an ebike purchase of $1,500+ is no small investment. You be the judge.)
ADDENDUM on Oct 28, 2020: Since I now have numerous threads posted (sorry about that), I want to let viewers know their chronological sequence, thus every thread title will begin with (# ).
[ item 1 ]: CDU display: If you are one of those ebikers who have a propensity to dink around with the handlebar-mounted computer display unit (CDU) parameters (guilty), and then you either forget the original settings (guilty) or neglect to write down the info before dinking around (guilty), then here are some helpful items for you. The following is for the 2018/2019 M2S KUSH (dual suspension) and the R750 (hardtail) equipped with the 750W BaFang rear hub motor setup utilizing the “INTELLIGENT” 800S cdu:
I emailed M2S for the factory settings. Here is their reply:
[[ The menu settings on the bike are as follows (I may have mixed up the order sequence on the battery and wheel size settings):
Screen 1) mph or kmh setting
Screen 2) Backlight brightness
Screen 3) Display shut off timer
Screen 4) wheel size - set to 29
Screen 5) battery voltage - set to 48
Screen 6) password - enter 1919
Screen 7) speed - set to desired limit
Screen 8) CUL - set to 15
Screen 9) Hal - set to 6
Screen 10) ASS - set to 12
Screen 11) set to 0
Screen 12) set to 0
Screen 13) PAS - set to desired setting (1-3, 1-5, or 1-9 ]]
If you the ebiker, do change the settings, go through the complete setting menu again just to verify that the change(s) you made have actually been accepted. I had 2 instances where that (new setting didn't take) occurred. Just keep doing it until everything meets your satisfaction. You can scroll over and over-- no need to exit/re-enter the menu program..
After I amended my own dumb azz inputs, I noticed a definite improvement in my mighty beasts performance. Become comfortable dealing with the menu stuff so that, when you do go out for a ride, you can easily stop riding and re-program the cdu. One particular “option” that you might try is changing the BATTERY VOLTAGE (screen 5) between UBE and 48.. See if you gain an improvement, too. If not, just change it back..
If you want further data info, go to this PDF download:
http://APT-800s-Display-Manual.pdf/
And, if you are really feeling adventurous, check out this item from the BIKTRIX ebike website. It is specifically for BaFang mid-drive motor units, but there may also be rear hub versions out there, too: https://support.biktrix.com/hc/en-us/articles/360039064292-Bafang-Controller-PAS-Programming-Guide .. By the way this website has a lot of neat technical info on their various drivetrain systems and I'm sure those are going to be compatible with the M2S brand line of ebikes, too.
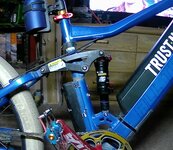
[ item 2 ] 190x50mm rear shock: Order placed on Oct 8th.. package delivered Oct. 18th..
https://www.walmart.com/ip/Mountain...Lock-Out-165x35mm-190x50mm-200x55mm/171951310
After 14,600 miles, the rear shock rubber seal on the KUSH “folded under” and air seeped out. The folding was due to me NOT occasionally lubricating the seal/steel piston shaft whenever I oiled the chain. Anyway, instead of trying to tuck the well used seal back into place, I decided to just go ahead and replace the entire shock.
And dang, am I glad I did. First of all, my original A5(brand) rear shock, from upper bolt center to lower bolt center, measures 6.5”, or 165mm with a 35mm movement distance (thus, the 165x35mm size)... So, that is the length shock body that I should be shopping for. However, over on the M2S website, I came across the above-referenced DNM shock in 190mm, or 7.45” length, with 50mm movement (thus, 190x50mm size) AND it was listed as compatible with their KUSH ebike. [Available Size Eye to Eye x Travel: 165 x 35 mm ( 6.50 x 1.38 inch), 190 x 50 mm ( 7.83 x 1.97 inch), 200 × 55 mm ( 7.87 × 2.17 inch) ] ..
A 15mm increase in shock movement is a 3/5 inch improvement (25mm= 1”)-- at the shock body.. I'm sure that figure translates to even more movement back at the rear wheel. So, what the hey, I bought the DNM shock. Damn, what a major improvement.
The thing about having a rear shock on an ebike is that the weight of the ebike, plus the rider (in my case 205 pounds), is asking a lot of the shock. Pump in too much air and the ride will be very harsh. Granted, you will have some suspension movement back there, but it won't be very cushy. If you inject too little air, the shock will “bottom out” and that is definitely NOT a good feeling/sensation either. What to do, what to do?? If feasible, get a LONGER shock.. So, after reviewing the M2s data, I did. And, the ride cushiness has improved tremendously.
If you do swap out to this DNM shock: By the way, you will need two 5mm allen wrenches to remove the male/female shock bolts. Also, take those 2 wrenches with you on your first few rides to make sure that the 1” long male bolt does NOT back out. I just put glue on the entire thread area upon re-installing it.. But, ya never know.. It uses the very same rubber spacers/steel sleeves that your A5 shock has. All you need to do is soak one of the UPPER rubber sleeves in dish soap (to loosen it) and then pull it off with a pair of pliers. Take a hammer and lightly tap the steel sleeve (and remaining rubber washer) back out from the shock body. Do the same for the narrower bottom shock setup. Insert same into the DNM 190mm shock and you are good to go. .
[BAROMETRIC RECOMMENDATION;
Weight 120 lbs - Main air chamber 90 Psi, Negative chamber 50 Psi.
Weight 140 lbs - Main air chamber 105 Psi, Negative chamber 50 Psi.
Weight 160 lbs - Main air chamber 120 Psi, Negative chamber 55 Psi.
Weight 180 lbs - Main air chamber 135 Psi, Negative chamber 65 Psi.
Weight 200 lbs - Main air chamber 150 Psi, Negative chamber 70 Psi.
Weight 220 lbs - Main air chamber 165 Psi, Negative chamber 75 Psi.]
The DNM air pressure settings for me, at a 205 pound riding weight, calls for 150psi in the upper shock and 70psi in the lower shock. When I went out for a shake-down ride, and took my shock pump (Rear shock pump:https://www.amazon.com/Bike-Shock-M...coding=UTF8&psc=1&refRID=952EEWCNHBFYZ7M3JK3C ) along, i increased those numbers to 190/80 and felt a much more mellow, cushy ride. The high pressure air pumps release a bit of air when you disconnect them, so over-inflate by 10 or so psi. When screwing the pump connecter onto the shock, give it an extra turn at the end because that is usually what it takes to actually complete the connection (just glance at the shock pump gauge to verify). Also, make sure that the blue lockout arm on the shock body is NOT locked out when utilizing the air shock pump..
ADDENDUM: There is a damping adjustment dial (red) that uses 30 total clicks.. I just put mine at 15 clicks (midway)..
[item 3]: front fork shock: The following information is NOT recommended by bike shops/fork manufactorers ,etc.. BUT, I do it anyway. First of all, the forks on these basic, generic ebikes are not $900 RockShox units-- they are just basic suspension shock units. If you look at the black rubber seal at the top of the shock body (where the chrome leg goes in), you will see a silver o-ring thingie. It is actually a tightly wound spring.
I do the following:
Use a small diameter nail or a very tiny screwdriver (I got mine from an eyeglass repair kit at DollarTree)-- don't use a sewing needle because it might break off-- and insert it down inside the black rubber seal about 1/4”. You need to pull the seal back just enough to allow the insertion of the long needle nozzle that comes with a can of silicone spray lubricant. Start spraying the lube, at little at a time-- watch the little bubbles.. Continue doing the procedure until ??? ...DO NOT USE WD40...
When finished with the 1st leg, press down a few times so the fork compresses. Then repeat for the other leg. A simple procedure that will greatly extend the life of your forks inner workings. Also, apply a small amount to the 2 rubber seals so that they won't dry out and roll over like what occurred to my above-mentioned rear air shock (due to MY own negligence).
When doing this procedure, have patience AND wrap an old sock/ cloth around the fork leg so as to avoid having lubricant overspray drip down on to the DISC BRAKE area. If you contaminate that item, you'll have to do a lot of cleaning/drying/ sterilizing..
[ item 4]: cycling shorts: My usual modus operandi, as far as cycling apparel goes, is to wear a pair of cycling shorts and a pair of cargo shorts over them. I really like the extra pockets available on the cargo shorts. Instead of regular cotton shorts, I go to GoodWill/ ARC thrift store, buy cargo pockets style swim trunks, and cut out the mesh liner. Works like a friggin' champ and, at $3-$4 a piece, ya just can't go wrong. Plus, they are light weight, quick drying, and there are usually a bazillion patterns/motifs to choose from.
As for my spandex padded cycling shorts; I already own 10 pair, but 6 of them are wearing thin, so It was time to update. I stumbled across these units, bought 3, and have been VERY impressed with both the thick padding (red) and the fit (1” wide elastic band instead of drawstring). Cycling shorts: https://www.walmart.com/ip/Zefal-Comfort-Bike-Shorts-Unisex-Black-XL-2XL-36-40/187467666
[ item 5] : ebike battery transportation: My battery is 18” long. I had originally carried it, along with a 100 ounce CamelBak water bladder, in a hydration backpack designed for cycling. This meant that the pack was narrow side-to-side, resting on my spine. The addition of the long, heavy (7-8 pounds) battery also being centered over the bladder and over my spine, made for a narrow, yet bulky, profile. So, one day I formed a thought and cruised the internet, finding the laptop carrier shown below.
Whenever I go for an extended ebike ride (longer than 25 miles), I carry along an extra 7-8 pound battery. I always get a yuck out of those ebikers who focus on mounting that extra battery on the frame, running more electric wires, relays, switches, knobs, and god knows what else to accomplish their mission.
My methods requires NONE of the aforementioned. It also only takes me 3 minutes MAX to do a battery swap-out (about the same length of time spent at an intersection waiting for the traffic light to change.) You just have to remember to bring the key to remove the battery.
To accommodate that extra 18” long battery, I use the following:
LapTop BackPack (thickness is only 4.7”) .. https://www.amazon.com/gp/product/B0732ZFF2M/ref=ppx_yo_dt_b_asin_title_o09_s00?ie=UTF8&psc=1
And, since it is so inexpensive, I integrate the following items onto it:
chest/sternum straps;
https://www.amazon.com/gp/product/B07VMVMT9K/ref=ppx_yo_dt_b_asin_title_o07_s00?ie=UTF8&psc=1
waist belt; https://www.amazon.com/gp/product/B073Z9VY3J/ref=ppx_yo_dt_b_asin_title_o00_s00?ie=UTF8&psc=1
camera pouch; https://www.walmart.com/ip/Polaroid...55-t1242-t1255-t1234-compact-cameras/48617699 . I mount one of these on either side of the belt to hold my multi-tool and my set of keys.
In regards to mounting/installing the above items, I just start cutting slits in the backpack and the camera pouches and then re-inforcing the slits with HeavyDuty Gorrila tape. Works like a charm at preventing tears, etc.
Man, does it work great. The battery fits perfectly. The 100oz water bladder fits perfectly,too, right next to the battery. This backpacks “footprint” is evenly spread across the entire length AND width of my back area, making for the very comfortable hauling experience. Plus, it is only 5” thick.
I have installed modified cardboard boxes, re-enforced with the Gorilla tape-- and dense foam on the battery side--, to act as pockets for each item. The nice thing about the water bladder side is that you easily pack your tools/inner tubes, etc below the bladder--you just have to fill the bladder with water according to how much room is still available after inserting the other stuff. Remember: you can always only put 50ounces of water in a 100 ounce bladder, but you can NEVER put 100ounces in a 50 ounce bladder.. Oh, its' true, its' true. Also, affix a hook at the top of the backpack to secure the water bladder so it remains elongated (doesn't drop down into the pack).
As for those lamenting having to deal with the extra 20 pounds (in my case), I just look at it as exercise in addition to the cycling variety. Just stand up occasionally (in my case it is about 60% sitting/ 40% standing) just for that very reason (exercise). Besides, my precious $500 battery is cushioned/protected from vibrations a great deal better when resting on my body instead of on the ebike frame/rack, etc.
[item 6]: tools that I carry on my 50+ mile bike rides;
9in1 multi-tool; https://www.amazon.com/Topeak-Mini-...rds=bicycle+multi-tool&qid=1603752521&sr=8-10
Needle-nose locking pliers: https://www.walmart.com/ip/Irwin-Vi...Long-Nose-Locking-Pliers-Silver-1-pk/14293929 ..
And Thats All-- no inner tubes/no flat tire repair equipment, because none are ever needed..
My home tool box: https://www.ebay.com/itm/3728793206...C0WQJZks-P4qYXooETSEAUsmZCQ-CK80aAj6cEALw_wcB This package will take care of all of your repair needs.
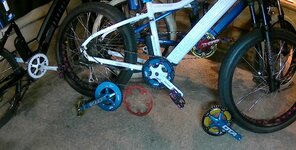
[item 7] pedals/crankset remove/install..
If you look at the photo's, you'll see the variety of these items that I have to use on my many toyz (ebikes AND old school bikes). The crankset removal tool is a 2-piece unit-- a “female” portion and a “male” portion (as used on a square taper 4-sided bottom bracket axle).
Everything about this procedure is normal EXCEPT for one. Read on..
RIGHT side (the side where the chainring is located) crank/pedal:
remove pedal: to unscrew, go top—rear—bottom--front, etc. etc.
remove crankset:
female section of crank removal tool; screw in top—front--bottom--rear--top etc etc.
male section; also, top—front--bottom--rear--top etc, etc (same as female section). This item will withdraw the crank away from the bottom bracket axle.
Install RIGHT side pedal; top—front—bottom--rear, etc etc.
install crank arm; push crank onto bottom bracket axle.. Use wrench to tighten bolt into bottom axle bracket to secure crank..
LEFT side crank/pedal:
remove pedal; [THIS IS WHERE THINGS ARE BACK-ASSed]. This item is “reverse threaded”.. Now pay attention.. top—rear—bottom—front—top—rear--bottom--front.. etc, etc.
remove crank arm; this item is “normal” (same as right side info.)
top—rear--bottom--front--top etc etc.
install pedal: again, BACK-ASSed.. top—front--bottom--rear--top--front--bottom--rear etc, etc.
install crank arm; same as right side installation..
The reason for the BACK-ASSed method is due to the fact that, whenever you are pedaling, you are also serving to keep the pedal axle “tightened”. Ever see a bike with a pedal that has become detached while on a ride?? Nope, ya sure haven't..
See photo's for the various flavors of cranks/pedals I have. And they are all ready to remove/install in a matter of 15 minutes.. Hey, ebikes (and ALL bikes) are toyz.. Enjoy them as such..
[item 8]: rear hitch mount motorcycle rack ; I have already posted this item on another MBR thread, but thought I'd copy it to this thread, too. Just google "rear hitch mount motorcycle rack".
Here is a real nice rack unit to get you started: https://www.discountramps.com/motor...K-Qk3JX7T4W1lXgVofaLygOZRqiVuxSAaAmM9EALw_wcB All motorcycle racks also include a loading ramp so you can roll your beast onto/off of the rack, Remember: the longer the loading ramp, (say, 6') the shallower the angle (a good thing).. In addition, most ebikes have a "walk" mode that will greatly ease the pushing factor. Just remember to really stay focused on the task at hand or you might roll the ebike off the side of the ramp/rack. Bummer deal, fer sure.
You will also want to consider buying this item so that you can have "fold up" capability for the rack : https://www.discountramps.com/hitch..._o8heHbzke61obrfJre8pb_4xoVATQgIaAmtpEALw_wcB .. If you're really feeling adventurous, consider mating one (or more) of these to the motorcycle rack for added stability/piece of mind (also google "motorcycle wheel chock" ):
https://www.bing.com/shop?q=motorcycle+wheel+chock&FORM=SHOPTB
And if you need to haul 2 ebikes, mating two of this carrier should be an easy enough project-- after all, one rack is rated for 400 pounds-- that equals 5+ fat tire ebikes. Ya just have to “think outside the box” a little to make it/them work. Also, if your front fork has lockout capability (full rigid), use it because compressing the forks during transport is extra hard on the internal hydraulics.
Oh yeah: No Cable lock devices.. A thief will cut thru it like it was a strand of pasta. Instead, use one (or more) U-locks to secure your mini Mighty Beast to the carrier rack if you plan stop along the way enroute to wherever. They (U-lock) are not expensive.. The longer the shaft arms, the better..
The End..
https://electricbikereview.com/foru...-sensor-bottom-bracket-price-is-200-00.40097/
As of today, Jan 5th, it is a work-in-progress. It should make current M2S ebike owners really appreciate their very correct ebike purchase. I also realize that many potential ebike buyers cruise these forums as an aid in their search for the ideal ebike at the most practical price. They also need to be made aware of “brand service after the sale”, or lack/deception thereof. After all, an ebike purchase of $1,500+ is no small investment. You be the judge.)
ADDENDUM on Oct 28, 2020: Since I now have numerous threads posted (sorry about that), I want to let viewers know their chronological sequence, thus every thread title will begin with (# ).
[ item 1 ]: CDU display: If you are one of those ebikers who have a propensity to dink around with the handlebar-mounted computer display unit (CDU) parameters (guilty), and then you either forget the original settings (guilty) or neglect to write down the info before dinking around (guilty), then here are some helpful items for you. The following is for the 2018/2019 M2S KUSH (dual suspension) and the R750 (hardtail) equipped with the 750W BaFang rear hub motor setup utilizing the “INTELLIGENT” 800S cdu:
I emailed M2S for the factory settings. Here is their reply:
[[ The menu settings on the bike are as follows (I may have mixed up the order sequence on the battery and wheel size settings):
Screen 1) mph or kmh setting
Screen 2) Backlight brightness
Screen 3) Display shut off timer
Screen 4) wheel size - set to 29
Screen 5) battery voltage - set to 48
Screen 6) password - enter 1919
Screen 7) speed - set to desired limit
Screen 8) CUL - set to 15
Screen 9) Hal - set to 6
Screen 10) ASS - set to 12
Screen 11) set to 0
Screen 12) set to 0
Screen 13) PAS - set to desired setting (1-3, 1-5, or 1-9 ]]
If you the ebiker, do change the settings, go through the complete setting menu again just to verify that the change(s) you made have actually been accepted. I had 2 instances where that (new setting didn't take) occurred. Just keep doing it until everything meets your satisfaction. You can scroll over and over-- no need to exit/re-enter the menu program..
After I amended my own dumb azz inputs, I noticed a definite improvement in my mighty beasts performance. Become comfortable dealing with the menu stuff so that, when you do go out for a ride, you can easily stop riding and re-program the cdu. One particular “option” that you might try is changing the BATTERY VOLTAGE (screen 5) between UBE and 48.. See if you gain an improvement, too. If not, just change it back..
If you want further data info, go to this PDF download:
http://APT-800s-Display-Manual.pdf/
And, if you are really feeling adventurous, check out this item from the BIKTRIX ebike website. It is specifically for BaFang mid-drive motor units, but there may also be rear hub versions out there, too: https://support.biktrix.com/hc/en-us/articles/360039064292-Bafang-Controller-PAS-Programming-Guide .. By the way this website has a lot of neat technical info on their various drivetrain systems and I'm sure those are going to be compatible with the M2S brand line of ebikes, too.
[ item 2 ] 190x50mm rear shock: Order placed on Oct 8th.. package delivered Oct. 18th..
https://www.walmart.com/ip/Mountain...Lock-Out-165x35mm-190x50mm-200x55mm/171951310
After 14,600 miles, the rear shock rubber seal on the KUSH “folded under” and air seeped out. The folding was due to me NOT occasionally lubricating the seal/steel piston shaft whenever I oiled the chain. Anyway, instead of trying to tuck the well used seal back into place, I decided to just go ahead and replace the entire shock.
And dang, am I glad I did. First of all, my original A5(brand) rear shock, from upper bolt center to lower bolt center, measures 6.5”, or 165mm with a 35mm movement distance (thus, the 165x35mm size)... So, that is the length shock body that I should be shopping for. However, over on the M2S website, I came across the above-referenced DNM shock in 190mm, or 7.45” length, with 50mm movement (thus, 190x50mm size) AND it was listed as compatible with their KUSH ebike. [Available Size Eye to Eye x Travel: 165 x 35 mm ( 6.50 x 1.38 inch), 190 x 50 mm ( 7.83 x 1.97 inch), 200 × 55 mm ( 7.87 × 2.17 inch) ] ..
A 15mm increase in shock movement is a 3/5 inch improvement (25mm= 1”)-- at the shock body.. I'm sure that figure translates to even more movement back at the rear wheel. So, what the hey, I bought the DNM shock. Damn, what a major improvement.
The thing about having a rear shock on an ebike is that the weight of the ebike, plus the rider (in my case 205 pounds), is asking a lot of the shock. Pump in too much air and the ride will be very harsh. Granted, you will have some suspension movement back there, but it won't be very cushy. If you inject too little air, the shock will “bottom out” and that is definitely NOT a good feeling/sensation either. What to do, what to do?? If feasible, get a LONGER shock.. So, after reviewing the M2s data, I did. And, the ride cushiness has improved tremendously.
If you do swap out to this DNM shock: By the way, you will need two 5mm allen wrenches to remove the male/female shock bolts. Also, take those 2 wrenches with you on your first few rides to make sure that the 1” long male bolt does NOT back out. I just put glue on the entire thread area upon re-installing it.. But, ya never know.. It uses the very same rubber spacers/steel sleeves that your A5 shock has. All you need to do is soak one of the UPPER rubber sleeves in dish soap (to loosen it) and then pull it off with a pair of pliers. Take a hammer and lightly tap the steel sleeve (and remaining rubber washer) back out from the shock body. Do the same for the narrower bottom shock setup. Insert same into the DNM 190mm shock and you are good to go. .
[BAROMETRIC RECOMMENDATION;
Weight 120 lbs - Main air chamber 90 Psi, Negative chamber 50 Psi.
Weight 140 lbs - Main air chamber 105 Psi, Negative chamber 50 Psi.
Weight 160 lbs - Main air chamber 120 Psi, Negative chamber 55 Psi.
Weight 180 lbs - Main air chamber 135 Psi, Negative chamber 65 Psi.
Weight 200 lbs - Main air chamber 150 Psi, Negative chamber 70 Psi.
Weight 220 lbs - Main air chamber 165 Psi, Negative chamber 75 Psi.]
The DNM air pressure settings for me, at a 205 pound riding weight, calls for 150psi in the upper shock and 70psi in the lower shock. When I went out for a shake-down ride, and took my shock pump (Rear shock pump:https://www.amazon.com/Bike-Shock-M...coding=UTF8&psc=1&refRID=952EEWCNHBFYZ7M3JK3C ) along, i increased those numbers to 190/80 and felt a much more mellow, cushy ride. The high pressure air pumps release a bit of air when you disconnect them, so over-inflate by 10 or so psi. When screwing the pump connecter onto the shock, give it an extra turn at the end because that is usually what it takes to actually complete the connection (just glance at the shock pump gauge to verify). Also, make sure that the blue lockout arm on the shock body is NOT locked out when utilizing the air shock pump..
ADDENDUM: There is a damping adjustment dial (red) that uses 30 total clicks.. I just put mine at 15 clicks (midway)..
[item 3]: front fork shock: The following information is NOT recommended by bike shops/fork manufactorers ,etc.. BUT, I do it anyway. First of all, the forks on these basic, generic ebikes are not $900 RockShox units-- they are just basic suspension shock units. If you look at the black rubber seal at the top of the shock body (where the chrome leg goes in), you will see a silver o-ring thingie. It is actually a tightly wound spring.
I do the following:
Use a small diameter nail or a very tiny screwdriver (I got mine from an eyeglass repair kit at DollarTree)-- don't use a sewing needle because it might break off-- and insert it down inside the black rubber seal about 1/4”. You need to pull the seal back just enough to allow the insertion of the long needle nozzle that comes with a can of silicone spray lubricant. Start spraying the lube, at little at a time-- watch the little bubbles.. Continue doing the procedure until ??? ...DO NOT USE WD40...
When finished with the 1st leg, press down a few times so the fork compresses. Then repeat for the other leg. A simple procedure that will greatly extend the life of your forks inner workings. Also, apply a small amount to the 2 rubber seals so that they won't dry out and roll over like what occurred to my above-mentioned rear air shock (due to MY own negligence).
When doing this procedure, have patience AND wrap an old sock/ cloth around the fork leg so as to avoid having lubricant overspray drip down on to the DISC BRAKE area. If you contaminate that item, you'll have to do a lot of cleaning/drying/ sterilizing..
[ item 4]: cycling shorts: My usual modus operandi, as far as cycling apparel goes, is to wear a pair of cycling shorts and a pair of cargo shorts over them. I really like the extra pockets available on the cargo shorts. Instead of regular cotton shorts, I go to GoodWill/ ARC thrift store, buy cargo pockets style swim trunks, and cut out the mesh liner. Works like a friggin' champ and, at $3-$4 a piece, ya just can't go wrong. Plus, they are light weight, quick drying, and there are usually a bazillion patterns/motifs to choose from.
As for my spandex padded cycling shorts; I already own 10 pair, but 6 of them are wearing thin, so It was time to update. I stumbled across these units, bought 3, and have been VERY impressed with both the thick padding (red) and the fit (1” wide elastic band instead of drawstring). Cycling shorts: https://www.walmart.com/ip/Zefal-Comfort-Bike-Shorts-Unisex-Black-XL-2XL-36-40/187467666
[ item 5] : ebike battery transportation: My battery is 18” long. I had originally carried it, along with a 100 ounce CamelBak water bladder, in a hydration backpack designed for cycling. This meant that the pack was narrow side-to-side, resting on my spine. The addition of the long, heavy (7-8 pounds) battery also being centered over the bladder and over my spine, made for a narrow, yet bulky, profile. So, one day I formed a thought and cruised the internet, finding the laptop carrier shown below.
Whenever I go for an extended ebike ride (longer than 25 miles), I carry along an extra 7-8 pound battery. I always get a yuck out of those ebikers who focus on mounting that extra battery on the frame, running more electric wires, relays, switches, knobs, and god knows what else to accomplish their mission.
My methods requires NONE of the aforementioned. It also only takes me 3 minutes MAX to do a battery swap-out (about the same length of time spent at an intersection waiting for the traffic light to change.) You just have to remember to bring the key to remove the battery.
To accommodate that extra 18” long battery, I use the following:
LapTop BackPack (thickness is only 4.7”) .. https://www.amazon.com/gp/product/B0732ZFF2M/ref=ppx_yo_dt_b_asin_title_o09_s00?ie=UTF8&psc=1
And, since it is so inexpensive, I integrate the following items onto it:
chest/sternum straps;
https://www.amazon.com/gp/product/B07VMVMT9K/ref=ppx_yo_dt_b_asin_title_o07_s00?ie=UTF8&psc=1
waist belt; https://www.amazon.com/gp/product/B073Z9VY3J/ref=ppx_yo_dt_b_asin_title_o00_s00?ie=UTF8&psc=1
camera pouch; https://www.walmart.com/ip/Polaroid...55-t1242-t1255-t1234-compact-cameras/48617699 . I mount one of these on either side of the belt to hold my multi-tool and my set of keys.
In regards to mounting/installing the above items, I just start cutting slits in the backpack and the camera pouches and then re-inforcing the slits with HeavyDuty Gorrila tape. Works like a charm at preventing tears, etc.
Man, does it work great. The battery fits perfectly. The 100oz water bladder fits perfectly,too, right next to the battery. This backpacks “footprint” is evenly spread across the entire length AND width of my back area, making for the very comfortable hauling experience. Plus, it is only 5” thick.
I have installed modified cardboard boxes, re-enforced with the Gorilla tape-- and dense foam on the battery side--, to act as pockets for each item. The nice thing about the water bladder side is that you easily pack your tools/inner tubes, etc below the bladder--you just have to fill the bladder with water according to how much room is still available after inserting the other stuff. Remember: you can always only put 50ounces of water in a 100 ounce bladder, but you can NEVER put 100ounces in a 50 ounce bladder.. Oh, its' true, its' true. Also, affix a hook at the top of the backpack to secure the water bladder so it remains elongated (doesn't drop down into the pack).
As for those lamenting having to deal with the extra 20 pounds (in my case), I just look at it as exercise in addition to the cycling variety. Just stand up occasionally (in my case it is about 60% sitting/ 40% standing) just for that very reason (exercise). Besides, my precious $500 battery is cushioned/protected from vibrations a great deal better when resting on my body instead of on the ebike frame/rack, etc.
[item 6]: tools that I carry on my 50+ mile bike rides;
9in1 multi-tool; https://www.amazon.com/Topeak-Mini-...rds=bicycle+multi-tool&qid=1603752521&sr=8-10
Needle-nose locking pliers: https://www.walmart.com/ip/Irwin-Vi...Long-Nose-Locking-Pliers-Silver-1-pk/14293929 ..
And Thats All-- no inner tubes/no flat tire repair equipment, because none are ever needed..
My home tool box: https://www.ebay.com/itm/3728793206...C0WQJZks-P4qYXooETSEAUsmZCQ-CK80aAj6cEALw_wcB This package will take care of all of your repair needs.
[item 7] pedals/crankset remove/install..
If you look at the photo's, you'll see the variety of these items that I have to use on my many toyz (ebikes AND old school bikes). The crankset removal tool is a 2-piece unit-- a “female” portion and a “male” portion (as used on a square taper 4-sided bottom bracket axle).
Everything about this procedure is normal EXCEPT for one. Read on..
RIGHT side (the side where the chainring is located) crank/pedal:
remove pedal: to unscrew, go top—rear—bottom--front, etc. etc.
remove crankset:
female section of crank removal tool; screw in top—front--bottom--rear--top etc etc.
male section; also, top—front--bottom--rear--top etc, etc (same as female section). This item will withdraw the crank away from the bottom bracket axle.
Install RIGHT side pedal; top—front—bottom--rear, etc etc.
install crank arm; push crank onto bottom bracket axle.. Use wrench to tighten bolt into bottom axle bracket to secure crank..
LEFT side crank/pedal:
remove pedal; [THIS IS WHERE THINGS ARE BACK-ASSed]. This item is “reverse threaded”.. Now pay attention.. top—rear—bottom—front—top—rear--bottom--front.. etc, etc.
remove crank arm; this item is “normal” (same as right side info.)
top—rear--bottom--front--top etc etc.
install pedal: again, BACK-ASSed.. top—front--bottom--rear--top--front--bottom--rear etc, etc.
install crank arm; same as right side installation..
The reason for the BACK-ASSed method is due to the fact that, whenever you are pedaling, you are also serving to keep the pedal axle “tightened”. Ever see a bike with a pedal that has become detached while on a ride?? Nope, ya sure haven't..
See photo's for the various flavors of cranks/pedals I have. And they are all ready to remove/install in a matter of 15 minutes.. Hey, ebikes (and ALL bikes) are toyz.. Enjoy them as such..
[item 8]: rear hitch mount motorcycle rack ; I have already posted this item on another MBR thread, but thought I'd copy it to this thread, too. Just google "rear hitch mount motorcycle rack".
Here is a real nice rack unit to get you started: https://www.discountramps.com/motor...K-Qk3JX7T4W1lXgVofaLygOZRqiVuxSAaAmM9EALw_wcB All motorcycle racks also include a loading ramp so you can roll your beast onto/off of the rack, Remember: the longer the loading ramp, (say, 6') the shallower the angle (a good thing).. In addition, most ebikes have a "walk" mode that will greatly ease the pushing factor. Just remember to really stay focused on the task at hand or you might roll the ebike off the side of the ramp/rack. Bummer deal, fer sure.
You will also want to consider buying this item so that you can have "fold up" capability for the rack : https://www.discountramps.com/hitch..._o8heHbzke61obrfJre8pb_4xoVATQgIaAmtpEALw_wcB .. If you're really feeling adventurous, consider mating one (or more) of these to the motorcycle rack for added stability/piece of mind (also google "motorcycle wheel chock" ):
https://www.bing.com/shop?q=motorcycle+wheel+chock&FORM=SHOPTB
And if you need to haul 2 ebikes, mating two of this carrier should be an easy enough project-- after all, one rack is rated for 400 pounds-- that equals 5+ fat tire ebikes. Ya just have to “think outside the box” a little to make it/them work. Also, if your front fork has lockout capability (full rigid), use it because compressing the forks during transport is extra hard on the internal hydraulics.
Oh yeah: No Cable lock devices.. A thief will cut thru it like it was a strand of pasta. Instead, use one (or more) U-locks to secure your mini Mighty Beast to the carrier rack if you plan stop along the way enroute to wherever. They (U-lock) are not expensive.. The longer the shaft arms, the better..
The End..
Attachments
Last edited:
 I really like your motorcycle rack idea. I currently have a Thule XT2 Pro hitch mount and TBH I prefer something more robust for a 70 lb ebike.