Hi Balsa61.
Waterbottle holder location OPTIONS:
I have already posted this info on the ARIEL RIDER forum. So, I decided to just go ahead and do a “copy&paste” for you most excellent
LECTRIC ebike gangsta posse hooligans.
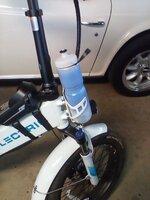
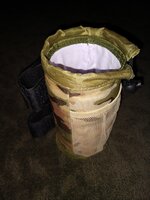
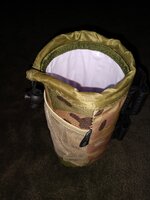
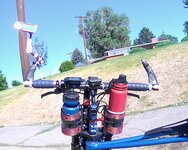
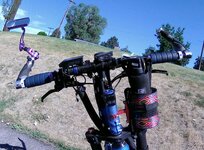
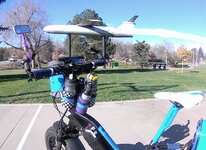
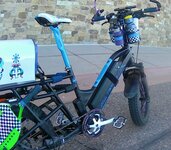
The following post will detail how I have installed “custom” waterbottle holders on 4 of my ebikes. I went ahead and attached photo's at the end of this response. You really need to 1st scroll down to the end of this post to examine the photo's. Things will then make more sense.
My peas o' chit ArielRider(brand) X52(model) ebike beast, with its 20”x4” tires (actually 16”x3” motorcycle tires), uses a
two-water bottle configuration. It is also pictured with the 1 bottle mount configuration.
My brand new 2023 M2S(brand) ScoutCargo(model), with its 20”x4” tires(actually 16”x3” motorcycle tires), uses a
three-waterbottle holder configuration. I decided to mount the triple bottle set-up just so I could show other riders what is possible IF you“think outside the box”.. Too much fun.
[COPY&PASTEitem:]
a).
WaterBottle holder:As you may already know, water bottle holder placement on the frame of any ebike can be quite a challenge, and on these moped-style frames, even more so. I stumbled upon this method of fastening 1 or 2 units to pretty much any ebike.
I had already installed this handlebar height extender
https://www.aliexpress.us/item/3256805362855529.html?
and, as a side benefit, thanks to the multiple shims(2 or more), I was able install 2 of these water bottle holder brackets (1 black and 1 red) in place of 2 of those shims.
https://www.amazon.com/gp/product/B08RBWC43B/ref=ppx_yo_dt_b_asin_title_o09_s00?ie=UTF8&th=1
Upon inspecting my 6 ebikes, every one of them has at least a couple of(spacer) shims under the stem. The aforementioned bottle holder bracket(s) are exactly the same width as those shims. Thus, the bracket will just replace the shim(s), as needed. You only need to verify that the
side location of the bottle holder won't interfere with side-to-side movement (hit the top tube/bar) when you turn the handlebar.
Also, if you use a front-mounted cage-type metal cargo carrier, etc., you will need to factor that item (and its non-turning location) into the equation. Even with that item factored in, it should be easy to at least install one holder unit at the “rear” of the stem. Don't worry, because it will still
not be a factor when you mount/dismount the ebike.
You will see that the skinny little “long bracket” that the actual bottle cage will mount to has 3 screws. The very short one, the one that connects the arm to the skinny stem bracket, has one very disconcerting habit: it will try to “back out”. Due to the location of the bottle cage frame, it won't be able to dislodge itself. It will, however, be “loose” and the cage/bottle will wobble. Enough to drive a person batty. So, you need to use a LocTite-type screw thread liquid (blue) OR glue. Also, get a few small washers and tape them on top of the screw head. They, too, will prevent the screw from trying to back out (it won't have anywhere to go).
Once you have the bracket(s) located in a good position, it is time to screw on/attach the water bottle holder to that long, skinny bracket. Since I already own these water bottle holders (2 for $11-- not bad) they were my logical choice.
https://www.amazon.com/gp/product/B07CZWQYD7/ref=ppx_yo_dt_b_search_asin_title?ie=UTF8&th=1 I did have to drill 2 holes in each bottle mount. The good thing about doing that is I can place the holes “high” or “low” on the mount. My choice.
Also needed is 1 (or 2) of this particular item:
https://www.amazon.com/Progresso-Tr...wder-18-5-Ounce/dp/B00434J53M/ref=sr_1_1_sspa? So, why a can of
PROGRESSO soup? Because its
fatte than normal width(for a soup can) makes it an ideal container in which to
insert a typical size water bottle. And, just for you to use as a reference, I actually use this water bottle (among others) ht
tps://www.amazon.com/gp/product/B093FJW45Q/ref=ppx_yo_dt_b_search_asin_title?ie=UTF8&psc=1 on numerous occasions and it works just fine. Of course, the shorter water bottles work great, too.
There are a few pre-assembly modifications needed to make this set-up work correctly.
Having the empty soup can, with its pop-top lid removed, means that you need to
also use a regular
can opener to remove the thin sharp
rim edge left by the pop-top. Now is also a good time to “personalize” the soup can by removing the original label and applying whatever pattern rocks yer boat. I used contact paper carbon fiber and a 1” strip of multi-color cloth trim. Decorative duct tape is another option.
You might assume that all you need to do now is insert the soup can into the bottle holder, insert the water bottle itself, and you are Good To Go. Not so, young grasshopper. There will be 2 things working against you:
The weight of a full water bottle.. Gravity.
What you now need to do is use a flat blade screwdriver and a hammer to make 2 parallel slits/slots (about 1/4” apart) in the bottom of the soup can (think snake fangs). Now look at the photo of the linked black water bottle holder(s). See how, at the bottom, there is that small “L”? Well, there are also 2 open slots down there. What you need to do is get a ZipTie and run it through the soup can slits and also both of those bottom slots.
Another option is to drill holes in the sides of the soup can. You can now
insert a screwdriver and screw the mounting screws(2) via the inside of the soup can (use some washers, too.).
Either option will prevent the
soup can from being ejected from the holder. However, that, in and of itself ,will only ½ solve the problem.
You will also need to locate a stretchy elastic band-type item (Iactually bought these-- they work great)
https://www.amazon.com/Revlon-Extra-Black-Elastics-Count/dp/B01F8SRBXC/ref=sr_1_32?
This stretchy thing will be inserted along the top edge of the water bottle holder and then wrapped around the
water bottle body/top section nipple as needed to prevent “ejection”.. Works like a champ. EasyBreezy..And there you have it. As a side benefit, you can use the soup can/container to act as a kind of mini-storage compartment. I actually put my keys in one and then set a cut-in-half plastic water bottle on top of the keys to keep them from being ejected..
[end of CUT&PASTE]
And there you have it. See the following photo's..

