Shred Program Changes

AltaShred

Member
I got a Shred earlier this year and have really enjoyed it. Subsequent to getting the Shred, I also got an electric assist road bike. One of the major differences that struck me between the two was the difference in how the assist was implemented. In general terms:

Shred - Each assist level (1-5) would result in power up to a certain speed. EG assist 1 was equal to around 11 MPH depending on battery charge. As you exceeded that speed, the assist would fade away and you would actually slow down to say 9.5 mph before it would pick up and then drop off again at around 11. level 2 would be same thing around 15 mph (15 down to 13 up to 15 etc). If you wanted to go faster you would either have to do all the work or change to a higher assist level.

Road bike - Again 5 levels of assist. The way the OEM describes it is actual % of power/torque with the levels of assist from 100% up to 360%. The assist goes all the way up until you hit the speed limit regardless of the level you are on. There is no sensation of the assist starting and stopping. It makes you feel like you have bigger or smaller muscles depending on the level of assist you choose. for example, if you choose level 1 at 100% and you are putting in 100 watts, the bike will put in 100 watts as well for a total of 200 watts. If the terrain/wind means this well get you 15 MPH, that's what you get, if the terrain changes your speed will as well. Very natural.


After I got the Road bike I became use to its implementation of assist and started looking around to change the Shred. After a lot of reading on different forums regarding programing the controller, I decided to give it a try. The winters make it hard to bike a lot so this will give me a project to work on.

Notice
1) The majority of the information is from various other web sites except for items I mention are derived from my own testing
2) As soon as I changed the OEM programming I have conceded that I have no warranty and assume all risk of burning up the motor or the controller.


The first thing I did was download the original configuration. Below is the first Tab (Basic) and confirms that there are speed limits imposed based on the assist level chosen.


Original Shred Basic.PNG


The next tab is pedal assist. Again this is the original factory setting
There are some behaviors about the original program that I didn't like a lot.
1) When going up a hill, the lower the gear I shifted to the less assistance I got.
2) When I stopped pedaling, the motor continued for a short period

These items are addressed with changes to this tab

Original Shred Pedal Assist.PNG


The next tab is the throttle.
Original Shred Throttle.PNG


The last tab is the Torque. There is a lot going on here and I suspect I will be doing a lot of my testing on these settings.


Original Shred Torque.PNG


That's it for the original settings of the Shred. Next post will be on the settings I have done to Basic page and the Pedal Assist.
 
Last edited:
Great that you can change the settings. The point about PAS "dropping out" till you drop to a certain mph is a really good one for people to know about--it's one reason to test-ride a bike before buying it to check out the riding experience. For folks in hilly areas that "dropping out" makes the bike into a brick and impossible to enjoy riding. But, this is how some bikes are set up. It's great you can change the settings yourself. Pedego had a problematic controller earlier this year that behaved as you describe and they are in the process of replacing them on bikes that had them (for free, upon request). Users can't access/program this on their own. We had one bike with a controller like that and they swapped it out for us.
 
After reviewing the levels of assist (0-9) and reading various forums, the general consensus is the 5 levels of assist offered by the Shred should line up with 1,3,5,7,9 in the software. To allow better testing as well as real time display of power consumption I ordered a color display for the Shred that allowed 9 levels of assist to line up with the software. At least that is what I thought when I ordered it.

Below is the one I ordered and received. Current time, Ride Time and Current Power Consumption are very nice. Battery percent is flaky just like the original power bars were. Unfortunately it only has 5 levels of assist though. So don't order this one.


DPC18 Display.PNG


Subsequent to this I have ordered the below and hopefully it will give me the 9 levels.,


images1Y43XGRV.jpg
 
Continuing with the Programming.
Basic Tab Changes

I have made the following changes to the Basic Tab.
Assist current levels have been spaced out to 30% from 1-7. Assist 8 and 9 are more or less to climb hills. All levels have had the limit speed eliminated by changing it to 100%. In essence, the speed does not effect the amount of assist.

This should allow the bike to react based on the amount of torque being applied to the pedals per the torque tab and level of assist chosen.


BasicTabRev1.PNG


Pedal Assist Tab Changes

Start Current - Reduced to 10%, no need to stress motor on start
Time of Stop - Reduced to 10 ms. This shortens time motor runs on when you stop pedaling
Keep Current - Increased to 70%, helps hold the motor power input steady


Pedal Assist TabRev1.PNG


Torque Tab Changes

In this tab I reduced the start and the full Kg settings through the whole range. My understanding is the Start setting is the force required on the pedal required to get the min current % on the current assist level, and the Full Kg is the force required to get 100% of the current setting of the current assist level. A bit of a mouthful. The reason I reduced this across the board was I didn't get a feeling that the assist changed a lot based on my pedal force compared to how my road bike reacted.

To clarify my understanding of the settings.
If I am in spd range20 and have selected assist level 1 on my screen and I push on the pedal with 27kg of force I will get 100% of 10% of 20 amps assistance or 2 amps


Torque TabRev1.PNG


I took the bike out for a test ride and have the following feedback.

1) Gone are the problems with the bike assist fading away going up a hill as I shift down. The assist is strong and consistent.
2) Gone are the variations in speed based on the assist level selected.
3) The torque settings I put in have a huge impact, especially at the bottom end, very light pedal force was resulting in way too much assistance. Need a lot of refinement in this area.


Next Steps.
In order to get towards an assistance percentage system, I need to refine the torque settings. To do this I need to quantify the amount of power being put in through the pedals. As well, I need to map the sp0 thru sp100 ranges and see what cadence they correspond to. Lastly, I need to see how accurate the force mV settings are to real life. Once this is done I can refine the settings again.
 
Last edited:
Hi YYC,

I ordered the 500C through Amazon with 3 day delivery. As soon as the order was confirmed, it swapped over to delivery by Jan. Bit if a bait and switch by the seller.

I ended up ordering and getting the "New 850C" color display and it works for 9 levels. When the 500C eventually gets here, will post how it works.


Further Testing
Was trying to map the speed levels on the torque screen and ran into a bit of a snag. I made the assumption the speed levels would be coming from the pedal cadence sensor and would be displayed at the bottom on the torque screen. I took the chain off and used my electric drill to spin the pedals. The speedsignalACC increments continually as you pedal and stops when you stop. Should check how much per revolution but think it would be the number of pulses per rev. as defined by pedal type on tab 2. Mine is set for 24 so expect it to increase 24 per rev.

The speed signal level seems to sit at 0 and briefly flashes to one about once per revolution. Unfortunately there doesn't appear to be a display of the speed that would correspond to the speed ranges in the torque table. The only way to determine these different levels will be to set the assistance so it is set to zero except for one speed range. Then do a road test to see what speed it kicks in at. Then perform the test again in a different gear to see if the speed stays the same or if it changes with the change in gear. Expect/hope it changes with the change in gears as this will indicate it is linked to the cadence sensor and not the speed sensor in the motor. Once this is confirmed can roughly calculate the RPM ranges through trial and error.

If anyone has information on the speed ranges of the torque table would appreciate the input.
 
thank you so much for taking the time to write this all up

I am planning to get a surface rook in the next few months and if not happy with the assist being able to do this will be great

excited to know the surface controllers are unlocked
 
Hey Vincent,

I got my wife a rook and was looking at the colt for myself. When I got to the store I liked the look of the Shred better so ended up with it.

One thing I noticed was she seemed to have an easier time going up hills than me. When I downloaded and compared the rook to the shred I noticed the factory keep current on it was set to 70 versus 30 on the shred. As you note above I moved mine up to 70 as well and it made a lot of difference going up hills.
A couple of her other settings that I noticed are:

Time of stop is 25 ms. I noticed when riding her bike it keeps going after you stop pedaling. I will lower this to 10 ms.
Her torque settings seem to be very high across the range at the 100% point Once I determine the effects etc on mine, I will likely modify hers so it is more like mine.

Good luck with the bike when you get it. I know we have a lot of fun riding ours.
 
Thanks for this info, good chance I will end up modifying mine also

I am waiting for the 2019 to come out hoping the battery will be a little bigger

But the ability to adjust the controller is huge and makes me even more likely to buy this bike
 
Vincent,

The rook/colt have a larger capacity battery "holder" than the Shred. There are a couple places where you can get larger batteries that will work for them. Message me and I will send you a link if you want.
But.
As the guy that sold me my bike said when I told him I wanted to buy a spare battery. "Wait until you have tried it a few rides to see if you need the extra capacity/spare".

We don't use a lot of assist and we are not speed demons. Mostly to flatten hills, kill headwind and help us old folks along a bit. We have never used more than about 3/4 of a battery. Our rides are typically 20-30 miles. When I ride my road bike with my work partner, we will do up to 50 miles. Same size battery, a lot faster riding and still I only use about 60% of the battery.

Your milage may vary (pun intended) depending on your expectations.

When do the 2019s come out?
 
Excellent news on the efficiency of the battery, since I’m not in a hurry and was under the impression the 2019‘s will be announced in January figure I will just wait, if they don’t change much maybe I’ll get a 2018 on clearance ....

Have some bikes I need to sell and will just wait a few more weeks to see what happens

I am really excited that the controller is unlocked, would not mind turning down the assist just a little bit on the rook but 2019 might be a little different, we will see

Wish they would put a little bit bigger tire rim on them, want to go as wide in tires as I can and the rim looks skinny...

That’s another thing I’m hoping they might changed a little for 2019 probably not
 
AltaShred any luck with "plug and playing" the 500C?
Got the 500C and it plugs in and powers up just fine. 9 levels of assist.
I now have two displays that provide 9 levels. Will try them both into the summer and decide which one I like best. The other color one that only has 5 levels will go on my wifes bike. (rook/colt).
 
Programming Changes - Torque Calibration.

The next step in confirming/modifying the settings on my Shred controller is the kg / mv table in the upper section of the torque tab.

I had noticed previously that my base voltage was set to 0 on the original settings and during testing, I have always shown 752 mv with no force on the pedals. I am making the assumption the zero setting refers to no torque mv and have set mine to 750 mv

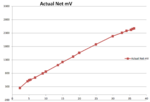
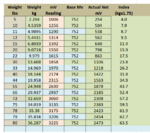
The next step was to map the mv reading against know force on the pedal. I set up to do the load testing up to 60 kg (approx. 130 lbs).
Think 5 gallon pail hanging from pedal and barbells in the pail.
Results are below

PedalForceCurve.PNGPedalForceTest.PNG
There are a couple of points to note.

1) The curve is relatively linear
2) The max reading I could get our of the torque sensor was 3225 and this corresponded to 80 lbs of force on the pedal. I went all the way up to 110 lbs and the torque didn't change.

ForceSettingsController.PNG

Its unfortunate that the force on the pedal and torque readings limit out at approx. 35 kg when the force table goes up to 60kg.
To work around this and maintain the max resolution I indexed the weight by 1.75 to come up with a span to match the table. This is shown in the last column of the first table and this is what I used to calculate the delta voltages in the lower table.
 
Programming Changes - Torque Table

Subsequent to the above, I put together a table to calculate the force on the pedals by a human to achieve 200 watts at various RPM.

ForceKWCalc.PNG

Notes on table
1 - Speed Zone is number on top of torque table, I am assuming this is pedal cadence. Will have to confirm when roads clear.
2 - RPM for calc is the cadence I have used to calculate the watts
3 - force on pedals is required kg by human on pedals to achieve 200 watts at the specified RPM. Takes into account the length of the cranks. This number would be a bit optimistic as it would only apply when the pedal is in the horizontal.
4 - Scaled to range of controller is adjusting the force numbers to match the highest range of torque listed on the table in previous post for the lowest rpm range.

In essence the only purpose this serves is to establish a reasonable setting for the force on the pedal to get 100% assistance at the various RPMs. Per the previous post, the force/mv table is linear but not accurate so there are some compromises. Below is the revised torque table settings in the controller (Rev9)

Torque Table Jan6th.PNG

If you look at the "Full(kg)" settings across the table you can see they are approx. the same as the scaled to controller line in the first table.

Another item I changed is to set the keep current to 0% across the board. The controller would keep power on when pedaling with no force after it had engaged. This didn't make sense and setting the keep to 0% stopped this behavior.

The next step will be to get the bike out for a test ride and:
1) Confirm the RPM in the torque table is for the pedal and not the rear wheel
2) Map the pedal RPM to the various levels
3) Adjust the torque table to the new RPM's if they have changed
4) Fine tune the assistance table as required.
 
Hey YYC,

Will try to get out this weekend for a test ride or at the very least map the speed ranges in the torque table. The roads at my end of town are almost clear, not sure about the bike paths in the valley though.
 
Back