Reformvette
Active Member
Thanks for posting this information about the seat.View attachment 44047
Of the dozen or so I've tried, it's the most comfortable split seat I've used.
Thanks for posting this information about the seat.View attachment 44047
Of the dozen or so I've tried, it's the most comfortable split seat I've used.


Nice !!Finished plug, version 1.0, wired and ready to ride (when it warms up and the ice melts...)


Oh Sure.... You had to go and brag about your roads and now their saying we got a big snow dumping coming over night. Look What You Did!! You offended the Weather Gods! Everyone knows that if you want to make it rain, just go out and wash your car.What? Why wait? Roads in Winona have been clear for a couple of weeks!")
Somewhere I had read that the battery on the XP is current limited (by the battery or maybe the controller) at 18 amps. On a full throttle acceleration run in our basement garage I glanced at the display and it was at 18mph and 20amps (I ran out of space) so your confirming what I thought I saw. Thanks for the "Heads Up" on the fuse, I will order up some 25 or 30 ampers.About the only thing I'd question is your selection of a 20A fuse. I've seen 20A draws on my bike when pushing max speeds or going hard up hills, so I'm wondering if your fuse will pop pretty routinely.
I can't wait for the snow! I'll be testing out a studded tire bike all week! WOOHOO!!!!Oh Sure.... You had to go and brag about your roads and now their saying we got a big snow dumping coming over night. Look What You Did!! You offended the Weather Gods! Everyone knows that if you want to make it rain, just go out and wash your car.
17 degrees here in Kansas this morning, and dropping! No riding for a while...
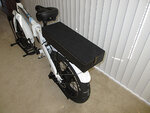
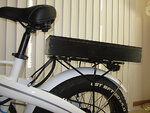
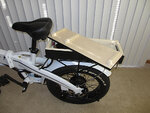
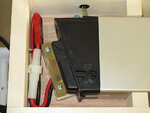
George, great woodworking skills! Nifty battery installation - very robust. Thanks for the photos and detailed description. Very useful for folks who have acquired a spare battery.
My woodworking skills aren't at the level needed to have built mine out of wood, but it looks like you've come up with a winner. About the only thing I'd question is your selection of a 20A fuse. I've seen 20A draws on my bike when pushing max speeds or going hard up hills, so I'm wondering if your fuse will pop pretty routinely. I think I'd run at least 30A fuses, or perhaps 40A. If there's a wiring fault even a 100A fuse would likely pop, but you wouldn't want it popping during normal riding. (Else carry a bunch of spares when you ride!)
I definitely like the idea of having both battery leads in parallel so you can use either battery. Since my two batteries aren't keyed alike, I have the two keys on a single key ring so that only one battery can be turned on at a time. (Lectric's neat feature that prevents the key from being removed unless the battery is turned off was a good idea, IMHO.)
We had a "heat wave" here last week where temps got up into the low 50's - I got a couple short rides in. But now back to hibernating -- I'm sure getting anxious for spring to arrive!
Bud


 bit.ly
Interesting. I'll be looking forward to reading more about it once it gets out in daily use.I have started a product that does just that.
Allows you to use 2 or 3 batteries in parallel, regardless of nominal voltage or state of charge.
It is an IDEAL DIODE with just a constant 0.028V SAG.
Interesting. I'll be looking forward to reading more about it once it gets out in daily use.
GeorgeXP


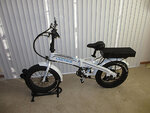
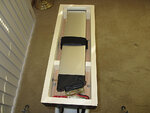
I'm in a situation where I live in a apartment style building with a secure place in our underground garage to park my XP but no power available to charge it. Folding the bike every time (multiple per week) to remove the battery for charging is not going to hack it. I'm making plans to relocate the battery to a slide-in box (home made) mounted on the rear rack.
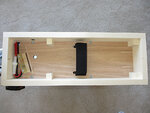
First option is I can remove the OEM male battery connector that is mounted inside the frame and extend it out to the rack. Second option is to splice into the wiring behind the OEM male connector either by direct soldered connect or via "Y" splitter and extend out to a new male connector. Third is to make a extension cord that has the same male/female connectors that the bike/battery use leaving the OEM male connector in place in the frame. I'm leaning towards the second option because with this I could still easily use the internal frame location if I felt the need to without having to change/remove anything.
Option 1 uses the OEM male connector so just the wiring is all I need, the other two require finding the connectors. I have spent a bit of time searching for these connectors our batteries have and have come up dry. I do see some of the Belicore batteries on aliexpress come with the male connector, but I can't find anyplace that just sells the connector. I can probably kludge up my own male connector but I would much rather buy one.
So, if any of you out there find a source for these connectors, or at least the male connector (bike wiring side) please post it.
tnx
George
Hey Bud, if you can attach a picture, I would like to see your set up...Not sure that George is actually using two batteries, but rather just relocated the battery for ease of removing it for charging...
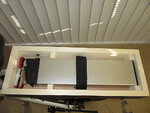
I am using two batteries however, and have wired them in parallel. Using the batteries' internal switches, I can run off either battery or both simultaneously. With about 600 miles running on on both batteries now I prefer the simultaneous parallel operation over the single, sequential as it's easier on them as in parallel the maximum current drain is only 10 amps per battery (approximately...give or take each battery' s internal resistance). On a long ride I might use them sequentially so as to insure I have adequate power to get home ;-)
Bud
