Relocating Battery to Rear Rack

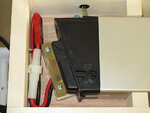
Finished plug, version 1.0, wired and ready to ride (when it warms up and the ice melts...)
Bud 44204
 
Finished plug, version 1.0, wired and ready to ride (when it warms up and the ice melts...)
Nice !! 👍👍

Because I am planning to put my battery in a wooden box (not a slide in) that the connector will be permently mounted in, I decided to run my wires out the bottom. Running both my wires out the side of the connector as was my Plan-A would make drilling the mounting holes I need a little too close to the wires. Running out the back as you did or out the bottom would give me plenty of room on the outside of each pin to drill 3/16" (or there-abouts) holes to use long screws to lock it in place to the bottom of the box. Going out the bottom would give me a little more room on the back side for the in-line fuse I want to add.

George
 
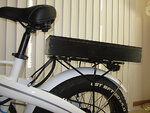
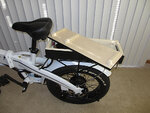
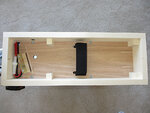
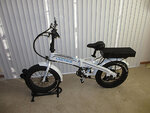
It’s been a while, but I finally got my rear mounted battery box completed. No longer having access to getting a metal box bent up I had to make it out of wood. Keep in mind that wood working is not my expertise. I usually use the “Measure 3 times, Cut 3 times,…. and it’s STILL Too Short!!” construction technique. Actually, I’m pretty good at mechanically building things, it’s just when it comes to the “Fit & Finish” (store bought look) I have a problem.

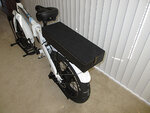
The box is 19-7/8” x 7-1/4” x 3-1/4”. The length was determined by how much room I needed inside for the battery/fuse, width was to keep it the same as the bike’s rack so I could still use it as a rack, and the height was because 2-1/2” pre-cut wood was the closest I could find (I no longer have a table saw for ripping). I used four 1/2” cushion clamps (as was used by 6zfshdb above) to mount the box to the rack. I glued a cut of a rubber door mat to the lid to assist in holding cargo.

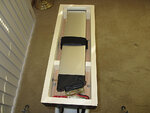
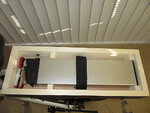
On the inside I glued in spacers to keep the battery centered side-to-side, runners to support it 1/8” high, a mount and guide for the connector, and two slots for a Velcro 2-sided strap. The battery is inserted to the rear first then lowered down on to the connector and moved slightly ahead where it drops into the mount/guide part. The two wood screws holding the connector in place were snugged down then backed out 1/2 turn to allow the connector a little wiggle room to position itself when mating. The Velcro strap runs under the bike rack. So now the battery is secured in the box front-to-back, side-to-side, and due to the Velcro strap it is secured directly to the bike rack so it should never bounce out. The lid has guides to keep it in position. It is put on about a half inch from the front first, then the rear is lowered while the lid is slid forward to lock into a 1/4” holding pin. The rear is secured with a hasp with hook.

The battery connector is made from 90 minuet epoxy as was done by Solarman above. It is connected to a in-line fuse holder which will have a 125vdc @ 20Amp Fast Blow ceramic fuse, out to Anderson PowerPole connectors, and down to the back-to-back Deans connectors between the frame OEM battery connector and the controller. This way the battery could be still used inside the frame if need be. My reason for using the APP’s was so I could simply pop the pins out of the shells and pull the complete down harness out of the box and frame without cutting the wires. The wires from the OEM connector complete to my battery connector pins are 12awg super flex silicone, and a little under 3 feet in length. The wire from the frame to the box is enclosed in Splitflex Wire Tubing.

So that’s about it folks. Now just to wait for the Minnesota winter to be over!

George
 

Attachments

  • Lectric XP_1.jpg
    Lectric XP_1.jpg
    206.1 KB · Views: 482
  • Lectric XP_2.jpg
    Lectric XP_2.jpg
    199.6 KB · Views: 494
  • Lectric XP_3.jpg
    Lectric XP_3.jpg
    193.7 KB · Views: 495
  • Lectric XP_4.jpg
    Lectric XP_4.jpg
    197.7 KB · Views: 481
  • Lectric XP_5.jpg
    Lectric XP_5.jpg
    188.2 KB · Views: 459
  • Lectric XP_6.jpg
    Lectric XP_6.jpg
    168.1 KB · Views: 465
  • Lectric XP_7.jpg
    Lectric XP_7.jpg
    175 KB · Views: 459
  • Lectric XP_7a.jpg
    Lectric XP_7a.jpg
    209.8 KB · Views: 494
Last edited:
What? Why wait? Roads in Winona have been clear for a couple of weeks! :)
 
17 degrees here in Kansas this morning, and dropping! No riding for a while...

George, great woodworking skills! Nifty battery installation - very robust. Thanks for the photos and detailed description. Very useful for folks who have acquired a spare battery.

My woodworking skills aren't at the level needed to have built mine out of wood, but it looks like you've come up with a winner. About the only thing I'd question is your selection of a 20A fuse. I've seen 20A draws on my bike when pushing max speeds or going hard up hills, so I'm wondering if your fuse will pop pretty routinely. I think I'd run at least 30A fuses, or perhaps 40A. If there's a wiring fault even a 100A fuse would likely pop, but you wouldn't want it popping during normal riding. (Else carry a bunch of spares when you ride!)

I definitely like the idea of having both battery leads in parallel so you can use either battery. Since my two batteries aren't keyed alike, I have the two keys on a single key ring so that only one battery can be turned on at a time. (Lectric's neat feature that prevents the key from being removed unless the battery is turned off was a good idea, IMHO.)

We had a "heat wave" here last week where temps got up into the low 50's - I got a couple short rides in. But now back to hibernating -- I'm sure getting anxious for spring to arrive!

Bud
 
What? Why wait? Roads in Winona have been clear for a couple of weeks! :)
Oh Sure.... You had to go and brag about your roads and now their saying we got a big snow dumping coming over night. Look What You Did!! You offended the Weather Gods! Everyone knows that if you want to make it rain, just go out and wash your car.

About the only thing I'd question is your selection of a 20A fuse. I've seen 20A draws on my bike when pushing max speeds or going hard up hills, so I'm wondering if your fuse will pop pretty routinely.
Somewhere I had read that the battery on the XP is current limited (by the battery or maybe the controller) at 18 amps. On a full throttle acceleration run in our basement garage I glanced at the display and it was at 18mph and 20amps (I ran out of space) so your confirming what I thought I saw. Thanks for the "Heads Up" on the fuse, I will order up some 25 or 30 ampers.

Speaking of fusing, in case anyone is wondering why I went with the 125vdc 1-1/4" x 1" inline fuses, it was because of the ~54v supply voltage. The regular glass fuses and the auto style plug-in fuses have a 35v max rating. Amps is Amps so they both will blow at the same point but the question is what will happen When it blows. It's claimed that the higher voltage can cause a arcing that could blow the glass or actually form a shorting bridge in the plug-ins. Is ~54v enough to cause this, I don't know. I personally have never seen this happen to me but it does make sense so I opted to pay a tad more for the 250vas/125vdc ceramic fuses. After all, the reason for the fusing it to provide a external protection for the system.

George
 
Oh Sure.... You had to go and brag about your roads and now their saying we got a big snow dumping coming over night. Look What You Did!! You offended the Weather Gods! Everyone knows that if you want to make it rain, just go out and wash your car.
I can't wait for the snow! I'll be testing out a studded tire bike all week! WOOHOO!!!!
 
17 degrees here in Kansas this morning, and dropping! No riding for a while...

George, great woodworking skills! Nifty battery installation - very robust. Thanks for the photos and detailed description. Very useful for folks who have acquired a spare battery.

My woodworking skills aren't at the level needed to have built mine out of wood, but it looks like you've come up with a winner. About the only thing I'd question is your selection of a 20A fuse. I've seen 20A draws on my bike when pushing max speeds or going hard up hills, so I'm wondering if your fuse will pop pretty routinely. I think I'd run at least 30A fuses, or perhaps 40A. If there's a wiring fault even a 100A fuse would likely pop, but you wouldn't want it popping during normal riding. (Else carry a bunch of spares when you ride!)

I definitely like the idea of having both battery leads in parallel so you can use either battery. Since my two batteries aren't keyed alike, I have the two keys on a single key ring so that only one battery can be turned on at a time. (Lectric's neat feature that prevents the key from being removed unless the battery is turned off was a good idea, IMHO.)

We had a "heat wave" here last week where temps got up into the low 50's - I got a couple short rides in. But now back to hibernating -- I'm sure getting anxious for spring to arrive!

Bud

I have started a product that does just that.
Allows you to use 2 or 3 batteries in parallel, regardless of nominal voltage or state of charge.
It is an IDEAL DIODE with just a constant 0.028V SAG.

Let does batteries DATE each other and give you more power, range and lifecycles! 🙏

 
I have started a product that does just that.
Allows you to use 2 or 3 batteries in parallel, regardless of nominal voltage or state of charge.
It is an IDEAL DIODE with just a constant 0.028V SAG.
Interesting. I'll be looking forward to reading more about it once it gets out in daily use.

GeorgeXP
 
Interesting. I'll be looking forward to reading more about it once it gets out in daily use.

GeorgeXP

Cool. I am already testing the first prototype on my bike on a daily basis since December last year and it works amazing.
We are testing each DATE X2 at 30A+30A and 60A on one port.
I can't wait for my other bigger battery order to show up in coming weeks so we can increase the power source for testing.

However, the T-plugs are rated for 60A.
Probably if we would be switching to XT90-S we can push it to 90A but the form factor will be bigger as the plugs are more than double in size.

We prefer to do our test workbench setup as we can literally extend it or shrink it to any needed testing conditions.

456384563745636

In these photos we are testing the temperature of one battery at 28A for 16 min, as we first need to make sure our batteries can withstand the job in a good fashion.

DATE X2 tests will be ready soon.

Each item will be tested, to make sure it keeps cool and runs smoothly, at least for 1 hour in the above 30A+30A and 60A and test results will be shared with you. 👌
 
I'm in a situation where I live in a apartment style building with a secure place in our underground garage to park my XP but no power available to charge it. Folding the bike every time (multiple per week) to remove the battery for charging is not going to hack it. I'm making plans to relocate the battery to a slide-in box (home made) mounted on the rear rack.

First option is I can remove the OEM male battery connector that is mounted inside the frame and extend it out to the rack. Second option is to splice into the wiring behind the OEM male connector either by direct soldered connect or via "Y" splitter and extend out to a new male connector. Third is to make a extension cord that has the same male/female connectors that the bike/battery use leaving the OEM male connector in place in the frame. I'm leaning towards the second option because with this I could still easily use the internal frame location if I felt the need to without having to change/remove anything.

Option 1 uses the OEM male connector so just the wiring is all I need, the other two require finding the connectors. I have spent a bit of time searching for these connectors our batteries have and have come up dry. I do see some of the Belicore batteries on aliexpress come with the male connector, but I can't find anyplace that just sells the connector. I can probably kludge up my own male connector but I would much rather buy one.

So, if any of you out there find a source for these connectors, or at least the male connector (bike wiring side) please post it.

tnx
George

Hi George

Just curious that now after completing your box on the back rack (looks very nice by the way) are you able to run with 2 batteries installed and switch over to 1 when the other craps out?
 
Not sure that George is actually using two batteries, but rather just relocated the battery for ease of removing it for charging...

I am using two batteries however, and have wired them in parallel. Using the batteries' internal switches, I can run off either battery or both simultaneously. With about 600 miles running on on both batteries now I prefer the simultaneous parallel operation over the single, sequential as it's easier on them as in parallel the maximum current drain is only 10 amps per battery (approximately...give or take each battery' s internal resistance). On a long ride I might use them sequentially so as to insure I have adequate power to get home ;-)

Bud
Hey Bud, if you can attach a picture, I would like to see your set up...
 
Scroll back to page 1 of this thread... I posted pictures of the battery box I made. There's also a shot of the connector I fabricated near the top of p.2.
 
Back