penserv
Member
- Region
- Canada
- City
- Calgary, AB
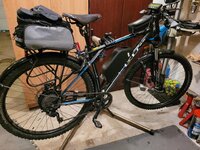
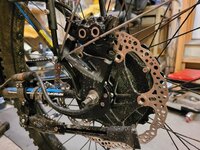
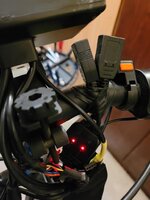
This Ebike has been my COVID-19 mental health project and it proves that I am now certifiable, but who cares, it's almost done. I've been following Linklemming's build and I didn't go for a custom frame. I had traded an indoor trainer to my son in law for a Specialized Curve bike and then found that the triangle in the frame was too small to fit the battery into. So, just before Christmas, I bought a used mountain bike. In Calgary, in December, the pickings are rather slim, so the bike I got was a GT Karakorum. It's a reasonable aluminum frame and it met my 2 criteria - large size and big enough triangle to fit the battery onto the lower tube. I discarded everything else on the frame except the handlebars and the front fork. It's a Suntour suspension fork and it's not great quality but the bike head is not tapered. It's just a straight 1 1/8" tube and the RockShox fork from the Specialized bike wouldn't fit. That's about the only component I might upgrade at this point. The bike is a bit dirty because i was able to ride it a couple of days ago and it was really wet with all the melting snow. I had to go with a 220 mm brake rotor on the rear wheel to get clearance between the edge of the GMAC hub motor and the caliper of the hydraulic brake. I also went to Magura MT5 brakes which are about 2 mm thinner than Hope brakes. I actually wanted MT7 brakes, but the LBS only had MT5 and even ChainReactionCycle was backordered till spring. Riding this thing is awesome. I averaged 27 km/hr on a long uphill climb of about 2 km from the bottom of the Bow Valley to the top of the ridge. I still have to fine tune the PAS sensor, because right now the power cuts in at max. I've got the Baserunner controller, which is incorporated into the battery cradle and just makes the battery look bigger (52V, 20 AH). The Baserunner is just as configurable as the Phaserunner, so I have the electronic freewheeling set up on 1.5 amps I also found a nice USB adapter so I can charge my cell phone or Garmin on longer rides. This is the same adapter that Grin sells (they're out of stock till spring). I got this one from Golden Motor. I also added the SPL-01 headlight from Grin (again, out of stock). I got that one at Hilleater. Wonderful headlight. May never need it, but you never know, one evening at the golf course, after a few pints, it might be nice to have a good headlight. This hasn't been a cheap project. I haven't tabulated everything the way Linklemming did, but I figure I have about $4K Cdn in this build. That's equivalent to the $3K US Linklemming had. But everything is quality components and built the way I want it. I've got a handlebar bottle holder and bell coming this week and if I have to, I'll put the handlebar extender back on for all the accessories. Another cool thing I put on this bike is the N-Lock head piece. You have to ride with the key in, but when you lock it, the handlebars move independently of the front fork.