Manual brake sticking

Dewey

Well-Known Member
Region
USA
City
Arlington, Virginia
The front Tektro Aries manual brake on my RadExpand stopped working at the top of a hill, thankfully the motor inhibitor & rear brake was enough to bring me to a stop before I over-ran into the intersection at the bottom. The bike is 4 months old and I've put about 400 miles on the odo. I had earlier adjusted the caliper bolt to tighten the cable as it began to stretch, but now I wonder if the pads wore out (this is my first bike with disk brakes). I am unsure if the clicking sound is a problem with the brake cable sticking in the housing. After chatting with Rad I'm going to take it in to the shop I bought it from for repair as they're a Rad-authorized dealer so can work with them to authorize any warranty claim for parts & labor. Hopefully it will be a simple fix, while I wait I'm riding around on a lightweight Zizzo Liberte folding pedal bike.
 
Last edited:
Best luck with the warranty work.
I have Tektro cable calipers with about 12000 miles on them. I have had no trouble with failing to close. If cable clamp is not tightened properly, the cable can come loose.
Brake pads, the gap should be about 1/64" with the brake handle released. I tighten my caliper about every 1000 miles. You use a 5 mm ball end allen wrench from the opposite side of the caliper. Clockwise is tighten.
 
I may have had only 400 miles on my Radrunner when the back brake failed. I think it had Tektro Aries, too. In my experience, what they call cable stretch doesn't affect front brake because the front cable doesn't flex when the handlebars are turned. If you had to adjust the cable within 400 miles, it sounds like you had significant pad wear. Your front brake may have failed for the same reason my back brake failed: a caliper misaligned at the factory.

I had left the calipers alone because I didn't understand Radpower's adjustment instructions. When I removed the pads, I found that they were fairly thick at one end but worn down to the backing at the other. In other words, the caliper was misaligned.

The solution was pretty simple. Buy new pads for an Aries. Make sure that the cable adjustment is loose enough for the lever on the caliper to open to the stop. Unbolt the caliper and replace the pads. If the new pads won't fit around the disc, use a 5mm Allen to loosen the big screw head on the inboard side of the caliper.

Snug the mounting bolts, then back them off a quarter turn or so, to let the caliper move. Reach through the spokes with a 5mm Allen bit to tighten the adjustment screw until the wheel won't turn. Then back off a couple of clicks, until the wheel turns freely. Now apply the brake by lashing the lever to the handlebar. If the lever goes all the way to the handlebar, you need to tighten the cable. With the brake lever applied, tighten the mounting bolts. Untie the lever to be sure the wheel turns freely,
 
Last edited:
Thank you for the detailed procedure @spokewrench mine is going into the shop today so I’ll see how it goes.

Edit: Also might be because I regularly bend the front brake cable when I fold the handlebar on my RadExpand
 
Last edited:
Under warranty I understand wanting to have the shop check it out.
But going forward this is something that you should learn to address as most maintenance will take less than 15 minutes and is much easier and faster than dealing with a bike shop.
 
Phew it was the whole shebang, my adjusting the brake wire had the effect of making the caliper stick on closing and ruined the caliper, front brake pads shot, brake cable and housing needed to be replaced. Rad said wear and tear so not covered under warranty, but the shop discounted parts and labor so $100 to repair. Given the excessive wear (they also recommended rear pads be replaced) I expect moving forward I should replace the brake pads every 3 months.
 
That's a shame. I've bought front and rear pads twice at Amazon, and they were $10. A Tektro Aries caliper is $22. A set of brake cables and housings was $9. Lacking cutters for hard steel, I used a cutoff wheel on an angle grinder to cut housings and cables to fit, and a reamer in the cut housing ends so the cable would slide smoothly.

Normally, one doesn't need to loosen the clamp at the end of a brake cable. I first loosened mine after 17 months, to replace the cable because the housing had come from the factory defective. If I hadn't looked at the other caliper, I might not have gotten the new inner cable properly installed on the caliper.

The metal part of a cable housing is a spring coiled around the inner cable. It flexes by opening little spaces between the turns of the coil. In time it will stretch like a screen-door spring that no longer retracts tightly. The first symptom is a spongy brake lever because you have to compress the spaces in the housing before you can put a strong pull on the caliper. The second symptom is wear and maybe glazing on the brake pads due to dragging.

Suppose the inner cable is 155cm long, and the new housing was 150cm. That would leave 5cm of inner cable to extend from the end of the housing to the lever on the caliper. If the housing stretches to 151 cm, the inner cable will extend only 4 cm, meaning it's pulling the lever on the caliper 1 cm toward the end of the housing. As the stretched housing lets the lever open less and less, the brake will drag.

On two bikes with mechanical brakes, I found a way to reverse stretching. I'd sometimes try the brakes separately to see if both worked well. I'd also notice if either felt spongy. If one did, I'd lash the lever to the handlebar overnight. That kept the housing in compression. In the morning it wouldn't feel so spongy. My brakes performed better, and the pads lasted longer.
 
Last edited:
Phew it was the whole shebang, my adjusting the brake wire had the effect of making the caliper stick on closing and ruined the caliper, front brake pads shot, brake cable and housing needed to be replaced. Rad said wear and tear so not covered under warranty, but the shop discounted parts and labor so $100 to repair. Given the excessive wear (they also recommended rear pads be replaced) I expect moving forward I should replace the brake pads every 3 months.
I'd be a little skeptical of that prognosis. If you had adjusted the cable that tight you would have immediately noticed that the wheel didn't turn freely. Additionally I don't know how that would ruin the housing.. Especially if the wheel was still turning freely.
I'll repeat.. Learn how to yourself as this is far from rocket science and minor adjustments are required somewhat frequently on a cable system.
The first time I dared undo the clamp on the inner cable, it was to replace the cable. I should have taken photos first. Reinstalling the wire was confusing. If I'd routed it wrong, I imagine pulling the brake lever could have put misaligned forces on the caliper lever.

Hoisting a bike a couple of feet makes work on a caliper more comfortable for me, and I can see better. The wheels turn freely, so I can be sure there's no drag.
 
My preferred assistant to work on my bike.
Straps are much easier and more versatile than hooks alone.
71L161wCoBL._AC_SX679_.jpg
 
I think the bike shop's price for new brake caliper, cable, and sheath is a little steep, but fair. They got high overhead to cover that we break-it-yourself home mechanics don't incur.
 
My preferred assistant to work on my bike.
Straps are much easier and more versatile than hooks alone.
I've been using ropes with 650-pound eye bolts. There's more friction than using pulleys, but that's okay. I lift and secure one end at a time, so I can lift with one hand and pull the rope with the other. Rope friction becomes an asset, making it easy to keep the bike from falling.

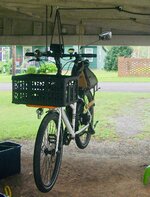
Until a couple of days ago, I was using one eye bolt for each end. One photo shows a bike suspended that way. It's a good setup for adjusting a derailleur with a laser lavel. With the bars suspended that way, the rope will slide to equalize when I move the bars to plumb the bike. Then rope friction will keep it plumb, ready for me to shine a vertical laser beam on the derailleur from behind. Evan a little swinging interferes with a task like that, but it wasn't bad. I guess rope friction dampened the oscillations.

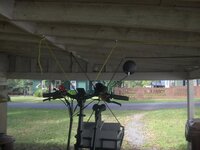
Swinging hadn't been a problem so far, but another photo shows how I used two eye bolts on each end to experiment with stiffening it against swinging. The V of the yellow rope prevents the stem from moving laterally, but maybe the bike could swing below the stem. The rear carrier is suspended by the brown rope in an X threading, which stiffens the bike against swinging independently of the rope.

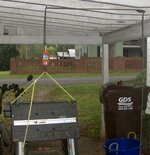
Two hassles were running a long rope through the path I needed, and tying off the end, which could be pretty long. Today I installed cleats. I pile the rope below the cleat, take the end up and over the cleat, run it through the first eye bolt, and thread it where I need it with no excess rope in my way. To tie off after lifting, one hand can make a foolproof knot around a horn of the cleat, with the bight of the rope.

I like to use a portable work table for bike repairs. It's at a good height and has pockets to keep small parts from being knocked off. It occurred to me that this could be used to keep a suspended bike from swinging: push the table against the bike, or lash the bike to it. With the leaves folded down, it's a saw horse. Here I am weighing it. 23.8 pounds. That should keep a bike from swinging.
 

Attachments

  • suspend single.jpeg
    suspend single.jpeg
    454 KB · Views: 14
  • suspend dual.jpeg
    suspend dual.jpeg
    403.8 KB · Views: 16
  • suspend cleat.jpeg
    suspend cleat.jpeg
    128.6 KB · Views: 14
  • suspend table.jpeg
    suspend table.jpeg
    362.9 KB · Views: 19
Last edited:
I'm all for DIY and simplicity... but the fact that the setup I use comes with straps that won't harm the finish and lends itself to multiple easy attachment points makes it well worth the $20. The pulley is also easier on me.
I roped mine with a single rope that lifts both sides at the same time but it's actually designed to be used with 2 ropes to lift individually or simultaneously.
I just purchased a second one this week as I have two bikes I want to work on at the same time and I'm making things as easy as possible for myself.
ymmv
 
Back