Known Issues & Problems with Qualisports Products + Help, Solutions & Fixes

Admin

Administrator
Staff member
No ebike is perfect, this is a thread dedicated to sharing known issues or problems with electric bikes from Qualisports as well as any help and solutions you know of. Sometimes that means a DIY fix and other times it can mean a recall, software update or part replacement by a dealer.

Please be respectful and constructive with feedback, this is not a space for hate speech. In many cases, representatives from the company will see feedback and use it to improve their product. In the end, the goal is to enjoy riding and help each other go further and be safer.
 
I’ve been riding the Qualisports Volador since April. As of today, I’ve put 1010 miles on the bike. It’s a bit of a quirky ride, and I love it. However, a couple weeks of riding lead me to replacing the saddle with something more comfortable. A couple months back the very basic plastic pedals were replaced with a nice set of aluminum folding pedals. On the same day, one pedal became loose and the other stiffened.

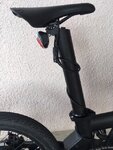
The seatpost battery is elegant and unique, but does not lock in place. I picked up a small, locking chain as I wanted to be able to lock the seatpost battery to the frame. A motivated thief could thwart that deterrence, but it gives me a measure of peace when away from the bike, while parked in friendly areas of town.

The breaks are squeely, but they grab quite well. I can readily get 20 miles on a charge, when using mainly pedal assist 1 or 2, with very occasional throttle use and higher assist levels.
 
I have 2 Dolphins. I bought on-line. If you can, I would suggest buying from a local dealer. Shipping boxes were not in good shape. Both had the racks unsecured in the boxes causing slight scratches in the bike coating. During the shipping / delivery I imagine they were not careful. I received no notice that they were shipped and these were left on my front porch for at least 4 hours. I have had no assistance is asking for touchup paint or any recourse on the bike needing adjusting right away and am hopeful I may get some help on these 2 items. This is a problem when buying on-line without a dealer in San Diego. I am sure Qualisports will continue their product and quality improvement as these bikes become more popular.

1st bike. Had an issue with the front rack. One out of three holes in the rack do not match up to the holes on the bike for attaching. One hole in the rack will need to be elongated about 1/16 of an inch to be able to use the third bolt. Brakes were good but needed to be adjusted and the gears need to be adjusted since there is a clacking sound. There were 4 washers short that I had to use from the second bike to attach the fenders. I used Bolton Bikes review to look and see how to install the fenders. Thank you Kyle.

2nd Bike. Upon unpacking the chain was lying on the ground. It was so kinked up I decided to remove the rear tire to unkink it and put the chain back on. You will need a 18mm wrench which I did not have so I borrowed one for now. Brakes and gears will need to be adjusted but not immediately. Any good bike shop can handle it. This is not a big deal and if I would have bought these bikes at a shop and I am sure all would have been taken care of already. Needed to buy more washers since I used these for the other bike.

Overall, I lived through the experience (haha). At the time I was bummed since this is a lot of money and I had to watch some videos to understand what to look for and what steps to take but everything has worked out for now.

Qualisports should have included at least a diagram of how the fenders are attached and perhaps a parts list for the fenders. That would have been nice.

I am 63 and weigh 236 and am 6' tall and have no problem going up a small hill with pedal assist. Even tried steeper hills and still no problem with pedal assist in 7th gear at level 3 assist. Using only the throttle will get you part way up a big hill, all the way up on a small hill and on level ground it is awesome to ride around at 19+ mph. These bikes do seem to be built very well and I think Kyle's review from Bolton Bikes made the difference for me to purchase and take a chance and buy online.

For help in attaching the fenders; tape the nutplates to the inside of the fender (much easier to deal with), attach 1 small bolt into the black top plate to the inside nutplate and then use a taller bolt with many washers and attach to the inside nutplate to bend the metal slightly into the contour of the fender. Let sit for a few minutes for the metal to take shape and remove the taller bolt and now you can easily use the small correct bolt for attaching the fender brace to the fender. In the future the black top piece could be already slightly contoured to help with the assembly.

Hope this helps and I plan on enjoying these bikes in our RV travels as well as the beaches on the west coast. Alaska is our next big trip.

Both bikes fit into the back of a 1996 Jeep Cherokee. These should be safer inside and away from the elements.

I want to say thank you to Kyle and Jessica at Bolton Bikes and to Alex and Daniel at Qualisports for their help.

Mark
 
I ordered a Dolphin and received it last Friday. Unfortunately winter has come early to Denver with almost a foot of snow that fell this week. So, I have not had much of chance to ride my Dolphin, but the few miles I did, I am very pleased with it. I put together an unboxing video forThere whomever might be interested in seeing how they will receive a Dolphin and what has to be done to get it ready to ride. A link is include at the end of this posting.

There are a few things that should be mentioned about the packaging of the Dolphin. I bought through Amason but it was shipped from Qualisports. The taping of the box needs to be better. The top of the box was unsecured because the three places of packing tape were broken. Depending on how the box was handled, some loose items in the box could have fallen out but fortunately that was not the case. Qualisports needs to seal the box with better use of packing tape or use plastic packing straps. The other item to mention is that there were absolutely no instructions on how to attach the fenders. That took some trial and error to figure out. Also, there could have been better instructions on how to use the display unit. I am still trying to figure out how to access and change settings as needed. The final item is that the rear light didn't work. I changed the batteries in it but it does not switch on. Still need to contact Qualisports about that.

I do want to mention that leading up to my decision to purchase the Dolphin I had a couple of exchanges with Qualisport and want to thank Alex for his assistance. Pre-sale support was good.

All in all, I am very pleased with the Dolphin so far. The fit and finish is quite nice and it just looks like a quality bike. I debated as to whether or not to go with the Beluga with its 4" fat tires and 500W motor. After a lot of back and forth research and thinking, I decided that the smaller folding size and and anticipated greater distance per charge for the 350W motor would be best for me. I will be using it as we travel in our small travel trailer and I don't anticipate that I will be dealing with extreme trails. Campng away from power for several days or a week puts a benefit to having greater mileage from a full battery charge. I will see how that goes. The fact that the Dolphin comes with balloon size tires of 2.35" was another deciding factor. The little I have ridden my Dolphin shows that these tires give the stability I anticipated and look to help provide a comfortable ride.

 
I have 2 Dolphins. I bought on-line. If you can, I would suggest buying from a local dealer. Shipping boxes were not in good shape. Both had the racks unsecured in the boxes causing slight scratches in the bike coating. During the shipping / delivery I imagine they were not careful. I received no notice that they were shipped and these were left on my front porch for at least 4 hours. I have had no assistance is asking for touchup paint or any recourse on the bike needing adjusting right away and am hopeful I may get some help on these 2 items. This is a problem when buying on-line without a dealer in San Diego. I am sure Qualisports will continue their product and quality improvement as these bikes become more popular.

1st bike. Had an issue with the front rack. One out of three holes in the rack do not match up to the holes on the bike for attaching. One hole in the rack will need to be elongated about 1/16 of an inch to be able to use the third bolt. Brakes were good but needed to be adjusted and the gears need to be adjusted since there is a clacking sound. There were 4 washers short that I had to use from the second bike to attach the fenders. I used Bolton Bikes review to look and see how to install the fenders. Thank you Kyle.

2nd Bike. Upon unpacking the chain was lying on the ground. It was so kinked up I decided to remove the rear tire to unkink it and put the chain back on. You will need a 18mm wrench which I did not have so I borrowed one for now. Brakes and gears will need to be adjusted but not immediately. Any good bike shop can handle it. This is not a big deal and if I would have bought these bikes at a shop and I am sure all would have been taken care of already. Needed to buy more washers since I used these for the other bike.

Overall, I lived through the experience (haha). At the time I was bummed since this is a lot of money and I had to watch some videos to understand what to look for and what steps to take but everything has worked out for now.

Qualisports should have included at least a diagram of how the fenders are attached and perhaps a parts list for the fenders. That would have been nice.

I am 63 and weigh 236 and am 6' tall and have no problem going up a small hill with pedal assist. Even tried steeper hills and still no problem with pedal assist in 7th gear at level 3 assist. Using only the throttle will get you part way up a big hill, all the way up on a small hill and on level ground it is awesome to ride around at 19+ mph. These bikes do seem to be built very well and I think Kyle's review from Bolton Bikes made the difference for me to purchase and take a chance and buy online.

For help in attaching the fenders; tape the nutplates to the inside of the fender (much easier to deal with), attach 1 small bolt into the black top plate to the inside nutplate and then use a taller bolt with many washers and attach to the inside nutplate to bend the metal slightly into the contour of the fender. Let sit for a few minutes for the metal to take shape and remove the taller bolt and now you can easily use the small correct bolt for attaching the fender brace to the fender. In the future the black top piece could be already slightly contoured to help with the assembly.

Hope this helps and I plan on enjoying these bikes in our RV travels as well as the beaches on the west coast. Alaska is our next big trip.

Both bikes fit into the back of a 1996 Jeep Cherokee. These should be safer inside and away from the elements.

I want to say thank you to Kyle and Jessica at Bolton Bikes and to Alex and Daniel at Qualisports for their help.

Mark
Bolton Bikes review shows fender install on the Dolphin? Do you happen to have a link for that? Or do you mean you used the video only to see where the fenders went? Thanks!
 
Last edited:
I ordered a Dolphin and received it last Friday. Unfortunately winter has come early to Denver with almost a foot of snow that fell this week. So, I have not had much of chance to ride my Dolphin, but the few miles I did, I am very pleased with it. I put together an unboxing video forThere whomever might be interested in seeing how they will receive a Dolphin and what has to be done to get it ready to ride. A link is include at the end of this posting.

There are a few things that should be mentioned about the packaging of the Dolphin. I bought through Amason but it was shipped from Qualisports. The taping of the box needs to be better. The top of the box was unsecured because the three places of packing tape were broken. Depending on how the box was handled, some loose items in the box could have fallen out but fortunately that was not the case. Qualisports needs to seal the box with better use of packing tape or use plastic packing straps. The other item to mention is that there were absolutely no instructions on how to attach the fenders. That took some trial and error to figure out. Also, there could have been better instructions on how to use the display unit. I am still trying to figure out how to access and change settings as needed. The final item is that the rear light didn't work. I changed the batteries in it but it does not switch on. Still need to contact Qualisports about that.

I do want to mention that leading up to my decision to purchase the Dolphin I had a couple of exchanges with Qualisport and want to thank Alex for his assistance. Pre-sale support was good.

All in all, I am very pleased with the Dolphin so far. The fit and finish is quite nice and it just looks like a quality bike. I debated as to whether or not to go with the Beluga with its 4" fat tires and 500W motor. After a lot of back and forth research and thinking, I decided that the smaller folding size and and anticipated greater distance per charge for the 350W motor would be best for me. I will be using it as we travel in our small travel trailer and I don't anticipate that I will be dealing with extreme trails. Campng away from power for several days or a week puts a benefit to having greater mileage from a full battery charge. I will see how that goes. The fact that the Dolphin comes with balloon size tires of 2.35" was another deciding factor. The little I have ridden my Dolphin shows that these tires give the stability I anticipated and look to help provide a comfortable ride.

Nice unboxing. I would suggest airing down the front tire as an alternative to removing it. Either way works!
 
Bolton Bikes review shows fender install on the Dolphin? Do you happen to have a link for that? Or do you mean you used the video only to see where the fenders went? Thanks!

Sorry for the late response - I used Bolton Bikes review and kept zooming in to make sure I had them on right.

Mark
 
As Court mentions in his Dolphin review, the $450 8lb battery quick release seat post is a practical limitation. I planned to use the bike as I would have used a car - ie. for light commuting and basic shopping runs, and safe inside when not in use. For that to be feasible, I needed to be able to leave it outside for short periods of time, securing somewhat the seatpost battery (and seat). I considered a fixed bolt solution for the battery post, but wanted to be able to retain the quick release adjustability for other riders. I looked on Brooks forum and copied a permanent "leash" solution from about $4.00 worth of 10mm braided stainless steel and rubber-coated cable. It's looped around lower crossbar/seat tube post, and looped again under the upper seat rails. To match the bike's "stealth" aesthetic, I heat shrunk 1/4" matte black rubber tubing to the cable. It's not going to stop a determined thief with bolt cutters, but hopefully, more casual hooliganism is deterred. Also have an M8 1.25mm security allen hex bolt for under the seat (now upgraded to a Brooks Cambium C19), and some other DIY mods.
 

Attachments

  • seat post leash.jpeg
    seat post leash.jpeg
    84.1 KB · Views: 1,001
  • debadge.jpeg
    debadge.jpeg
    146 KB · Views: 1,081
  • KTLCD8HUSB.jpeg
    KTLCD8HUSB.jpeg
    92 KB · Views: 977
  • lightbar.jpeg
    lightbar.jpeg
    72.4 KB · Views: 980
  • wire control.jpeg
    wire control.jpeg
    143.4 KB · Views: 1,059
I folded my bike yesterday and noticed rust on the metal rod that's inside (part of the folding mechanism), what do you guys recommend to get rid of it?
 
Just a quick community advisory that the plastic frame cushion/washer on the clamp side of the seat post quick release is made from inferior plastic and may disintegrate in the short term. If this happens to you in the field, without a 4mm allen handy, the clamp can be opened and the nut side dialed-in to take the new gap. This step is important because otherwise the 8lb seatpost/battery may suddenly drop down to the street while underway. Nobody really needs that kind of excitement. I'm putting this here, because it's potentially significant enough to be in the Achilles Heel category.

Quick Release.jpg
 
As Court mentions in his Dolphin review, the $450 8lb battery quick release seat post is a practical limitation. I planned to use the bike as I would have used a car - ie. for light commuting and basic shopping runs, and safe inside when not in use. For that to be feasible, I needed to be able to leave it outside for short periods of time, securing somewhat the seatpost battery (and seat). I considered a fixed bolt solution for the battery post, but wanted to be able to retain the quick release adjustability for other riders. I looked on Brooks forum and copied a permanent "leash" solution from about $4.00 worth of 10mm braided stainless steel and rubber-coated cable. It's looped around lower crossbar/seat tube post, and looped again under the upper seat rails. To match the bike's "stealth" aesthetic, I heat shrunk 1/4" matte black rubber tubing to the cable. It's not going to stop a determined thief with bolt cutters, but hopefully, more casual hooliganism is deterred. Also have an M8 1.25mm security allen hex bolt for under the seat (now upgraded to a Brooks Cambium C19), and some other DIY mods.
Hello, I noticed that your lcd screen is different than standart dolphin bikes.Did you change the standard one? And I see you cover bottom cable with plastic tube . Cables are getting very dirty and hard the clean inside them . Can you share the link where did you buy this tube ? Thank you...
 
Hello, I noticed that your lcd screen is different than standart dolphin bikes.Did you change the standard one? And I see you cover bottom cable with plastic tube . Cables are getting very dirty and hard the clean inside them . Can you share the link where did you buy this tube ? Thank you...
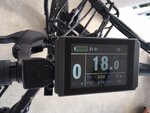
@ilgaz77 sadly, the factory KT-LCD5 display for my bike, arrived unworkably smashed. I bought a newer full-color KT-LCD8H on Ebay for $47 that came with the convenient usb mobile charge port, and it's great. I must say, QS were good about everything and rebated my out of pocket on that and a couple other smaller things. I was nervous about straying from the OEM display, but it worked out to be a very simple plug and play replacement with a harness that plugged into the control box behind the crank. The KT Controllers in the QS bikes use the newer KT software so can accept any of the old and current KT displays (and perhaps whatever comes next hopefully). It has an easier interface for P and C setting adjustments. I've put lots of little upgrades into the bike and should post some newer pictures. The hose looms were maybe $10 and can be found at any computer or office supply store. I straightened and smoothed out the run on a spaghetti knot of wires and cables and zip tied a short length of 1/2" conduit tubing over all the critical wires, all the way into the control box. It really tidies things up, with a bit more protection, adding very low weight.
 
Thank you for the explanation . I will buy conduit tubing very good idea. Your lcd screen seems better than original one :) I like your minimal set up . My concern is back tire . I have rear rack, panier and some stuff like tools, groceries etc. So already heavy load on back tire. I see you are using front rack and no fenders . So where did you put your front light ? I really like the front light on dolphin , it really gives bright light .
 
I folded my bike yesterday and noticed rust on the metal rod that's inside (part of the folding mechanism), what do you guys recommend to get rid of it?
@Kathy Smith the chemotrophic bacteria that eats the oxydized ferrous iron in metals like cro-mo is easy to kill, then seal from further attacks. Sometimes hard to find, my favorites for the tool shed are: Corrosion-X and Boeshield T-9 (made by Boeing for jet engines, landing gear etc). In the Caribbean, it's now fairly routine for mechanics remove engine covers on watercraft, vehicles, and aircraft and liberally spray the entire engine bay with this stuff. Plastics, everything.
 
Last edited:
Thank you for the explanation . I will buy conduit tubing very good idea. Your lcd screen seems better than original one :) I like your minimal set up . My concern is back tire . I have rear rack, panier and some stuff like tools, groceries etc. So already heavy load on back tire. I see you are using front rack and no fenders . So where did you put your front light ? I really like the front light on dolphin , it really gives bright light .
@ilgaz77 yeeeeeahhh, I wanted to have a brighter 12v ATV light bar for trail use, and long story short, I killed my front light via burning out the wee controller box sacrificial fuse. There's a thread on that here, with the punchline being: don't do what I did. Lols. For now, I use a clip on strobe, the OEM rear light, and a Brooklyness Classon helmet with position lights and turn signals.
 
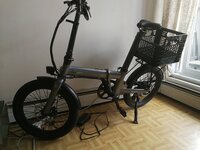
Btw I forgot to ask how to remove the stickers from bike frame? I will attach one of picture . I changed the bike seat added mirror and milk container at back
 
I folded my bike yesterday and noticed rust on the metal rod that's inside (part of the folding mechanism), what do you guys recommend to get rid of it?
Just a quick community advisory that the plastic frame cushion/washer on the clamp side of the seat post quick release is made from inferior plastic and may disintegrate in the short term. If this happens to you in the field, without a 4mm allen handy, the clamp can be opened and the nut side dialed-in to take the new gap. This step is important because otherwise the 8lb seatpost/battery may suddenly drop down to the street while underway. Nobody really needs that kind of excitement. I'm putting this here, because it's potentially significant enough to be in the Achilles Heel category.

View attachment 66402
This happened to me. The post didn't drop while riding but the plastic washer broke. Other than tightening the screw, is there anything else one should do? The post seems fine now that I tightened it.
 
Picture here
That looks like a good setup @ilgaz77 with the rear basket. Due to the short wheelbase, I have to be mindful to position my feet over the pedals a little bit differently when I am in cargo mode to avoid the back of my heels clipping the rear baskets, using middle of my foot on pedal, rather than front leverage of toes. I can live with that. For decal removal, I dusted them in about 3 super-gratifying minutes using a low-power drill, and a 3M stripe off wheel. It's basically a hard pencil eraser that spins around. There are cheaper decal-removing wheels at hardware stores for about $11. Useful for removing all kinds of gluey and sticky stuff on painted surfaces, without damaging paint. Another fun item for the toolbox!
 
This happened to me. The post didn't drop while riding but the plastic washer broke. Other than tightening the screw, is there anything else one should do? The post seems fine now that I tightened it.
@Kathy Smith I'm not sure, but I have to assume the sacrificial plastic bit is more important than I had first thought for taking the over-levered tightening pressure off the metal. All the quick releases seem to have some version of this. The plastic bit is a different shape than the quick releases I have nearby, so for now I'm just going metal on metal. Two solutions: order an $8 replacement quick release and cannibalize the plastic washer, or, cut a small bit of rubber/old inner tube and put it in there to take the slack/over leverage.

Update: I found an extra rubber handlebar adapter in my toolkit and cut it down to size, and awled out the hole. Works okay, but a bit thicker than it needed to be. You could probably use leather too.

IMG_2532.JPG
IMG_2534.png
IMG_2535.jpg


Another Update Dec 29:
@Kathy Smith the above rubber washer solution proved to be a bit too soft for the weight of the seat post. I'm now using regular electrical tape, doubled over on itself a few times, then cut into a harder washer shape. This seems to have the right combo of give and friction without compression.

tape.jpg
IMG_3493.jpg
 
Last edited:
Back