I ordered a Dolphin and received it last Friday. Unfortunately winter has come early to Denver with almost a foot of snow that fell this week. So, I have not had much of chance to ride my Dolphin, but the few miles I did, I am very pleased with it. I put together an unboxing video forThere whomever might be interested in seeing how they will receive a Dolphin and what has to be done to get it ready to ride. A link is include at the end of this posting.
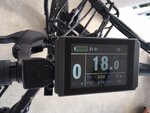
There are a few things that should be mentioned about the packaging of the Dolphin. I bought through Amason but it was shipped from Qualisports. The taping of the box needs to be better. The top of the box was unsecured because the three places of packing tape were broken. Depending on how the box was handled, some loose items in the box could have fallen out but fortunately that was not the case. Qualisports needs to seal the box with better use of packing tape or use plastic packing straps. The other item to mention is that there were absolutely no instructions on how to attach the fenders. That took some trial and error to figure out. Also, there could have been better instructions on how to use the display unit. I am still trying to figure out how to access and change settings as needed. The final item is that the rear light didn't work. I changed the batteries in it but it does not switch on. Still need to contact Qualisports about that.
I do want to mention that leading up to my decision to purchase the Dolphin I had a couple of exchanges with Qualisport and want to thank Alex for his assistance. Pre-sale support was good.
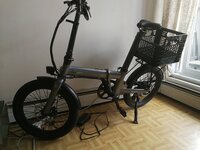
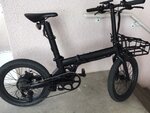
All in all, I am very pleased with the Dolphin so far. The fit and finish is quite nice and it just looks like a quality bike. I debated as to whether or not to go with the Beluga with its 4" fat tires and 500W motor. After a lot of back and forth research and thinking, I decided that the smaller folding size and and anticipated greater distance per charge for the 350W motor would be best for me. I will be using it as we travel in our small travel trailer and I don't anticipate that I will be dealing with extreme trails. Campng away from power for several days or a week puts a benefit to having greater mileage from a full battery charge. I will see how that goes. The fact that the Dolphin comes with balloon size tires of 2.35" was another deciding factor. The little I have ridden my Dolphin shows that these tires give the stability I anticipated and look to help provide a comfortable ride.
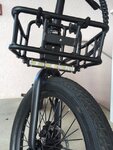

") I like your minimal set up . My concern is back tire . I have rear rack, panier and some stuff like tools, groceries etc. So already heavy load on back tire. I see you are using front rack and no fenders . So where did you put your front light ? I really like the front light on dolphin , it really gives bright light .
I like your minimal set up . My concern is back tire . I have rear rack, panier and some stuff like tools, groceries etc. So already heavy load on back tire. I see you are using front rack and no fenders . So where did you put your front light ? I really like the front light on dolphin , it really gives bright light .