KITS VS TURNKEY (NEW!)

However, the installation time is usually underestimated, and the level of customization needed if a bike is not a 'perfect ' fit is often always missed by a first timer, and even some of the pro's.

It's going to be a royal pain for most, as a surprising number of people tend to overestimate their mechanical or electrical skills. Just ask any spouse of a DIY homeowner how their originally planned project times in reality doubled, tripled, or worse.
It's not that hard. If you can crimp a terminal on a wire using a pro tool like a klein, 4 hours on the no-display models. 90 minutes of that making the torque arms and clamps if you didn't buy them. Have an angle grinder & safety glasses available if the axle slot is too small.
Hard part is making cheap hubs not lock up under the pressure of the dropout.
I agree, rim brakes are obsolete in a disk brake world, if you ride in the rain or snow. I do. That conversion is not impossible either, just making a few U-clamps out of metal scrap. Buying mating cables is the hard part on that, I still don't have a name for the end I use. No vendors use a name either.
For battery and power cables, use Anderson Power Pole connectors. You could use XT 60 or 90 connections too. Different kits have different sensors, and different crank styles and spacing and axle diameter can prevent some from working. Making the wiring clean, and tight to the frame, and then wrapping it with braided cable wrap takes time to do it right. Getting the right motor, with correct cassette or freewheel, and correct drop out width is not something that most people are familiar with doing. Carbon frames do not lend themselves well for kits, and I can list at least a dozen issues someone will run into there. There are 6 different styles of bottom brackets out there, and 4 of them may not be a fit for any mid drive. Unless you get the hub motor built into the right rim from the supplier then you have to find someone to do that re-spoking and make sure the motor you ordered has correct number of spoke holes in the hub for your time, and correct off set can be done. Having done over 50 conversions, with many different bikes, recumbents, trikes, tandems, etc, I can say with a decent level of experience, it is not as easy as some make it out to be.
 
Recovering from a mistake made when ordering the kit for a particular bike could be pretty tough to recover from. I think most can see that. Examples might be incorrect rim size selected from a number of different options available, incorrect drop out dimensions, etc. That said, many of the suppliers have making those selections down to a science, with warnings regarding each piece of the puzzle regarding proper selections. If you go wrong here, you either can't read or have simply not done your homework/due diligence.

I'm not even going to get into mid drives. I think it may be best if those are left to the more experienced (or daring?).

Hub drives though just aren't that tough. Figure out the difference in the available hub widths (the 135mm standard dropout, and the 150mm or bigger for the fat tire conversions), the difference between direct drive and geared, and pay attention to what size wheels are on the bike now and order the same for your kit to be laced to. From there it's about PAS, throttle (I think your nuts if you don't do both!), and other fairly simple stuff. No rocket science involved. Just a little homework....
 
I agree mid drives are best left to the factory. Hub drives already built into wheels are not hard, especially if no PAS. Pas, I had to modify a couple of afternoons to make the modern crank capable magnet plate fit a 90's one piece crank. Connectors, I had an order out to mouser for XT90 that went over 100 days, they never delivered. I soldered an XT60 from e-bay on my home built charger, took 2 of them to have it not melt out. Andersen, I could have had some from parts-express if I wantd to pay $8 freight for one part. that took a year to find out a source for them, I cut the andersen off the battery and used bullet connectors. ***** it, I use dorman bullet connectors from the auto supply. Use male for plus female for minus so you can ***** it up plugging it in. The taiwanese ones from dorman are good for 30 amps. The ****ese ones from ebay will melt out at that current. 3M, T&B, Ideal, Panduit also make real 30 amp connectors, but not in bullet. Insulated both sexes .250" spade lug terminals are another option.
 
Hub kits these days are pretty much like Lego sets. All (or almost all) hub motors available on after-market can also be found laced-in, for not much more money. Crossing the wires is about the only big mistake one could make. Or - ordering fat size instead of cruiser (though suppliers usually have exchange policy).
 
"use Anderson Power Pole connectors"

Worth noting that the proper tool for crimping the connectors for Andersons are necessary and in fact mandatory I found. Also getting the connector all the way into the housing with thinner gauge wires can be a struggle. That said I use Anderson's and have the proper tool.
 
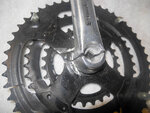
My BBS02 went in easy, but the old bottom bracket was tough. Must have had steel-aluminum corrosion that fused both cranks. Today I know that a pickle fork would have popped them off but I don't own one. I do own a sazwzall, Cutting slots in the crank arm wasn't enough. I had to slice thru the gears to release the tension.

bbs crank.jpg

Funny. Crankgear also has to come off to install a PAS sensor and I've done that a half dozen times on other bikes, some older than above. They always just fell off with a little push from my crank puller tool.

So yes, what Mike charges to install TSDZ2 mid drive is quite fair.

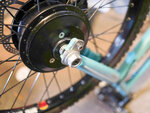
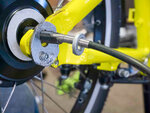
Hub drives do take me a while because I put on torque arms, and am too cheap to buy them for $20/set. I make torque plates out of scrap steel. Here's two examples.

torqu_plate.jpg trq_nova.jpg
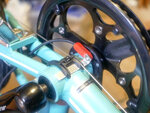
The PAS sensor usually requires a home made bracket. I've never owned a BB where the round bracket can actually be secured by the BB ring. This one was fairly easy.
pas_brkt.jpg

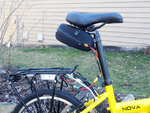
Placing the controller and hiding the rats nest of wires can take some thought, I would rather have the kits with integrated harness, but most have been the ratty type. I change out themotor wires to a 9 pin cable and put the whole mess under the luggage rack where water hits it. This bike needs a fender. Thay all need fenders.

control.jpg
 
Back