My family has not dined out in a restaurant since February due to the COVID-19 pandemic. Instead, we find ourselves eating takeout meals more frequently now than we had in the past. Since I'm always looking for opportunities to ride my Allant+ 7s, I thought I'd come up with a way to simplify my takeout trips and avoid using the car while simultaneously getting some exercise to burn off some of the calories I was about to ingest  .
.
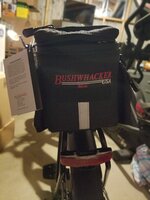
I usually use (and love!) panniers for carrying cargo. These are, however, not ideal for carryout food because of the dimensions and the fact that I don't want to spill some sauce or salad dressing in the same bags I use for work clothes and my laptop.
The Allant 7 has a Racktime Rack, which is compatible with the Racktime Snap-it system that is included on all Racktime trunk bags. I purchased the Snap-it adapter kit (system alone without a trunkbag):
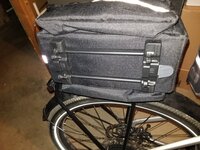
I then used the included hardware to attach it to a Insta-Crate (I think we got from Costco for about $5). The result: A collapsible cargo crate that can be used for takeout and collapsed when empty for less wind resistance or a flat rack for pizza :
:


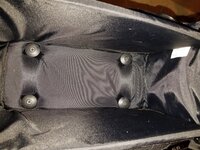
It works fine for its intended purpose, but it is not ideal. I had to clip away some of the plastic stabilizing grid on the bottom to get the Snap-it system to mount flush. The Insta-Crate is a little flimsy and not as robust as the classic milk crate. I wouldn't overload it. Since it is not super sturdy it makes a bit of noise when you go over bumps in the road. When I have it extended up into crate mode it is right near the edge of the saddle, so I can feel it behind me when I sit on the bike. I could have mounted the hardware further forward to avoid this but that would mean even more overhang off the back of the rack (it is already not centered as you can see in the first photo).
It snaps in and out very easily and can be added or removed in seconds. The mount itself is very stable and I have no concerns of it falling off. It serves my intended purposes perfectly for now, but in the future I might repurpose the Snap-it hardware to mount on a different more robust crate or box or else mount to a bag (trunkbag).
Anyway, I thought I'd share this idea with others.
Overall, I like the Racktime Light-it rack on the Allant+ 7/7s and I like the Racktime Snap-it system.
.I usually use (and love!) panniers for carrying cargo. These are, however, not ideal for carryout food because of the dimensions and the fact that I don't want to spill some sauce or salad dressing in the same bags I use for work clothes and my laptop.
The Allant 7 has a Racktime Rack, which is compatible with the Racktime Snap-it system that is included on all Racktime trunk bags. I purchased the Snap-it adapter kit (system alone without a trunkbag):
SYSTEM ACCESSORIES - racktime
www.racktime.com
I then used the included hardware to attach it to a Insta-Crate (I think we got from Costco for about $5). The result: A collapsible cargo crate that can be used for takeout and collapsed when empty for less wind resistance or a flat rack for pizza
:It works fine for its intended purpose, but it is not ideal. I had to clip away some of the plastic stabilizing grid on the bottom to get the Snap-it system to mount flush. The Insta-Crate is a little flimsy and not as robust as the classic milk crate. I wouldn't overload it. Since it is not super sturdy it makes a bit of noise when you go over bumps in the road. When I have it extended up into crate mode it is right near the edge of the saddle, so I can feel it behind me when I sit on the bike. I could have mounted the hardware further forward to avoid this but that would mean even more overhang off the back of the rack (it is already not centered as you can see in the first photo).
It snaps in and out very easily and can be added or removed in seconds. The mount itself is very stable and I have no concerns of it falling off. It serves my intended purposes perfectly for now, but in the future I might repurpose the Snap-it hardware to mount on a different more robust crate or box or else mount to a bag (trunkbag).
Anyway, I thought I'd share this idea with others.
Overall, I like the Racktime Light-it rack on the Allant+ 7/7s and I like the Racktime Snap-it system.