Fender and Rack kit for Turbo

Douglas Ruby

Well-Known Member
Region
USA
City
Groton
Today I picked up the Specialized fender and rack kit for my 2016 base Turbo and installed it. Installation was pretty straightforward but with a few issues.

1. The screws and washers included did not quite match what was called for in the installation instructions.

2. The rear fender was prewired down to the bottom bracket. You have to pull the seat post and unplug the seat light. Then you pull the rear light wire down through the seat tube (from the open access plate under the bottom bracket).

3. The problem is that the wire from the battery and from the seat light each have 1 male and 1 female spade connectors. The wire from the rack light has 2 male connectors. I ended up soldering one side and plugging in the other side.

4. There appears to be some kind of electronics in the rack reflector that drives the rack light. When you turn the battery off, it takes a while (minutes) for the tail light in the rack to bleed down. I disconnected the wires and took the battery out of the bike and the light kept going!

5. I still am augmenting the taillight with a flashing light on the seat post.

I will put pictures up when I get a chance.

Doug
 
Thanks for the post Doug. The rear light has a capacitor inside that keeps it on. This feature is really for dynamo lights. When you stop the bike, even thought the dynamo isn't delivering power you're not in the dark. Common usage in when you stop at a light.

I know this doesn't apply to your bike, but hopefully it's helpful.
 
Chris, this makes a lot of sense, With the capacitor electronics (DC to DC power supply) between the battery and the light, it makes sense that the wiring does not have any polarity, thus the two male spade connectors instead of a male and female like the seat light which is driven directly off the battery. I wish they would have supplied a male to male adapter with the kit. It would have saved a lot of work when wiring the racklight with the bicycle upside down.
 
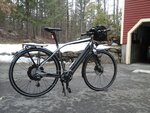
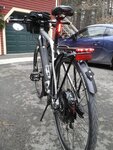
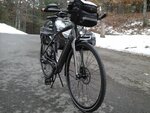
Finally have pictures of my base Turbo with fender/rack, Michelin tires, Ergon grips/bar ends, Thunderbolt tail light, 44T front chainring and bash guard, and Wing Light turn signals.

20160131_120305.jpg 20160131_120350.jpg 20160131_120423.jpg
 
Last edited:
Hi Doug, can you please tell me what mirror you are using there? I'm interested in fitting the wing lights and a mirror but most of the mirrors I can find fit into the handlebar ends like the wing lights.

Thanks,
Richard
 
I took the stock mirror, bent the stem to make it angle the right way and mounted it upside down. As it is delivered in the US the stock mirror gives you a good view of your left arm. By flipping it over, it works well and is very stable.
 
Last edited:
Today I picked up the Specialized fender and rack kit for my 2016 base Turbo and installed it. Installation was pretty straightforward but with a few issues.

1. The screws and washers included did not quite match what was called for in the installation instructions.

2. The rear fender was prewired down to the bottom bracket. You have to pull the seat post and unplug the seat light. Then you pull the rear light wire down through the seat tube (from the open access plate under the bottom bracket).

3. The problem is that the wire from the battery and from the seat light each have 1 male and 1 female spade connectors. The wire from the rack light has 2 male connectors. I ended up soldering one side and plugging in the other side.

4. There appears to be some kind of electronics in the rack reflector that drives the rack light. When you turn the battery off, it takes a while (minutes) for the tail light in the rack to bleed down. I disconnected the wires and took the battery out of the bike and the light kept going!

5. I still am augmenting the taillight with a flashing light on the seat post.

I will put pictures up when I get a chance.

Doug
I'm not sure how the rack supports any load with only one point of contact, how sturdy is it wihtout the seatstays supports ?
 
The vertical weight distribution comes down through the braces connected to the rear dropout. The fore-aft distribution is through the aluminum fender which is attached to the seat stay brace.
 
The vertical weight distribution comes down through the braces connected to the rear dropout. The fore-aft distribution is through the aluminum fender which is attached to the seat stay brace.

How much load have you tried it with ... I'm thinking about purchasing that rack for the clean integration, and while I can't expect specialized wouldn't sell a unstable rack ... I am very intrigued about how it works.
 
How much load have you tried it with ... I'm thinking about purchasing that rack for the clean integration, and while I can't expect specialized wouldn't sell a unstable rack ... I am very intrigued about how it works.

after looking at some pictures closer, it appears that the rack arm is keyed to the chainstay - can you confirm that on your setup?

I just don't see how a light fender can support a 25kg load being torqued during breaking / acceleration.

turbo6 (2).jpg
 
Last edited:
after looking at some pictures closer, it appears that the rack arm is keyed to the chainstay - can you confirm that on your setup?
I just don't see how a light fender can support a 25kg load being torqued during breaking / acceleration.

I don't know what you mean by "keyed to the chainstay". The rack support arm mounts to the upper of the two threaded screw holes on each rear dropout. This carries ALL of the vertical force vector (up to and over 55 lbs = 25kg). The rack is attached to the fender itself about 10" from the chainstay cross brace. The horizontal force vector of acceleration/braking is either in tension or compression virtually directly around the aluminum (not plastic) fender. Any bending moment on the fender is braced by the curved shape of the fender. It really is a very clever design unless you wanted to use the rack w/o the fender, in which case a frame mount could VERY easily be fabricated which would connect to the chain stay cross brace.

I would expect the fender to be able to handle many 10's of kg (at least 50-100 lbs) of force in tension or compression as long as it is around the circumference and not a twisting or bending moment. Acceleration is a non-issue since we would be hard pressed to achieve .2G (= 5kg) and in braking no more than .5G (12.5kg).

Of course, if you intend to run into brick walls at 30+mph, all bets are off!

Doug
 
Last edited:
I hear what Kermit is saying, there seems no real brace from the rack to the seat stays as a normal rack would have. For that reason looks like it lacks some rigidity. ? Maybe not.
I will say it all looks good, and wonder where you got it all.
I needing fenders myself, have a couple of ideas, and some on order but that's been a month, and at this point am not holding my breath on my LBS to get me some ?
In the US, the fender kit can be ordered directly from Specialized's web site. Search for specialized turbo accessories.
 
Last edited:
You may have noticed that the rear fender is kind of "cutoff" and could wrap a bit further around the rear wheel. Part of the reason for this is that it is designed to support a European license plate (required in a number of countries) which would hang below the fender a bit. Since that it is not required in the US, I decided to order a fender flap to attach to the license plate bracket. Looking around I found out that Brooks sells a leather fender flap. As soon as I get it in and mounted, I will leave another picture.
 
I tried the Brooks leather flap in front but it was too thick to install. Still looking for a front guard flap - open to suggestions. The front mud guard is useless in terms of protecting the feet from getting wet.
 
Back