Dillenger 36v Bike Kit on Specialized

WilliamT

Active Member
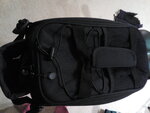
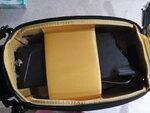
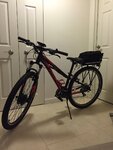
I just recently got my Dillenger 36v e-bike kit and hooked it up to a xs small Specialized Hardrock. Because the frame was too small to hold the battery, I bought a Topeak Explorer rack and the Topeak MTX EX bag. The battery was too big by 2-3 inches so I cut out the back of the bag so some of the battery is in the compartment that holds the water bottle in the back. The battery lays sideways in the bag and there is a hole we cut up front for the wires to go through. The power button can be reached outside the bag in the water bottle net so the bag can remain zipped up. There is also room to put repair kits and other things as well.

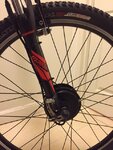
The front motor is pretty small so it not too noticeable. The wheel fit without any filing.

I still have to put the pedal sensor on and the magnets for disabling the motor when braking. Other than that it wasn't too hard to put together even without instructions.

The bike was initially 31.5 lbs. With the kit, bag, and rack the total weight came out to be 48.6 lbs.

The only problem that the main cable from the hub needs to be fully pushed in to the point where the arrow on the small connector has to pretty much touch the edge of the cable that goes to the battery. Just hearing it click isn't enough otherwise you get a error on the screen.

I did a quick ride on the bike using the throttle and its really moves. I'm happy with the results.

Here is the kit if anyone is interested.

http://dillengerelectricbikes.com/e...bike-kit-samsung-power-13ah-by-dillenger.html

Just used a box cutter to cut enough space for the battery. Its a snug fit and I have to turn it at a diagonal to remove and insert it. Other than that, it well padded. There is still some room for a repair kit, tire levers, and a tube next to the battery. On top of the battery there is still 11 in x 7 in x 2 in (LxWxH) of room; just enough for my U lock. The hole in the front for the wires and the rear should provide some ventilation for the battery. I'm not sure if I need to add more holes though.
IMG_0119.JPG IMG_20170217_061905.jpg IMG_20170217_061816.jpg IMG_20170217_061728.jpg
 
Last edited:
Nice looking bike, and a good price on the Dillinger on sale. They put the controller in the bottom of the battery and have a clean cable layout. I've got several motors that use a similar connector, None of them give good tactile feedback as to whether they are fully seated, but I've not had connection issues.

The controller in your battery was probably looking to lose some heat via the controller frame being bolted to the downtube. Holes for ventilation probably are a good idea.

I've temporarily stuffed an external controller in a similar bag on the rack, along with the battery, on an ebike, and find that they do get warm.
 
Last edited:
WilliamT,

Don't you need to strengthen the front fork with some torque arms?

The forks on this bike has very thick dropouts. If they tapered or were the thin type I would have added some. The wheel axle came with torque washers on each side. The kit also comes with C washers that I added on each side as well.

Update: I'll probably get a torque arm in addition to the washers installed. It's cheap insurance I suppose.
 
Last edited:
Nice looking bike, and a good price on the Dillinger on sale. They put the controller in the bottom of the battery and have a clean cable layout. I've got several motors that use a similar connector, None of them give good tactile feedback as to whether they are fully seated, but I've not had connection issues.

The controller in your battery was probably looking to lose some heat via the controller frame being bolted to the downtube. Holes for ventilation probably are a good idea.

I've temporarily stuffed an external controller in a similar bag on the rack, along with the battery, on an ebike, and find that they do get warm.

The connector to the battery was hot so I'll probably poke more holes at the front of the bag for ventilation. I didn't attach the brace that is used to mount to the bike but noticed there is a metal strip underneath. Is that used as a heatsink?
 
controller.jpg

Was the original motor cable long enough to reach the front wheel or did you need an extension cable?

The metal bottom at the rear of battery cradle is probably used as a heat sink for the six motor driver transistors. Normally, that part not clamped to the frame. The part I think you removed clamps to the frame, and there would be some heat transfer to it via the tab/screw by the red arrow.

The round connector shouldn't get hot, Maybe it's loose w/o the full cradle? If you put the metal/plastic piece back on, it will hold the battery to the cradle better.

I sometimes put a dolphin battery in a rear bag like you, but mine doesn't have any controller so I can put a power connector right to the end of the battery. Doesn't get hot. Controllers in the bag get warm though. I like to mount them on the bike somewhere with air flow.
 
View attachment 15320
Was the original motor cable long enough to reach the front wheel or did you need an extension cable?

The metal bottom at the rear of battery cradle is probably used as a heat sink for the six motor driver transistors. Normally, that part not clamped to the frame. The part I think you removed clamps to the frame, and there would be some heat transfer to it via the tab/screw by the red arrow.

The round connector shouldn't get hot, Maybe it's loose w/o the full cradle? If you put the metal/plastic piece back on, it will hold the battery to the cradle better.

I sometimes put a dolphin battery in a rear bag like you, but mine doesn't have any controller so I can put a power connector right to the end of the battery. Doesn't get hot. Controllers in the bag get warm though. I like to mount them on the bike somewhere with air flow.

The kit came with an extension cable that I used to connect to the motor cable. That was long enough for this bike.

I attached the metal bottom and that kept it cooled even after a 30 mile ride. I left the plastic part off. The metal was very secure without the plastic part.
 
Dillenger does have an extension cable set you can buy. If I had to do it again, I would get that along with the kit instead of having to pay shipping twice. The PAS (yellow) cable is just 1-2 inch too short for my bike going from the rack. It's not needed for the kit though.

http://dillengerelectricbikes.com/spares/bafang-8fun/wiring-cable-extension-set-by-dillenger.html
For this kit, I needed Version 4.0

I do like how you can use your existing brakes with the kit. It comes with magnets you attach to your brakes to cancel the motor when you brake.

One thing I would have liked to see is a cable that allows you to connect a front head light. My RadWagon has this feature.
 
Finally got the extension cable for the PAS and hooked the optional pedal sensor. My crank axle is thicker than normal so we had to cut down the inner part; clipping the center plastic tabs until the two semi-circle pieces closed. The sensor with the light has a lever attached behind it to help pivot it closer to the circle. I had to remove that and attach it flush to the frame. Now that the sensor is in place, we can now use the assist levels. I wanted to put it on the inside like the RadWagon but there wasn't enough space. I made some runs on the different assist levels and it seems to be working fine.


PAS Sensor.jpg
 
Last edited:
View attachment 15320
Was the original motor cable long enough to reach the front wheel or did you need an extension cable?

The metal bottom at the rear of battery cradle is probably used as a heat sink for the six motor driver transistors. Normally, that part not clamped to the frame. The part I think you removed clamps to the frame, and there would be some heat transfer to it via the tab/screw by the red arrow.

The round connector shouldn't get hot, Maybe it's loose w/o the full cradle? If you put the metal/plastic piece back on, it will hold the battery to the cradle better.

I sometimes put a dolphin battery in a rear bag like you, but mine doesn't have any controller so I can put a power connector right to the end of the battery. Doesn't get hot. Controllers in the bag get warm though. I like to mount them on the bike somewhere with air flow.
Dillenger Dolphin pack has a controller in it? Is there any documentation on this? Very odd...
 
Dillenger Dolphin pack has a controller in it? Is there any documentation on this? Very odd...

From what I've read, the controller is the unit that attaches next to the battery. There is also a sticker on that unit that has the controller information on it.
 
Last edited:
I was going over the results from Grin's stress tests for Suntour forks. These are cast aluminum fork dropouts similar to what this bike has.

For suspension forks, you want the cheaper ones because they don't use magnesium dropouts but aluminum alloy. That will be a little stronger in resisting the axle rotation from the motor. The tests basically showed that if you tighten the lug nuts to around 60 Nm, it's going to take around 62-65 Nm of torque to get the axle to rotate 20 degrees before the forks fail. This test is only with the lug nuts only.

It was interesting to see that machined aluminum drop out forks gave in to axle rotation at around 35 Nm but never cracked very similar to how steel forks reacted to axle spinouts.

Digging around on the web, the Dillenger 350 watt motor look very similar to the Bafang G-01 36v hub motor. Those motors have a max torque range between 32-36 Nm. At that range and these forks, the charts shows a possible 2-3 degrees of axle rotation when tighten to 60 Nm without any reinforcements.

With the torque arm in place, the general results is that it almost doubles the amount of torque needed before axle rotation leading to failure. But even with the torque arm in place, there is still a possibility of just a little bit of rotation.

The kit does comes with torque washers and c washers to help counter the axle rotation. To reinforce that, I added a torque arm and also added some loctite to the axles to make sure the lug nut doesn't loosen up.

Long story short, check your lug nuts to make sure they are tight before each ride.

IMG_0124.JPG
 
Last edited:
I've done several aluminum forks and AL suspension forks with front motors up to 750W. I advised all against. However I was willing to help the builder IF they used two properly fit torque arms. I ALWAYS use the Grin products. No exceptions. The 750W is a daily rider. From April-November, or the first snow and is going into season 3 or 4 very soon. I would't for myself but from my limited experience two sided torque arms have not failed.
These are all commuter/city street bikes.

For me, 350W is about as high as I'm comfortable with on a front hub. At 750w, just a quick google search shows those motors producing on average 80 Nm. With numbers that high, I would definitely use 2 torque arms. One wouldn't be enough.
 
For me, 350W is about as high as I'm comfortable with on a front hub. At 750w, just a quick google search shows those motors producing on average 80 Nm. With numbers that high, I would definitely use 2 torque arms. One wouldn't be enough.
I think 350 would be a good cutoff, although the Q128 or Grin Bafang at 43nm would be ok by me. In the end I try and have succeeded nstayingbaway fro AL forks. For daily riding on decent streets I just never needed to invest $350 or more for a decent, repairable, sustainable by my definition, fork. I'm an over build guy with any front motor and AL if it was going to be my ride. That's just me. Old ones break to easy snd old brain boxes get scrambled to easy. Yours is likely the best advice.
 
Back