azor tweelingfiets build thread

Region
Europe
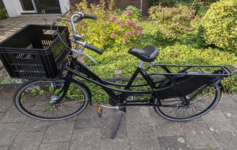
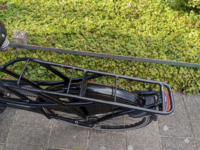
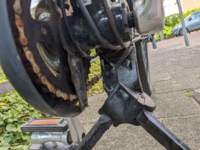
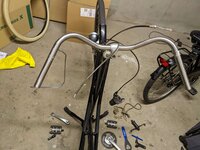
after asking for some help picking out a bike in this thread i came to the conclusion there probably wasn't an off the shelf solution that would fit my needs and my budget, so i decided to build one. i'm making this thread to keep track of the build progress and ask for help along the way. here are some pictures of the bike i'll be converting. it's an azor tweelingfiets, kind of in between a mid tail and a long tail cargo bike in size. it has a super sturdy rear rack designed to be able to safely carry 2-3 kids, and a removable front rack. i will be putting a seat on the rear and using it as a way for me and my girlfriend to get around town without pissing away money on buses and trams.

stock bike specs:
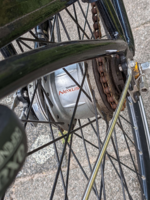
- 7 speed shimano nexus
- front and rear drum brakes
- shimano dynamo in the front hub to power the headlight/taillight
- plenty of bonus rust that came free of charge

i plan on putting a 750W BBS02 into it, paired with a 48V 17 - 20Ah battery from Jenny Mao at Aijiu batteries. i will downtune the motor to 250-350W for everyday driving and save the extra for when it's needed. have an eggrider on the way to make tweaking the motor settings a bit easier. for now i'm going to just tear it down and clean the rust off the important bits.

i've started ordering all the tools and parts i need, and was wondering if anyone had any opinions on where to get the BBS02 in Europe? the "official sellers" linked on bafang's website seem to be charging €550+ for the kit, same goes for like em3ev and that sort of shop. this is the best price i've found on it (€380), and then i've seen reference to this shop on the endless sphere forum so i think it's a bit more reputable and only €100 more. is it worth shelling out the extra €200+ to get the motor from a fancier place or is it worth the risk to go with a cheap shop that has a decent return policy?
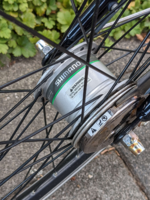
 

Attachments

  • azor.png
    azor.png
    2.3 MB · Views: 212
  • tweeling side profile.png
    tweeling side profile.png
    5.5 MB · Views: 220
  • shimano nexus 7 speed.png
    shimano nexus 7 speed.png
    2.8 MB · Views: 198
  • shimano dynamo.png
    shimano dynamo.png
    2.8 MB · Views: 177
  • rear rack.png
    rear rack.png
    6.8 MB · Views: 184
  • deflop and dynamo wire.png
    deflop and dynamo wire.png
    2.9 MB · Views: 193
  • bottom bracket.png
    bottom bracket.png
    3.9 MB · Views: 198
Loving that dynamo front hub, no parasitic power draw off the battery for the lights.

I went with a US dealer with a good reputation for after sales service and it repaid me when I needed to replace the controller after a couple of years only to find Bafang had changed the design in 2016 to the current ‘b’ model without telling their retailers. It was only because my dealer kept a stock of ‘a’ model spares for their customers that I was able to get a replacement. I pay domestic shipping and get in-stock parts fast. Not saying don’t go for a good deal, just thought I’d share my experience.

Since 2016 I’ve broken two Nexus 8 IGH with my BBS01, this year I had the shop convert my bike with an Enviolo Cargo CVT hub and it’s been working well so far. So I agree it’s a good idea to tune down the power, maybe fit a gearsensor or tap the ebrake or pause pedaling to stop the motor before shifting.
 
Last edited:
Loving that dynamo front hub, no parasitic power draw off the battery for the lights.

I went with a US dealer with a good reputation for after sales service and it repaid me when I needed to replace the controller after a couple of years

Since 2016 I’ve broken two Nexus 8 IGH with my BBS01, this year I had the shop convert my bike with an Enviolo Cargo CVT hub and it’s been working well so far. So I agree it’s a good idea to tune down the power, maybe fit a gearsensor or tap the ebrake or pause pedaling to stop the motor before shifting.
thanks Dewey. the dynamos are great, i honestly need to double check if this one still works lol. it looks to be in good shape but i'm not so sure about the wiring. i appreciate the input on finding a vendor. i wish there was more consistencies with how these sellers marked parts up but that's how it goes i guess.
my first bike out here i was taught to not shift the internal hubs while pedalling so i'm already kind of in the habit, i was planning on saving the money on a gear sensor but it would be nice to have something to save me from myself when i inevitably forget to shift properly.

Looks like a good project! Probably have to build some kind of bridge / spacer to go between the motor and the bottom bracket to run the cables through.
thanks! yeah i'm working on a design that i can 3D print out of solid TPU to route the wires and cables through. i was a bit disappointed because the cables start off by going through the frame up near the fork but then spit back out again right before the bottom bracket.
 
Just a few ideas here. 1) Get a spray can of gun oil. It is the unseen internal rust that is the big problem. In humid climates with temperature swings condensation causes internal rust. Spray inside every tube. The seat stays have little weep hole to spray in the oil. 2) A Nexus requires that you coast or are stopped when shifting. Otherwise you will kill it. A gear sensor is not needed, coasting is like the clutch pedal in a Porsche. Ease up on power, coast then shift. 3) Reroute all cables and wires over the bottom bracket to prevent them from being crushed. 4) Cut a clock face into the left side of the frame's BB shell, with one notch every 40 degrees for a total of 9. This will give the mounting bracket plate something to gain purchase upon so the motor will lock down and not move. Lock tight everything. 5) Use a KMC Z1eHX Wide chain. It is as strong as a belt and rust proof. On this build I would use a 36-t narrow wide chainring. This is a hauler not a speedster.
 
Last edited:
Just a few ideas here. 1) Get a spray can of gun oil. It is the unseen internal rust that is the big problem. In humid climates with temperature swings condensation causes internal rust. Spray inside every tube. The seat stays have little weep hole to spray in the oil. 2) A Nexus requires that you coast or are stopped when shifting. Otherwise you will kill it. A gear sensor is not needed, coasting is like the clutch pedal in a Porsche. Ease up on power, coast then shift. 3) Reroute all cables and wires over the bottom bracket to prevent them from being crushed. 4) Cut a clock face into the left side of the frame's BB shell, with one notch every 40 degrees for a total of 9. This will give the mounting bracket plate something to gain purchase upon so the motor will lock down and not move. Lock tight everything. 5) Use a KMC Z1eHX Wide chain. It is as strong as a belt and rust proof. On this build I would use a 36-t narrow wide chainring. This is a hauler not a speedster.
thank you for the tips, i will definitely get that chain on order today. do you have any pictures of what you mean with cutting into the bottom brocket shell? i think i get the idea i just want to make sure.

Forward cargo rack looks like it has some shock load absorbers. Interesting
it actually slides all the way out for some reason too. i guess it could be handy for days when i don't need it but i will probably try and figure out a way to lock it in place to prevent anyone from wandering off with it.
 
bottom brocket shell
With Bafangs I use a short piece of hacksaw blade. First tighten down the motor where you want it. Notice the position of the side plate and mark it. Then file into the side of the BB shell 2mm deep radial groves every 40 degrees. I make a paper template to guide me. I do not have photos of the process. This is the tool. I also remove all ugly connectors from the cockpit region to clean up a Bafang build to make it more of a Zen garden than a rat's nest.
 

Attachments

  • ShortyHack.JPG
    ShortyHack.JPG
    219.5 KB · Views: 125
With Bafangs I use a short piece of hacksaw blade. First tighten down the motor where you want it. Notice the position of the side plate and mark it. Then file into the side of the BB shell 2mm deep radial groves every 40 degrees. I make a paper template to guide me. I do not have photos of the process. This is the tool. I also remove all ugly connectors from the cockpit region to clean up a Bafang build to make it more of a Zen garden than a rat's nest.
i appreciate it. will revisit this once the motor arrives. i plan on getting some split loom to marry the brake sensor wire and the brake cable itself, and then i'll fit some type of enclosure in the gap of the frame right behind the kickstand where i can tuck all the extra cable into. definitely want it to be as zen as possible.
 
There are phone bags that hook to the top tube at the head tube. Just cut a slot and stuff all the connectors in along with the extra wire.
 
waiting on the motor kit to come in still, prepping the bike for install. the bike had obviously sat for a while according to the chain and sprocket rust, making the gears a bit sticky so i'm giving the hub a bath in some transmission fluid and will regrease it well when i slide it back together. the old tires were some really thin schwalbe marathon tires that were only rated for like 85 kg capacity, so i traded them with the tires from my transportfiets, a 1.75 marathon plus in the front and matching big ben in the rear. that should give some more cushion on the ride and the capacity on both of those is 115 kg so they ought to hold up better with passengers. there's this space in the bottom of the frame and i'm making a little enclosure to slide in there that will hold the extra wires and hopefully protect the connectors a bit from the elements. just an idea as of now it will need to get tweaked when i receive the motor and get everything wired up. a 36T narrow wide chainwheel, a new 19T sprocket for the igh, and KMC Z1eHX chain are ready and waiting, we'll see how long the nexus holds up because after this it is definitely the weakest part of the drivetrain.

at this point i think i'm about even with the budget i had originally planned on spending on the radrunner with accessories (and that's including the cost of all the tools i've needed to buy since i had to leave all of mine back in Texas). it probably won't be 100% finished for another month or so while i wait on parts to arrive but at the end of it i will have something that's much more usable and much easier to maintain.
 

Attachments

  • wire enclosure.jpg
    wire enclosure.jpg
    445.3 KB · Views: 158
  • shimano bath.jpg
    shimano bath.jpg
    250.7 KB · Views: 137
  • marathon plus.jpg
    marathon plus.jpg
    420.8 KB · Views: 141
  • handlebars.jpg
    handlebars.jpg
    492.8 KB · Views: 139
  • bottom bracket.jpg
    bottom bracket.jpg
    582.2 KB · Views: 143
Loving that dynamo front hub, no parasitic power draw off the battery for the lights.
This is not entirely true. It still takes power to turn the dynamo. All in all, taking losses into account, it is likely much more efficient to run the lights directly off the battery than it is to first turn it into kinetic energy only to turn it back into electric later.
 
  • Like
Reactions: JRA
my 1.75" tire dreams are crashing :( 
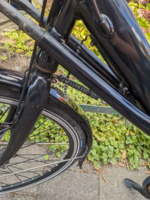
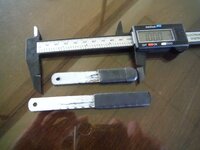
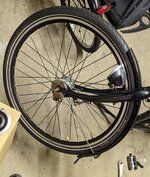
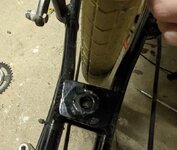
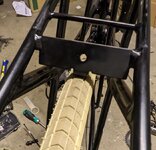
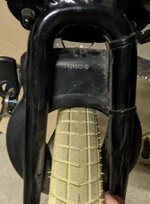
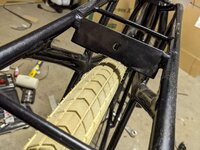
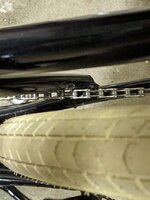
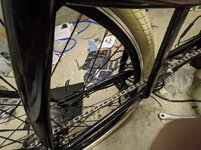
the front tire was a bit tight with the mudguard but i eventually got it to work. the rear tire however, no space. there's this mounting tab for the mudguard that is touching the new tires. i'm trying to decide if it is worth cutting the tab off to make space and then figuring out an alternative way to mount mudguards or if i should just size back down to 1.4" tires, maybe 1.5" at most.

on the same train of thought it looks like none of the hebie chaingliders are going to be long enough to cover the full chain of this thing, so i'm back to the drawing board on a chainguard as well. i could probably mount a lakdoek easy enough if i could find an extra long one but that's a big if.

otherwise everything is going well. motor and most electronics are installed. i like the size and shape of the eggrider it is very low key. had to buy an extension for the speed sensor because it wasn't long enough to get to the back wheel. everything else seems to be just barely long enough to stretch along the body of this thing. didn't realize how tight it was going to be with the bafang kit.


This is not entirely true. It still takes power to turn the dynamo. All in all, taking losses into account, it is likely much more efficient to run the lights directly off the battery than it is to first turn it into kinetic energy only to turn it back into electric later.
with regards to this, running exactly the same lights off both the battery and the dynamo yes the dynamo would be less efficient on paper, but if i'm not just using the throttle that means some of the kinetic energy is coming from my legs and i would think that would offset the losses? also when you factor in the fact i'm lazy and don't want to buy/lace a new rim i think it about evens out lol.
 

Attachments

  • front side tire clearance.jpg
    front side tire clearance.jpg
    113.9 KB · Views: 122
  • mudguard tab 1.jpg
    mudguard tab 1.jpg
    106 KB · Views: 114
  • mudguard tab 2.jpg
    mudguard tab 2.jpg
    95.7 KB · Views: 122
  • rear tire clearance.jpg
    rear tire clearance.jpg
    61.7 KB · Views: 120
with regards to this, running exactly the same lights off both the battery and the dynamo yes the dynamo would be less efficient on paper, but if i'm not just using the throttle that means some of the kinetic energy is coming from my legs and i would think that would offset the losses? also when you factor in the fact i'm lazy and don't want to buy/lace a new rim i think it about evens out lol.
As soon as you turn on your lights, lets say 30 watts, running off a dynamo, it will create an immediate drag of about double that on your bike. With pedal assist only, you will be forced to work a little harder to compensate (not the full 60 watts, but some, based on your assist level). It may offset the losses, but at the cost of you working harder, or at the cost of speed. Most likely, what will happen is you'll increase your assist level (remember, you said you're lazy.. ;)). and pass the watts on to the battery anyway. In addition: Een when your light is not on, a dynamo hub will ceate several watts of drag.

A dynamo hub on an electric bike makes about as much sense as an alternator on a Tesla...
i mean i would argue that it makes a bit more sense than an alternator on a tesla considering that you aren't expected to get out and push a car under normal operation (although that may not be the case with teslas considering all the issues i see with them...) whereas with a bicycle, it's still a bicycle, and you are still expected to provide at least some of the power. i'm not trying to build a throttle only moped and i'm not trying to go as fast as possible. the lights that are on there are a combined 6W of power so it's probably a negligible loss at the end of the day.

that being said i do see your point and had i built this bike from the frame up i probably would not have gone to the effort of adding the dynamo. at the very least the lights are all wired up and all i have to do is connect them to the motor controller if i ever decide to get rid of it in the future.
 
For a custom extended chaincase Google some ideas on the site:bentrideronline.com
The recumbent trike/bike crowd often need to fabricate chain enclosures using plastic tubing to fit their longer frames.

Alternatively you might look at the Veer split belt https://www.veercycle.com/products/split-belt-pro unlike Gates it does not require a frame break.
 
Last edited:
i am having chain line issues. i turned the rear sprocket around and it helps a bit but the chain is still rubbing on the frame when using both the straight 36T chainwheel and the included bafang 44T one that's slightly dished. is my only option here spending way too much money on a lekkie bling ring?
 
Is the frame rub preventing you from adding spacers to push the sprocket out?
 
it's rubbing on the inside edge of the frame here at the front of the tire. the only thing i can think of to fix it would be pulling the chain in towards the frame of the bike up by the pedals.
 

Attachments

  • bad chain 1.jpg
    bad chain 1.jpg
    61 KB · Views: 126
  • bad chain 2.jpg
    bad chain 2.jpg
    141.4 KB · Views: 131
Back