I realize this issue has been addressed in several different threads, but I wanted to summarize a modification option in a new post with the hope of reaching more people that are frustrated with Aventon PAS issues.
I can confirm that the KT-22A controller and KT-LCD3 display make a virtually un-rideable (for casual riders) bike into a much smoother and controllable riding experience. The only problem (as referenced in numerous posts) is that the KT-22A controller will not fit in the Pace 500 step-thru frame where the stock controller resides. I’m here to tell you though, that an external mount is well worth the cost and effort in my opinion. The “jolt” experienced in PAS1 and PAS2 with the OEM equipment is gone completely. And the high top end speeds in PAS1 and PAS2 are reduced to comfortable levels to where you can actually sync a gear with the PAS to benefit from both your own pedaling and the motor at the same time. The bike now starts out slowly and ramps up steadily and smoothly as it should. Each increase in PAS level is smoother than an automatic transmission vehicle. Throttle on demand (TOD) is available in all PAS levels including zero or you can program it to work in all levels except zero if you like. Throttle after pedaling (TAP) is also an option if you prefer. I don’t think you can program specific speeds for each PAS level (not that I’ve found anyway), but I don’t really feel the need because it is riding and shifting so smoothly with a basic configuration of the new equipment.
The Pace 500 is my wife’s bike, and she was not thrilled with the idea of having an externally mounted controller with visible cables. But she is so happy with the performance now that she blesses the upgrade regardless of the minor aesthetic issues. The installation process is all plug and play with locally sourced (USA) parts that I got in less than a week and for less than $150. The actual installation of the parts took only about an hour and is not difficult if you have some basic tools and mechanical ability. Programming the display took much longer because there is virtually no Pace 500 specific configuration information online that I could find, so it was a lot of trial and error. But if you use the values I’ve listed below, it should take you less than 30 minutes to program for basic riding.
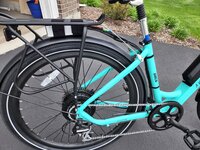
My best installation advice would be to install a rear rack/cargo carrier and mount the controller to the underside of that rack. I had already installed a rear rack and fenders when she first got the bike, so it was easy to envision a relatively clean install. A few Velcro straps and zip ties to neaten up the cable routing, and you can barely tell the bike is modified. I didn’t bother (yet), but painting the controller flat black would hide it even more. I ordered the controller and display (waterproof/Julet style) from jycyling-go via Ebay and the 3 waterproof Julet style cable extensions (Baluoqi brand 8-pin male to female 80cm long, Keen brand 9-pin male to female 600mm long, Ricetoo brand 3-pin male to male 800mm long) via Amazon. I made the 2 battery power extensions (roughly 36 inches each) myself with some 14g bulk wire and common barrel connectors.
Display programming videos are readily available online, but the Pace 500 values are not. I ended up using the values below.
First programming screen: very important to reduce the maximum speed from the default 72 km/h or it will not work at all, I used 30 km/h. Wheel diameter is 27.5 for stock Pace 500 and the other settings (metric/imperial) per your own preference.
Second programming screen (P values): P1=80, P2=1, P3=1, P4=your preference (0 for TOD, 1 for TAP), P5=15.
Third programming screen (C values): C1=02, C2=0, C3=your preference (startup/default PAS level), C4=3, C5=10, C6=5, C7=0, C8=0, C9=0, C10=N, C11=0, C12=4, C13=0, C14=your preference (1 is fine for casual riders).
I can confirm that the KT-22A controller and KT-LCD3 display make a virtually un-rideable (for casual riders) bike into a much smoother and controllable riding experience. The only problem (as referenced in numerous posts) is that the KT-22A controller will not fit in the Pace 500 step-thru frame where the stock controller resides. I’m here to tell you though, that an external mount is well worth the cost and effort in my opinion. The “jolt” experienced in PAS1 and PAS2 with the OEM equipment is gone completely. And the high top end speeds in PAS1 and PAS2 are reduced to comfortable levels to where you can actually sync a gear with the PAS to benefit from both your own pedaling and the motor at the same time. The bike now starts out slowly and ramps up steadily and smoothly as it should. Each increase in PAS level is smoother than an automatic transmission vehicle. Throttle on demand (TOD) is available in all PAS levels including zero or you can program it to work in all levels except zero if you like. Throttle after pedaling (TAP) is also an option if you prefer. I don’t think you can program specific speeds for each PAS level (not that I’ve found anyway), but I don’t really feel the need because it is riding and shifting so smoothly with a basic configuration of the new equipment.
The Pace 500 is my wife’s bike, and she was not thrilled with the idea of having an externally mounted controller with visible cables. But she is so happy with the performance now that she blesses the upgrade regardless of the minor aesthetic issues. The installation process is all plug and play with locally sourced (USA) parts that I got in less than a week and for less than $150. The actual installation of the parts took only about an hour and is not difficult if you have some basic tools and mechanical ability. Programming the display took much longer because there is virtually no Pace 500 specific configuration information online that I could find, so it was a lot of trial and error. But if you use the values I’ve listed below, it should take you less than 30 minutes to program for basic riding.
My best installation advice would be to install a rear rack/cargo carrier and mount the controller to the underside of that rack. I had already installed a rear rack and fenders when she first got the bike, so it was easy to envision a relatively clean install. A few Velcro straps and zip ties to neaten up the cable routing, and you can barely tell the bike is modified. I didn’t bother (yet), but painting the controller flat black would hide it even more. I ordered the controller and display (waterproof/Julet style) from jycyling-go via Ebay and the 3 waterproof Julet style cable extensions (Baluoqi brand 8-pin male to female 80cm long, Keen brand 9-pin male to female 600mm long, Ricetoo brand 3-pin male to male 800mm long) via Amazon. I made the 2 battery power extensions (roughly 36 inches each) myself with some 14g bulk wire and common barrel connectors.
Display programming videos are readily available online, but the Pace 500 values are not. I ended up using the values below.
First programming screen: very important to reduce the maximum speed from the default 72 km/h or it will not work at all, I used 30 km/h. Wheel diameter is 27.5 for stock Pace 500 and the other settings (metric/imperial) per your own preference.
Second programming screen (P values): P1=80, P2=1, P3=1, P4=your preference (0 for TOD, 1 for TAP), P5=15.
Third programming screen (C values): C1=02, C2=0, C3=your preference (startup/default PAS level), C4=3, C5=10, C6=5, C7=0, C8=0, C9=0, C10=N, C11=0, C12=4, C13=0, C14=your preference (1 is fine for casual riders).