CalgaryDHR
New Member
- Region
- Canada
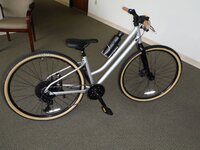
I wanted to detail adding lights to a Shimano Steps e6100 system; my experience was on a Norco Scene VLT, but most of it is universal. Shimano makes it pretty easy, but there are a few tripping points.
Tools and supplies:
-Compatible lights
-Android phone (or tablet, I bet)
-Screwdriver
-Allen keys
-Tape
-Shimano's instructions (https://si.shimano.com/pdfs/um/UM-78N0A-001-00-ENG.pdf)
-Zip ties
1. Get some compatible lights. While you can find quite a few, one easy solution my LBS found was ordering a spare set for a Kona Ecoco, which comes with lights standard. This ran me $150 CAD; not great, but not bad. There is some other suggestions in the EMTB thread linked further on.
2. Get the bike somewhere comfortable to work. A bike stand isn't required, but will make things easier and will not require you to lay on the floor; also, if you struggle, you don't want end up with your bike half dissembled in the dark. Some bins (I used one of my son's snack cups) for little screws is a good idea.
REMOVE YOUR BATTERY
(Maybe not required, but why risk it if you don't have to?)
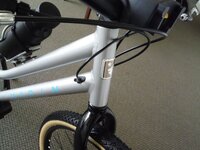
3. Remove the cover on the front, righthand side of the motor. This doesn't require removing the crank arm, but removing the crank arm can be helpful. The screws on the cover are tiny Phillips screws. Put them somewhere safe, not (ahem) on a tile floor next to your cat.
Once this cover is off, you should be able to see the little leads built into your Steps drive unit.
It may be a good idea to remove the little front center cover as well to make running cables simpler.
Another good idea? Take a photo of how the cables are tucked away, since you are about to fart around in there.
4. Thread your light cables to the motor. This can be difficult! I ran a 'fishing line' of jacketed steel clothesline up my front tube to get the headlight run nicely.
The rear light was very difficult to fish around the drive unit. I ended up having success with removing my speed sensor and using that cable to fish my rear light cable to the desired location. This took a lot of swearing, finessing, and care not to damage the important bits. On my bike, this cable went from the back 'left' of the frame/drive unit, under the drive unit, and pops up right next to the lighting connection. By taping my light's cable to the speed sensor wire, I could carefully pull the speed sensor cable back towards the drive unit connection, and the lighting cable showed up before my speed sensor cable length ran out.
If you remove the speed sensor, watch for the little 'lock washer' falling off behind the sensor.
5. Once your cables are run, I would immediately install the cables and confirm everything lights up. Each light cable should split into a simple pair of leads, probably with one of the wires marked with a stripe and one not. You will want to combine the 'striped' wires together by twisting, and then clamp them into one side (Positive? Negative? I don't know, just pick one. We can fix it soon if we mess up!). Repeat for the other cables to complete your circuit.
Now we have to turn the lights on. If your bike didn't come with lights originally, the computer may not let you turn lights on in the settings! Don't worry, we can fix this...with an Android phone at least. Thank goodness for the wonderful folks at EMTB forums for this! (Link here: https://www.emtbforums.com/community/threads/hardwiring-lights-to-e8000.975/). That is a great thread for this as well!
We need the e-tube project app...but not the current version. For some reason, Shimano went and disabled this option in their newest app. Head to https://apkpure.com/e-tube-project-cyclist/com.shimano.etubeprojectmobile.droid.phone/versions, and download '3.4.3'. And don't update the app when you open it!
Connect your phone or tablet to your bike (this is via bluetooth). Wander your way through the bike settings and find 'enable lights'. I will try and find this and screenshot where exactly to do this later!
Once this is done, your bike computer will allow you to turn your lights on. The options are to power the lights every time the bike is turned on OR not power the lights, so unfortunately you have to go through the settings or live with 'daytime running lights'. I bet some lights have a second switch to circumvent this, but not the Kona ones")
6. Your lights work! Now you have to mount them. If you got the Kona ones, the front light is really intended to be mounted at the base of a front fork; the rear seems to want to be on a rear fender. I don't know your bike. You figure it out. Maybe you will realize you need some different bolts. I bet some kind words and a 6 pack of beer will get you the right stuff at your LBS if you don't have a random collection of bolts around like me. Remember to leave enough cable on the front lights to accommodate turning your front wheel.
7. Tidy up. Once your lights are mounted, remember to remount your speed sensor and then tidy up the cables as required. This is where zip ties can be helpful.
8. Reattach the motor covers. If you have shifted cables around in the drive unit, you make need to tuck them back to get a good fit on the cover again. The cover may need to be 'popped' past a lip of the rest of the cover as well.
9. Confirm your bike still works with your speed sensor attached.
Tools and supplies:
-Compatible lights
-Android phone (or tablet, I bet)
-Screwdriver
-Allen keys
-Tape
-Shimano's instructions (https://si.shimano.com/pdfs/um/UM-78N0A-001-00-ENG.pdf)
-Zip ties
1. Get some compatible lights. While you can find quite a few, one easy solution my LBS found was ordering a spare set for a Kona Ecoco, which comes with lights standard. This ran me $150 CAD; not great, but not bad. There is some other suggestions in the EMTB thread linked further on.
2. Get the bike somewhere comfortable to work. A bike stand isn't required, but will make things easier and will not require you to lay on the floor; also, if you struggle, you don't want end up with your bike half dissembled in the dark. Some bins (I used one of my son's snack cups) for little screws is a good idea.
REMOVE YOUR BATTERY
(Maybe not required, but why risk it if you don't have to?)
3. Remove the cover on the front, righthand side of the motor. This doesn't require removing the crank arm, but removing the crank arm can be helpful. The screws on the cover are tiny Phillips screws. Put them somewhere safe, not (ahem) on a tile floor next to your cat.
Once this cover is off, you should be able to see the little leads built into your Steps drive unit.
It may be a good idea to remove the little front center cover as well to make running cables simpler.
Another good idea? Take a photo of how the cables are tucked away, since you are about to fart around in there.
4. Thread your light cables to the motor. This can be difficult! I ran a 'fishing line' of jacketed steel clothesline up my front tube to get the headlight run nicely.
The rear light was very difficult to fish around the drive unit. I ended up having success with removing my speed sensor and using that cable to fish my rear light cable to the desired location. This took a lot of swearing, finessing, and care not to damage the important bits. On my bike, this cable went from the back 'left' of the frame/drive unit, under the drive unit, and pops up right next to the lighting connection. By taping my light's cable to the speed sensor wire, I could carefully pull the speed sensor cable back towards the drive unit connection, and the lighting cable showed up before my speed sensor cable length ran out.
If you remove the speed sensor, watch for the little 'lock washer' falling off behind the sensor.
5. Once your cables are run, I would immediately install the cables and confirm everything lights up. Each light cable should split into a simple pair of leads, probably with one of the wires marked with a stripe and one not. You will want to combine the 'striped' wires together by twisting, and then clamp them into one side (Positive? Negative? I don't know, just pick one. We can fix it soon if we mess up!). Repeat for the other cables to complete your circuit.
Now we have to turn the lights on. If your bike didn't come with lights originally, the computer may not let you turn lights on in the settings! Don't worry, we can fix this...with an Android phone at least. Thank goodness for the wonderful folks at EMTB forums for this! (Link here: https://www.emtbforums.com/community/threads/hardwiring-lights-to-e8000.975/). That is a great thread for this as well!
We need the e-tube project app...but not the current version. For some reason, Shimano went and disabled this option in their newest app. Head to https://apkpure.com/e-tube-project-cyclist/com.shimano.etubeprojectmobile.droid.phone/versions, and download '3.4.3'. And don't update the app when you open it!
Connect your phone or tablet to your bike (this is via bluetooth). Wander your way through the bike settings and find 'enable lights'. I will try and find this and screenshot where exactly to do this later!
Once this is done, your bike computer will allow you to turn your lights on. The options are to power the lights every time the bike is turned on OR not power the lights, so unfortunately you have to go through the settings or live with 'daytime running lights'. I bet some lights have a second switch to circumvent this, but not the Kona ones
6. Your lights work! Now you have to mount them. If you got the Kona ones, the front light is really intended to be mounted at the base of a front fork; the rear seems to want to be on a rear fender. I don't know your bike. You figure it out. Maybe you will realize you need some different bolts. I bet some kind words and a 6 pack of beer will get you the right stuff at your LBS if you don't have a random collection of bolts around like me. Remember to leave enough cable on the front lights to accommodate turning your front wheel.
7. Tidy up. Once your lights are mounted, remember to remount your speed sensor and then tidy up the cables as required. This is where zip ties can be helpful.
8. Reattach the motor covers. If you have shifted cables around in the drive unit, you make need to tuck them back to get a good fit on the cover again. The cover may need to be 'popped' past a lip of the rest of the cover as well.
9. Confirm your bike still works with your speed sensor attached.