spokewrench
Active Member
- Region
- USA
I bought my Abound at the end of November. In eight weeks, the right BB bearing began making rubbing noises. I was registered, but Tech Support told me to turn the bike over and submit a clear photo of the serial number. Then they told me to take it to a dealer.
I would have needed a truck to haul it to a city with a dealer. For all I knew, the bearing wouldn’t make noise when the dealer tried it.
Aventon’s dealer in Logan, Utah (52,000) is Charged E Cycles. Their mechanics have LEVA certification for Aventon ebikes. In November, they made a youtube video showing how to replace an Aventon torque sensor. Having watched the video, I removed the chainwheel to see the bearing. I found that i could remove the seal. I wiped away some grease and added some good bearing grease. The noise went away.
Now I didn’t need assistance to pedal up several hills where I’d needed PAS for my first 100 days. However, it still didn’t pedal as “cleanly” as two other bikes, and it could get worse if I didn’t remove the BB to flush out the old grease.
The mechanic had sheared the cable off when he removed the torque sensor. He guided the new BB in and in the next shot he was screwing down the left cap. He said he’d had to loosen the right cap so he could turn the left cap without turning the torque sensor and shearing off the cable.
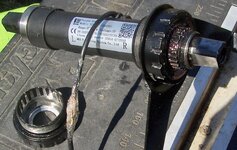
Following that advice, I loosened the right cap before trying to unscrew the left. I also monitored the PAS cable in the controller compartment. Each time I felt it being wound in, I’d back off on the cap as I pulled out the slack, then try again. When I finally got the sensor out, I saw that the certified Aventon mechanic hadn't known how to do it. The cap had metal fingers that engaged bars on the sensor. They were intended to keep the sensor from turning when the right cap was unscrewed or screwed back in. The left cap should not have been unscrewed.
The cable had passed through a hole to the controller compartment. The cable had slid through that hole each time the sensor started to wind it in and each time I pulled out the slack as I turned the left cap back to unwind it. The edge of the hole had torn through the outer jacket and laid bare three of the six conductors. The edge of the hole felt pretty smooth, and, to avoid damaging the cable, I hadn’t pulled hard. Wiring is supposed to have tough insulation to be certified for buildings or vehicles. It seems that the grease wasn’t the only part of the sensor that wasn’t up to snuff.
Cleaning the bearings of a defunct sensor would have been useless. I put some rubbery fuel-tank cement on the conductors to insulate them from each other. I reassembled the bike and PAS worked.
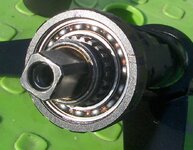
The next day, I removed the sensor to clean the bearings. Now that I could hold the bottom bracket up, I could see that what I’d thought were the balls were cups in the cage. Turning the bearing directly, I could feel that it was badly gummed up. I got it turning freely with brake cleaner and WD-40. I smeared Red ’n’ Tacky on the cage and replaced the seal. I hoped the cleaners would evaporate so that better grease could be wicked in. It wouldn't be ideal because OE grease was still in there.
Now PAS didn’t work. Movement of the cable had probably caused conductors to work through the rubbery cement and short. I could probably fix it, but did I really want these bearings in my bottom bracket?
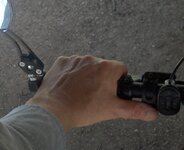
On the handlebar, I moved the throttle bracket away from the grip and rotated it down so I didn’t have to cock my wrist to move the lever. I found that now I could feather the throttle for the amount of power I wanted and hold it indefinitely without fatigue.
The bearings pedaled better than ever but still didn’t feel “clean” like other bikes. It felt a little like underinflated tires, but only while I pedaled. I’ve ordered a crankset where the chain wheel bolts on. If I fasten them to the Aventon BB, I can see how the chainwheel lines up. That should show me what shaft length I need in a non-PAS 100mm BSA bottom bracket.
I would have needed a truck to haul it to a city with a dealer. For all I knew, the bearing wouldn’t make noise when the dealer tried it.
Aventon’s dealer in Logan, Utah (52,000) is Charged E Cycles. Their mechanics have LEVA certification for Aventon ebikes. In November, they made a youtube video showing how to replace an Aventon torque sensor. Having watched the video, I removed the chainwheel to see the bearing. I found that i could remove the seal. I wiped away some grease and added some good bearing grease. The noise went away.
Now I didn’t need assistance to pedal up several hills where I’d needed PAS for my first 100 days. However, it still didn’t pedal as “cleanly” as two other bikes, and it could get worse if I didn’t remove the BB to flush out the old grease.
The mechanic had sheared the cable off when he removed the torque sensor. He guided the new BB in and in the next shot he was screwing down the left cap. He said he’d had to loosen the right cap so he could turn the left cap without turning the torque sensor and shearing off the cable.
Following that advice, I loosened the right cap before trying to unscrew the left. I also monitored the PAS cable in the controller compartment. Each time I felt it being wound in, I’d back off on the cap as I pulled out the slack, then try again. When I finally got the sensor out, I saw that the certified Aventon mechanic hadn't known how to do it. The cap had metal fingers that engaged bars on the sensor. They were intended to keep the sensor from turning when the right cap was unscrewed or screwed back in. The left cap should not have been unscrewed.
The cable had passed through a hole to the controller compartment. The cable had slid through that hole each time the sensor started to wind it in and each time I pulled out the slack as I turned the left cap back to unwind it. The edge of the hole had torn through the outer jacket and laid bare three of the six conductors. The edge of the hole felt pretty smooth, and, to avoid damaging the cable, I hadn’t pulled hard. Wiring is supposed to have tough insulation to be certified for buildings or vehicles. It seems that the grease wasn’t the only part of the sensor that wasn’t up to snuff.
Cleaning the bearings of a defunct sensor would have been useless. I put some rubbery fuel-tank cement on the conductors to insulate them from each other. I reassembled the bike and PAS worked.
The next day, I removed the sensor to clean the bearings. Now that I could hold the bottom bracket up, I could see that what I’d thought were the balls were cups in the cage. Turning the bearing directly, I could feel that it was badly gummed up. I got it turning freely with brake cleaner and WD-40. I smeared Red ’n’ Tacky on the cage and replaced the seal. I hoped the cleaners would evaporate so that better grease could be wicked in. It wouldn't be ideal because OE grease was still in there.
Now PAS didn’t work. Movement of the cable had probably caused conductors to work through the rubbery cement and short. I could probably fix it, but did I really want these bearings in my bottom bracket?
On the handlebar, I moved the throttle bracket away from the grip and rotated it down so I didn’t have to cock my wrist to move the lever. I found that now I could feather the throttle for the amount of power I wanted and hold it indefinitely without fatigue.
The bearings pedaled better than ever but still didn’t feel “clean” like other bikes. It felt a little like underinflated tires, but only while I pedaled. I’ve ordered a crankset where the chain wheel bolts on. If I fasten them to the Aventon BB, I can see how the chainwheel lines up. That should show me what shaft length I need in a non-PAS 100mm BSA bottom bracket.
Attachments
Last edited: