3 wheel recumbent

Hugh

Active Member
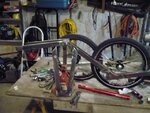
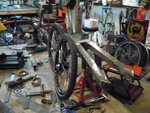
I have decided to use the brakes and electrics on my Bionx 500 equipped EVO road bike and build a 3 wheeled electric recumbent trike. I bought the plans, got the steel tube and have started the project. The style is called a tadploe trike which means the 2 wheels are in front and 1 wheel in back It is called the Warrior and i got the plans from a site called Atomic Zombie. The frame is made from 1/16" or 16 gauge 1 1/2" square tubing. You need a few parts from discarded bikes. The headsets from 3 old bikes are cut down and used in the steering assembly. A bottom bracket from one bike is also used. After i bought the plans there was the annual police bicycle auction where stolen and not claimed bikes are auctioned off. It just happens to be less than a block from my home. So i picked up 3 old bikes for $20 apiece. A grinder with cut wheels and a flap disc was used to cut them up and polish the pieces i needed. I also have a small 110 volt welder which is more the sufficient for the job. The BionX wheel is 28" in diameter and will be used as the rear drive unit. The EVO has 2 180 mm Tektro disc rotors which fit the front wheels. The front wheels were the most expensive components so far. You need 20" rims BMX style rims so I used my LBS and ordered 2 20mm disc ready hubs, 2 double wall 36 spoke 20" rims and had them lace the wheels up. Two 6" long 5/8th" fine thread bolts will be the front axles, those needed some 5/8ths" bronze bushings and one wrap of .010 shim to make them fit the 20mm hubs nice and snug. So far I have the main part of the frame built, the wheels all ready and will be making the front arms that hold the wheels and steering. It is a step by step process. The reason for this build is one - comfort and two- i like building things and 3 - bikes, in particular electric bikes are great. trike 001 (640x480).jpg trike 002 (640x480).jpg trike 003 (640x480).jpg
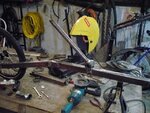
 
The middle picture has an extra rear wheel holder , this was the first attempt. the plans called for a 26"rear wheel. Turns out mine was a 28". So a second was fabbed up. I now think of it a the start of a 2nd build-in time of course.
 
Awesome! I'm eager to see how this turns out! I always wanted to do a recumbent Atomic Zombie project. I have their book.

I picked up a production tadpole that I've been meaning to convert to electric. I can get it wholesale, so I decided not to fabricate for now.

Good luck with your build!
 
i've been taking my time just so it stays fun and not become a job. The front arms that attaches the wheels to the main frame boom have now been fabbed up, the plans call for the seat boards to be cut and thats done. Once the 3 pieces of the seat have been joined together and a couple of seat braces welded to the frame boom have been added the front arms holding the wheels can be trimmed then welded to the frame. that job will hopefully be done tomorrow and I will post a couple new pictures.
 
001.JPG
Well it's been a while since I last posted but the Atomic Zombie warrior recumbent trike has now been built. At first it was pedal power only and taken for short rides in the neighborhood to see if it would need tweaking. A number of issue's were identified and corrected and so a few days ago the Bion X HD 500 hub motor was swapped in. Riding it on level 2 of 4 gives an average speed of around 18 kph or a little over 10mph and level 4 yields the limit of 32kph or 20 mph which is fast enough for me. It has mechanical front disc brakes on the 2 20" front wheels and no brake on the rear wheel.
 
The picture above was taken before the Bion X kit was installed. I will attempt to get a picture posted up soon of the upgrade
 
Except for the front fenders that are still being modified the trike has now been turned into an e-trike. For the last couple weeks it was taken on shorter shakedown rides to identify any issues that were then resolved. Minor things like changing the pulleys spacing from the frame and replacing the front pulley with a smaller one to improve the chainline leading to the front sprocket. I did not use the hydralic disc's from the donor EVO bike, instaed bought a set of mechanical front disc brakes off Amazon. So the BionX kit used everything except the power cut off switch the original brake lever had. Not a problem since when braking i always stop pedaling anyway. The next 2 pictures were taken on a 35 kilometer ride I took from my home that used a variety of roads, bike trails and some gravel walking/bike paths. The trike pedalled beautifully with the Bion X system. Level 2 power was mostly used and the average speed was about 19kph. The last stretch before heading home was down a paved bike path and level 3 was used and against a fairly stiff wind I was able to maintain a speed of 34 kph which is approx 21 mph. The power level showed about 2/3rds battery left.
electric trike 028 (360x640).jpg
electric trike 030 (360x640).jpg
 
I forgot to mention I have done a variation of the above ride on the BionX equipped road bike and my Bafang 1000 W fat bike several times, the difference on the trike was comfort as in no butt pain, no wrist strain and while pedalling i could sit there and look around at the scenery. The only issue is you are very low, hence the flag and on the back of the rack is a flashing red light and i am wearin an LED flashing red armband as well. Plus 2 mirrcycle mirrors to keep an eye on traffic approaching from the rear. Plus when in a traffic area if i need to cross in front of any vehicle I never do until I establish eye contact and make certain the driver knows my intentions. This last from years of riding motorcycles.
 
Went for another test ride 2 days ago. This along a gravel path called the Duff Roblin trail which runs along the top of the Red River floodway. The floodway is just a really big ditch around the city of Winnipeg that was dug in the 60's to save the city from flooding. Anyway it was about 10 miles of gravel which my trike was not really designed for then another 20 miles of city riding. the gravel section started off at a speed of around 10mph because it was a bit rough, I had to bump the speed up a bit the last third because there were thousands of grasshoppers, they starting jumping when I approached, and at 10mph they kept hitting me, a bit faster and it wasnt as much of an issue. The trike handled it beautifully, the last 20 miles of street riding was a mix of sidewalk, road and trail and because I wanted to get an idea of the range the power level was bumped up to 3, giving a speed of around 21mph on the road sections. All told the ride was just a bit over 35 miles and it used most of the battery, it would have lasted another few miles at most.
 
Winter is now fast approaching here in Winnipeg and the green trike is now sitting in my heated garage on a work table awaiting it's next stage. I had a great summer and got lot's of riding in. Even managed to convert a long time friend - we have known each other for 60 years now - he has a few health issues so I put him on the Bafang equipped fat bike for quite a few of those rides. I have his 29er schwinn mountain bike in my garage and we are awaiting a 500 watt Tongshen mid drive for installation. Back to the green trike, I took it for a few cold weather rides in the last couple weeks, temps around and slightly below freezing and it reinforced the fact that my hands don't take to the cold very well. So the green trike is getting a body. The framework will be thin metal rods, around 1/8 to 3/16ths" that will be covered in lite weight painter dropcloth canvas. The front wheels will be enclosed and the body from the riders seat forward will tilt up and forward for access. The portion behind the rider will also be enclosed, as in a tailbox. I expect some streamlining from this but more importantly, protection from rain and light snow. It will be removeable for the 2 months of hot weather we get here in Manitoba. It has been started and when the frame is more advanced I will put up a couple pictures.
 
Just being enclosed and not having my hands being exposed to windchill should help a lot. I was out on a local bikepath yesterday on my fat bike, the temp was just below freezing. Of course I was wearing gloves and had put a small lithium powered hand warmer into the top of each glove. That helped a little. Anyway i spotted a friend who has built a quadcycle with an enclosed body made of wood on the trail. It has an open cockpit and he had added a small wraparound windscreen. Just being enclosed and out of the wind and having internal heat generated by pedalling he was nice and warm and once we turned and headed downwind he was able to remove his gloves so I'm hopeful.
 
this picture shows the start of the frame for the trike body. The wood across the wheels is just to give the proper spacing till a bit more fram has been constructed and it becomes mor rigid The coroplast in the background will be zip tied to the frame and then I will stretch some light weight canvas across it and paint that. That will be tested first on a small piece to see if it is feasible.
Link Removed
 
No door, the round section at the front will allow the frame to pivot up for getting in and out
 
Short update on the body work. I have pretty much finished the front part of the frame. It now has a means of being tilted upward and locked in place. I went through my parts pile and attached 2 tubes, one of which slides into the other and the bottom tube connects to the front derailleur mast and the top to a bracket welded to the frame of the body. A seat clamp was used to apply tension to lock the frame into either up or down position. The frame now just needs to be checked for any welds that might need attention, get cleaned up then painted. The canvas covering idea has been scrapped. I will use a few pieces of coroplast to fill in some of the panels and they will add some strength and then the body will be covered in Dacron then painted in a bright color, possibly orange or yellow. The hope is that some strategic pieces of coroplast will help avoid the "zepplin" look once the dacron has been applied and heat shrank. Once all that's been done a tailbox will be built. I'm thinking a small gel 12V battery and some "penny" LED lights for turn signals plus an LED taillight will be built in as well
 
Here is a picture of the build so far
(Link Removed - No Longer Exists)
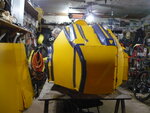
I decided to clad it in coroplast before appyling the dacron. The angle from the camera is a bit off, seen in person the front does not angle down as sharply as it appears. The blue taped pieces on the deck are raised cut outs to offer a bit clearance for the feet and knees. The front wheels have now been enclosed and the tailbox is yet to be built.
 
Here is another picture of the progress so far. A rounded nose has been added although only one side has been stitched up and taped so far and the wheel wells have been enclosed.

P1020680.JPG
 
About a month since the last update. The front part of the body is finished, the tailbox has been finished as well. Tailbox has 3 storage areas, 2 in the usual pannier area and the 3rd located in the sloping piece that runs from behind my head down to the rear. The tailbox sits on the rack for support and has 2 fastening points, one of which uses a 5/16ths bolt and wingnut to hold it down. The wingnut also serves as a ground for the small 12 V battery which resides in a small coro box in the enclosure. The battery will power the LED head and tailight and the LED turn signals. I am hoping to head out to my garage today and attempt the Dacron covering for the tailbox. It's smaller than the main body so I want to hone my Dacron covering skills on it first. Temps here are 30 below today so not in any hurry to go bump up the garage heat. If all goes well I will post up a couple pictures later.
 
Back