[#3] The X52 cockpit array..
I'm having to wait for a plumber to arrive, so I'll go ahead and get this thread started. As always, it is to your advantage to first scroll down to the end of this thread to view the photo's. That way, everything that you are about to read will make more sense.
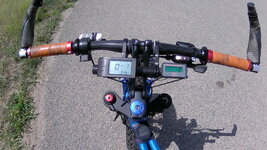
First of all, you will notice that the straight/flat handlebar and the extra 8” bar are carbon fiber material. That's because I like the appearance of same. I already owned the items, although I had also purchased this item, too-- just because it was a “riser bar” (like the X52's original bar): https://www.aliexpress.com/item/4000628589089.html?spm=a2g0s.9042311.0.0.454e4c4djogGUl
Plus, I thought it looked pretty cool. You will need to order size 31.8 by 620mm (or longer). For my purposes, because of the array of crap on my handlebar, the 620mm(24.5”) proved to be too short by about 50mm (2 inches).If I do decide to order it again, I will buy the 31.8x680mm(27” long).(By the way, 25mm=1 inch)..
The 8” long accessory bar (carbon fiber): https://www.aliexpress.com/item/32993817080.html?spm=a2g0s.9042311.0.0.454e4c4djogGUl
I installed this item because the handlebar was becoming too cluttered. Plus, I liked the final easy-access/easy viewing location of the computer display unit(cdu) and the monitor.
The LCD volt/% monitor:
Battery Monitor, Battery Capacity Tester DC12V 24V 36V 48V 60V Battery Capacity Indicator Module Iron-Lithium & Lead-Acid Voltage Monitor Tester Percentage Indicator: Amazon.com: Industrial & Scientific
I would have preferred to not be required to install this handy device on my X52. However, circumstances (which I will address in a later thread) dictate otherwise. It is extremely light weight (like a bunny fart) and can be attached to the 8” bar by using only clear packing tape. Its 2 wire connectors are really fine(thin) wiring. So, if you ever need to replace the harness, just take the item to a hobby shop that sells radio control items. Look in the “airplane” section. These connectors are used for nav lights , etc.
Also, concerning the proper code to use: for any 48v battery (the X48), use “12c”
(12x4=48, thus the 12c). for any 52v battery (the X52), use “13c” (13x4=52, thus the 13c). I utilize both types of batteries (48v and 52v), but re-programming for each is really not required.. Easy Breezy..
I wired my unit into the headlight wires (I use different lighting (strobe/flash) LED lites at the front (see photos). That way, the monitor only activates when I turn on the headlight. However, in hindsight I coulda shoulda woulda just used a little USB connector between the cdu unit and the monitor. What can I say?-- the curse of the elderly.
I also adapted one of these little gizmos to serve as a handy dandy quick view monitor. I installed much heavier gauge wires to insert into the ebike battery. Just stick the correct wire into the batteries correct hole (+) or (-) and see the readout. Works like a frigging champ, too.
Hand grip end-rings: https://www.aliexpress.com/item/4000172258344.html?spm=a2g0s.9042311.0.0.27424c4dckLuOH and 2pcs Lock Ring for Bicycle Bike Handlebar Grips Locking On Cycle Handle Bar Cover Grips End Fixed Rings|Bicycle Grips| - AliExpress
The bar ends: https://www.amazon.com/gp/product/B002I7PRUQ/ref=ppx_yo_dt_b_search_asin_title?ie=UTF8&th=1&psc=1
These nifty items serve multiple purposes:
They provide additional hand grip locations..
They protect those very expensive items mounted on the handlebar (the cdu unit, the rear derailleur shifter unit (though I swapped mine out for an under-bar shifter that I already owned), that precious $1,000+ cell phone that you spend all your time viewing instead of paying attention to the task at hand-- the ebike ride you are on.
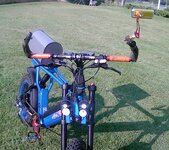
An excellent location for mounting a little dingle bell (as I have done).
The perfect mount for a rear view mirror. The mirror will set up much higher, more in line with your casual line of sight.
If you ever need to remove the rear wheel unit, just remove the mirror (a 10 second operation), grab the rear brake, walk the entire ebike back and turn it upside down. It will rest on the bar ends and the seat/saddle. Plus, once again, all of that crap on your handlebar will be protected.
The grips on the bar ends: I bought those items at the local WalMart. They seem to be a regularly stocked item.
The rear view mirror(s): There are 2 to a package.. By the way, these mirrors are all metal/glass. Not a drop of plastic.. Quality and highly adjustable.. I own them in every flavor except silver.. I like to mix and match the various components (see photos).
https://www.aliexpress.com/item/4000829735650.html?spm=a2g0o.detail.1000014.17.990276fdBZ1bVI&gps-id
This item is a real GodSend on an ebike. These bikes move along quite quickly. Case -in-point (copied from a website Customer Review):
So I crashed this bike into the side of a bus at full speed a couple of weeks ago. Don't ask me why though cause I don't remember a damn thing. I broke my shoulder and a few ribs, collapsed a lung, and basically turned half my body into a horrible bruise
The BIKE however... is perfectly fine. I can't really figure it out. I don't remember the accident, but I've seen the camera footage from inside the bus, which means I saw myself ride this bike straight thru the front door of the bus and then rebound a good 10 feet. Me=wrecked Bike=fine. I mean it didn't even pop the front tire..
The bike involved just happened to be a sub-$1,000 fat tire ebike.. As you can see, things happen very quickly when you are traveling along “at speed”-- even on an ebike. By negating the need to swivel your peanut head around to see whats happening behind you, just steal a glance at this baby. I also installed the little round convex mirror. Quite often, I see other ebikers plodding along at 10mph. The only problem is that their mighty stead (their ebike) is going 17mph. Talk about being behind the power curve.
The 130db wireless “horn/alarm bell”: https://www.amazon.com/gp/product/B07XWQ4SZY/ref=ppx_yo_dt_b_asin_title_o09_s02?ie=UTF8&psc=1
This tiny item is awesome. Loud like you can't imagine. You can see the 4-button controller (white) on top of the left side (front) brake hydraulic fluid reservoir.
There is also a small (1.5” long) hinge located on top of the black brake area. It has been duct taped to itself to keep it locked at a 90 degree angle. It just sets on top of the brake to insure that the control doesn't slide forward/downward whenever you press one of the 4 buttons. The control is attached via a). the double side tape enclosed in the alarm package. b). a stretchy hair follicle hoop (I find these all the time along the local bike paths) which has been attached back to itself with a very small nylon ziptie. c). a slightly larger white ziptie.
The horn/alarm unit is installed inside a stringed “soft carry” bag that is usually included with a pair of sunglasses. You can see the gray bag in the photo (directly above and behind the twin head lights). It also has a blue hair hoop around it to keep the horn/alarm unit stable and facing front. However, even a sock will work just fine and dandy to contain the alarm.
Also, in the aforementioned front end photo, you will notice that I have installed the following 2 headlight units: https://www.amazon.com/gp/product/B082T4S14X/ref=ppx_yo_dt_b_search_asin_title?ie=UTF8&psc=1
I prefer these lights to the original humongous/round X52 headlight because it (X52er unit) weighs 1.7 pounds, including the mounting bracket. It also does not have the option of being a strobe/flasher light. Being seen during daylight hours is my priority. Plus, dealing with dark areas (tunnels, etc) makes these very bright intense LED lights a GodSend.
The lights are attached to the front fork via 4” metal “L” brackets (covered with blue tape.
The black watch: https://www.ebay.com/itm/203130994410 This item is clear taped to the top tube crossbar(s). I just cut off the rubbery side bands.
SideNote: FYI, I have all of the abovementioned items (and more) installed on all 3 of my "priority" ebikes.
I guess that's it for this area of my X52 ebike.. But, more to come, fer sure..
I'm having to wait for a plumber to arrive, so I'll go ahead and get this thread started. As always, it is to your advantage to first scroll down to the end of this thread to view the photo's. That way, everything that you are about to read will make more sense.
First of all, you will notice that the straight/flat handlebar and the extra 8” bar are carbon fiber material. That's because I like the appearance of same. I already owned the items, although I had also purchased this item, too-- just because it was a “riser bar” (like the X52's original bar): https://www.aliexpress.com/item/4000628589089.html?spm=a2g0s.9042311.0.0.454e4c4djogGUl
Plus, I thought it looked pretty cool. You will need to order size 31.8 by 620mm (or longer). For my purposes, because of the array of crap on my handlebar, the 620mm(24.5”) proved to be too short by about 50mm (2 inches).If I do decide to order it again, I will buy the 31.8x680mm(27” long).(By the way, 25mm=1 inch)..
The 8” long accessory bar (carbon fiber): https://www.aliexpress.com/item/32993817080.html?spm=a2g0s.9042311.0.0.454e4c4djogGUl
I installed this item because the handlebar was becoming too cluttered. Plus, I liked the final easy-access/easy viewing location of the computer display unit(cdu) and the monitor.
The LCD volt/% monitor:
Battery Monitor, Battery Capacity Tester DC12V 24V 36V 48V 60V Battery Capacity Indicator Module Iron-Lithium & Lead-Acid Voltage Monitor Tester Percentage Indicator: Amazon.com: Industrial & Scientific
I would have preferred to not be required to install this handy device on my X52. However, circumstances (which I will address in a later thread) dictate otherwise. It is extremely light weight (like a bunny fart) and can be attached to the 8” bar by using only clear packing tape. Its 2 wire connectors are really fine(thin) wiring. So, if you ever need to replace the harness, just take the item to a hobby shop that sells radio control items. Look in the “airplane” section. These connectors are used for nav lights , etc.
Also, concerning the proper code to use: for any 48v battery (the X48), use “12c”
(12x4=48, thus the 12c). for any 52v battery (the X52), use “13c” (13x4=52, thus the 13c). I utilize both types of batteries (48v and 52v), but re-programming for each is really not required.. Easy Breezy..
I wired my unit into the headlight wires (I use different lighting (strobe/flash) LED lites at the front (see photos). That way, the monitor only activates when I turn on the headlight. However, in hindsight I coulda shoulda woulda just used a little USB connector between the cdu unit and the monitor. What can I say?-- the curse of the elderly.
I also adapted one of these little gizmos to serve as a handy dandy quick view monitor. I installed much heavier gauge wires to insert into the ebike battery. Just stick the correct wire into the batteries correct hole (+) or (-) and see the readout. Works like a frigging champ, too.
Hand grip end-rings: https://www.aliexpress.com/item/4000172258344.html?spm=a2g0s.9042311.0.0.27424c4dckLuOH and 2pcs Lock Ring for Bicycle Bike Handlebar Grips Locking On Cycle Handle Bar Cover Grips End Fixed Rings|Bicycle Grips| - AliExpress
The bar ends: https://www.amazon.com/gp/product/B002I7PRUQ/ref=ppx_yo_dt_b_search_asin_title?ie=UTF8&th=1&psc=1
These nifty items serve multiple purposes:
They provide additional hand grip locations..
They protect those very expensive items mounted on the handlebar (the cdu unit, the rear derailleur shifter unit (though I swapped mine out for an under-bar shifter that I already owned), that precious $1,000+ cell phone that you spend all your time viewing instead of paying attention to the task at hand-- the ebike ride you are on.
An excellent location for mounting a little dingle bell (as I have done).
The perfect mount for a rear view mirror. The mirror will set up much higher, more in line with your casual line of sight.
If you ever need to remove the rear wheel unit, just remove the mirror (a 10 second operation), grab the rear brake, walk the entire ebike back and turn it upside down. It will rest on the bar ends and the seat/saddle. Plus, once again, all of that crap on your handlebar will be protected.
The grips on the bar ends: I bought those items at the local WalMart. They seem to be a regularly stocked item.
The rear view mirror(s): There are 2 to a package.. By the way, these mirrors are all metal/glass. Not a drop of plastic.. Quality and highly adjustable.. I own them in every flavor except silver.. I like to mix and match the various components (see photos).
https://www.aliexpress.com/item/4000829735650.html?spm=a2g0o.detail.1000014.17.990276fdBZ1bVI&gps-id
This item is a real GodSend on an ebike. These bikes move along quite quickly. Case -in-point (copied from a website Customer Review):
So I crashed this bike into the side of a bus at full speed a couple of weeks ago. Don't ask me why though cause I don't remember a damn thing. I broke my shoulder and a few ribs, collapsed a lung, and basically turned half my body into a horrible bruise
The BIKE however... is perfectly fine. I can't really figure it out. I don't remember the accident, but I've seen the camera footage from inside the bus, which means I saw myself ride this bike straight thru the front door of the bus and then rebound a good 10 feet. Me=wrecked Bike=fine. I mean it didn't even pop the front tire..
The bike involved just happened to be a sub-$1,000 fat tire ebike.. As you can see, things happen very quickly when you are traveling along “at speed”-- even on an ebike. By negating the need to swivel your peanut head around to see whats happening behind you, just steal a glance at this baby. I also installed the little round convex mirror. Quite often, I see other ebikers plodding along at 10mph. The only problem is that their mighty stead (their ebike) is going 17mph. Talk about being behind the power curve.
The 130db wireless “horn/alarm bell”: https://www.amazon.com/gp/product/B07XWQ4SZY/ref=ppx_yo_dt_b_asin_title_o09_s02?ie=UTF8&psc=1
This tiny item is awesome. Loud like you can't imagine. You can see the 4-button controller (white) on top of the left side (front) brake hydraulic fluid reservoir.
There is also a small (1.5” long) hinge located on top of the black brake area. It has been duct taped to itself to keep it locked at a 90 degree angle. It just sets on top of the brake to insure that the control doesn't slide forward/downward whenever you press one of the 4 buttons. The control is attached via a). the double side tape enclosed in the alarm package. b). a stretchy hair follicle hoop (I find these all the time along the local bike paths) which has been attached back to itself with a very small nylon ziptie. c). a slightly larger white ziptie.
The horn/alarm unit is installed inside a stringed “soft carry” bag that is usually included with a pair of sunglasses. You can see the gray bag in the photo (directly above and behind the twin head lights). It also has a blue hair hoop around it to keep the horn/alarm unit stable and facing front. However, even a sock will work just fine and dandy to contain the alarm.
Also, in the aforementioned front end photo, you will notice that I have installed the following 2 headlight units: https://www.amazon.com/gp/product/B082T4S14X/ref=ppx_yo_dt_b_search_asin_title?ie=UTF8&psc=1
I prefer these lights to the original humongous/round X52 headlight because it (X52er unit) weighs 1.7 pounds, including the mounting bracket. It also does not have the option of being a strobe/flasher light. Being seen during daylight hours is my priority. Plus, dealing with dark areas (tunnels, etc) makes these very bright intense LED lights a GodSend.
The lights are attached to the front fork via 4” metal “L” brackets (covered with blue tape.
The black watch: https://www.ebay.com/itm/203130994410 This item is clear taped to the top tube crossbar(s). I just cut off the rubbery side bands.
SideNote: FYI, I have all of the abovementioned items (and more) installed on all 3 of my "priority" ebikes.
I guess that's it for this area of my X52 ebike.. But, more to come, fer sure..