2019 RadMini - Rear Rack Install Help

rekyt

New Member
Waited over month for it to be back in stock and ordered immediately last week, along with the small basket.

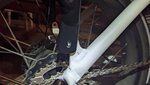
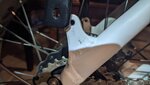
When attempting to install the lower\rear 33mm bolts on the rear rack, I cannot get either of the two screwed in more than halfway. Did some google searching and have seen other YouTube vids where people have same problem and have actually snapped the top of the bolt completely off. I was able to successfully back the bolt out on mine. I have reached out to Rad Support last night but have yet to hear back. An impact driver wouldn't even make the bolt budge.

Just wondering if anyone had a work around. Not sure if a smaller diameter screw\nut will work ok and keep the rack from rattling. any help is appreciated!

Thank you!
 
I don't have a Radmini; but, did install a Topeak rear rack on my Radrover. I also had a hard time with some of the rack screws. I thought the same thing about the screws being too large and the next size down was too small. I think paint got into the holes making it difficult to screw into place. It might help to insert/remove the screws several times without the rack attached to see if that helps clean out the treads.

I also had issues with the screws slowly backing out over time with normal riding. I would have to double-check the screw torque a few times a month. Adding blue loctite that comes in a chapstick looking tube has kept them in place at full torque for +2 years.
 
I just installed to Rad Mini Rear Racks yesterday on our two new Rad Mini Step Thru's. I myself can see what problems you had installing the rear racks, both racks did not line up perfectly to the bike mounting brackets. Let me say this is not a uncommon problem when it comes to products like a bike rack and especially one that is welded and has no adjustments and all has to fit properly as there is no bending the rack to fit the bikes mounting brackets. First you mentioned the screws were hard to get into the mounting brackets, yes they were and I had to run a tap into the mounting holes to clean out the threads so the screws would go in, I almost just drilled out the holes to a size larger so the bolt would just slide in, there is a nut that goes on the back side and be done with it, but I did it the hard way. Now when it came to the rack fitting the mounting brackets holes on the bike (4) I could only get (3) to line up and the fourth I had to long gate one of the holes on the rack to 1/8th of and inch to make it fit. Now I have the tools to do things like this and the know how, but I ask myself what about the person who doesn't have the knowledge, or tools to do this, what do they do. I spent more time on two racks then the time it took to do everything else on two new Mimi's to assemble and the rack only has four screws to screw in, go figure.
 

Attachments

  • DSCN3911.JPG
    DSCN3911.JPG
    426 KB · Views: 544
I experienced some resistance threading the screws, such that hand-tightening was not possible, and even using a tool was more difficult that I would have expected. Ultimately that was not my main complaint. I also have the aforementioned problem where the holes do not line up between the rack and the bike frame on my Radmini Step-Thru. I too thought about elongating the holes on the connection to the seat post, but reasoned that I should not have to for a $75 purpose-built rack, so I contacted the company for guidance. I figure, however, that if I want a rack any time soon, I'll end up modifying the holes, since it took a month to receive the current rack, and if the solution is to send me another one, who knows how long that will take. Alternatively, I could get a Topeak rack and forget about the RadRack. Disappointing.
 

Attachments

  • PXL_20201004_223437887.jpg
    PXL_20201004_223437887.jpg
    253 KB · Views: 375
  • PXL_20201004_223456883.jpg
    PXL_20201004_223456883.jpg
    242.1 KB · Views: 358
  • PXL_20201004_223502681.jpg
    PXL_20201004_223502681.jpg
    261.8 KB · Views: 380
Better to not modify anything.
I had the same situation and had to bring it down a couple of inches for the bolt holes to line up.
Used a big strong screwdriver that works like a prybar and leaned on it to line it all up.
Stay with it. Persistence will pay off.
 
As I stated above we purchased two Rad Mini's and two rear racks for these ebikes. I had problems with both racks lining up with the factory frame mounting holes, it was like three of the four mounting holes would lineup, but the fourth was off from a half hole to almost a full hole for the mounting bolt to go in. This becomes a problem as the racks and the frame of the Mini are pretty strong and neither are going to give very much, if any at all. Since I own every tool to mankind and know how to use them, I removed the rack and put it in a large vise and bent the offending arm into alignment, thus not putting any pressure on the frame or the rack. Now I realize most won't be able to do this, it will take knowledge beyond bolting on accessories with a wrench and screwdriver. If I was in this group I would call Rad and ask for a replacement and hope it fits better then what you have, a rack that has some adjustments would be a better choice offered by Rad.
 
Contacted Rad, and they acknowledged that a batch of their rear racks had shipped without passing what one might call rigorous QA. Today they notified us that they issued a refund, and will ship a new (fully QA'd) rear rack when they are stock again. I will say that Rad has been responsive to issues like this. They could have simply apologized and sent a replacement. I'll call it 'customer retention'.
 
Back