Wired-In Ebike Lights Guide

Admin

Administrator
Staff member
While visiting my buddy Chris Nolte at Propel Bikes in Brooklyn, NY we spent some time talking about bicycle lights. Chris runs an electric bike shop, so most of the models we looked at had the option to wire-in some lights to run off of the ebike battery. Some of these lights would work just fine on their own, being powered by independent rechargeable cells. Many electric bikes come with lights already wired in. I hope this guide helps you understand why lights for bikes are important, what some of the options are, and why ebikes can be a great choice for commuting in different conditions. They help you go further, carry more weight without struggle, and can be convenient in low light night/morning conditions if they do have lights. The video overview below includes many different light products, some preinstalled and others aftermarket with clamps to work with ebike computers like the Bosch Intuvia:


Popular brands we covered here include:
  • Busch & Müller ($40 to $120), can be seen on Riese & Müller products, official website at https://www.bumm.de/en/
  • Supernova M99 Pro ($449) can be seen on the Stromer ST2 S and R&M Delite GX Rohloff, official website at https://supernova-lights.com/en/
  • Supernova E3 E-Bike V6s ($149) can be seen on many Riese & Müller models, official website at https://supernova-lights.com/en/
  • Light & Motion official website at https://www.lightandmotion.com/ at 5:33 in video
  • Fuxon has a lot of decent headlights that I've been seeing on BULLS electric bike models, and they do have the side window cutouts. These lights tend to be plastic vs. metal for the more premium products. They alloy does add to your bikes weight and the cost, so it's not necessarily always better.
  • Tern has a cool proprietary headlight that fits on their Andros adjustable stem on the Vektron ebike that allows you to physically turn the light on or off. You can see my review of this at https://electricbikereview.com/tern/vektron/
Most ebike lights are direct current (DC) powered, some dynamo powered lights are alternating current (AC) but it's rare. That said, Chris said that all rear lights are DC and they usually get their power from the headlight as it converts AC to DC and sends it back. I like how some of the newer ebike lights have side windows, so the beam will shine in more directions and keep you visible. I've seen more electric bicycles that now have rear lights that activate whenever the brakes are pulled. This is a European requirement. Chris had some really cool light mounts that help you adapt to handlebars, stems, and the bracket for ebike displays like the Bosch Intuvia. I always aim to mount my headlight up near the stem so it points where you steer and is sprung vs. being down on the suspension arch unsprung and potentially bouncing around. Something I consider when mounting a rear light is that if you place it on the seat post, a loaded cargo rack could block the beam or your long jacket could hang down below the saddle and block the light. Consider the right seat stay, the back of a rack, or your own backpack or helmet for best results. Higher is usually better so cars and trucks can see you. I've seen a couple of ebikes with seat-integrated backlights, and this makes it less easy to swap a rigid post for suspension seat post or different saddle... so it's not my favorite design, it's also very easy to block with a long shirt or jacket.

In closing, many states actually require you to have lights on your bike by law. New York is one such state. Many newer ebikes actually have "always on" daytime running lights (DRL) following automobiles. The LEDs don't use that much energy, and it could save your life, but sometimes it's also annoying, so I appreciate bikes that let you turn them off manually if you want. Usually, ebike shops can show you how to do this or update your software to make it possible (if you've got a Bosch powered ebike especially). Many of the fancier headlights from Germany have a design that aims down, so it won't blind oncoming traffic. As always, I really appreciate your input and additions to this guide! I realize that we only really scratched the surface here and new products come out all of the time. Chime in below and feel free to share your own pictures and tips :)
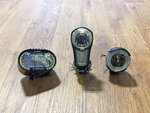
lights-for-electric-bikes-busch-muller-supernova.jpg
 
I purchased the Outbound Lighting Road Edition headlight without the battery and hardwired it into the Bosch motor. https://www.outboundlighting.com/
Next I installed a B+M Toplight Line 5v-15v only for E Bike by removing the reflector on the rear rack and replacing it with the Toplight. Trek had installed a wire into the port on the Bosch motor and left it inside the frame. I utilized this wire to supply power to the rear taillight and then tapped into this wire to supply power to the headlight.
 
Last edited:
CAUTION! When replacing stock hardwired lights with higher-powered aftermarket options, bear in mind that many of the motor controllers have underrated headlight outputs. Make sure you first check the current rating of your controller's lighting outputs and ensure they can handle the increased current draw. Bafang, for example, has light outputs rated at 6V @ 500mA - these are not sufficient to power many of the lights mentioned in this video. You risk burning-out the lighting circuit of the motor controller if you draw too much of a load. Worse, since many motor controllers are potted, this means it also is not reparable short of replacing the controller. There is a solution, however, to get high power integrated lights working with any controller - with some additional circuitry. I'm running the Busch + Müller IQ X E on my Bafang bike and this is how I got it working.
 
Looking at ebikes I question why so many manufacturers stop at a headlight? Rather than running a wire from the headlight, or looking for items which will accept high input voltages, I have purchased a DC to DC converter (step down) to convert ebike battery voltages from 52V plus to 6 volt or 12 volt to accomodate different devices. I am currently wiring my converter to allow expansion of lights, alarms, chargers, blue tooth, solar panels, etc.., and am starting with a Gorilla motorcycle alarm which operates at 12v but has a minimal parasitic draw of about 10mA. I predict a crossover of devices from the motorcycle world and knowing the draw is critical - here's a great video (https://www.fixmyhog.com/video/parasitic-draw-test-015477/#). By choosing the correct wire size, device type, etc.., the sky's the limit for Ebikes - as long as you manage the battery condition. (examples http://www.dctodcpower.com/index.ph...=189_193_196&zenid=070i31i5f8jqldclihf5ishpj4 )
 
Last edited:
More about the dc to dc converter, please. Link to Price, Weight, etc would be nice.
 
@mbouck makes a very good point!

Make sure you first check the current rating of your controller's lighting outputs and ensure they can handle the increased current draw.

I added an inexpensive LED headlight to my Momentum (Giant sub-brand) transcend E+ bike this summer. The LED headlight only draws 2.4w @ 6v and the bike lighting circuit can handle up to 9w @ 6v.
(Here's my writeup on the install )

The latest Giant firmware update activates the lighting circuit by default when the bike is powered up and I always forget to turn on my battery powered taillight so I've been looking for a nice 6v Headlight/Taillight combo.

I really like the Light & Motion "Nip & Tuck" lights which are now rebranded as "Vis-E Combo". I bought two sets of "Nip & Tuck" lights for $50 each on eBay and was really stoked about the deal I got since they normally sell for over $120 per set.

It was only after I received the Nip & Tuck sets that I realized that the headlight set to High (500 Lumen) and taillight draw 9.49w (1.61A), slightly exceeding my bike's max of 9w (1.5A).

I've seen where one other forum member wired in a Vis E-800 (800 Lumen) headlight and Vis E-TL taillight with a combined wattage of over 15watts into a Giant bike's lighting circuit. He posted that the Vis E-800 seemed to be the same brightness when set to high (800 Lumen) or medium (400 Lumen) and seemed to have no ill effects on the bike.

SO....Would wiring the 9.49w max load Nip & Tuck to my bike fry something, or will the headlight simply not achieve maximum Lumens?
 
I got bored this afternoon so I mounted and wired the Light & Motion Tuck (aka Vis E-TL) to my Transend E+. I've never removed a mid-drive motor or worked with JST JWPF connectors before so I took my time and spent a bit over 4 hours on the project.
IMG_2923.JPG

A pair of 2x4 blocks kept the Ride Control One from touching the floor and having the bike upside down made the project easier than using a repair stand.


IMG_2922.JPG

The rear brake hydraulic hose and a three-wire JST connector run under the motor, all the other connectors, shifter cable and wires run on top of the motor. I removed the chain to make things easier and took the opportunity to give it a good cleaning. Remove the six size 20 Torx screws from the motor housing (two on the sprocket side and four on the other side). The cover on the non-chain side can be removed easily, removing the cover entirely on the chain side would require removing the crank arm and I didn't want to deal with that so I left it in place. Then remove the three size 30 Torx bolts that pass through the frame and motor. There's also one size 20 Torx bolt that attaches the front of the chain guard to the motor. Unplug the three-wire connector, then lift the motor and slip it out from under the rear brake hose.


IMG_2924.JPG

I set the motor on a stool (perfect height) and fished the taillight wire into the frame alongside the shifter cable (chain side).


IMG_2925.JPG

The red arrow shows the bike's taillight wire, the JST JWPF male connector was already on the bike and covered with a rubber cap. The green arrow is the wire from the taillight. I ordered the connectors JST JWPF 2-wire connectors from eBay and carefully soldered the connectors in place since I don't have the proper crimping tool. Soldering those tiny pins onto the minuscule taillight wires with a full size Weller soldering gun was a lot of fun. I shot this photo before I pushed the blue silicone plug into place to seal the JST taillight connector.

Below a link to a video I made of the AliExpress headlight and Light & Motion taillight in action. I haven't decided wether or not to replace the cheap headlight with the Light & Motion 'Nip' (aka Vis E-500) light I have since the Nip and Tuck combo exceed the bike's 9w lighting circuit by about .5w.

UPDATE: I did replace the AliExpress headlight with the Light & Motion Nip headlight with the Light & Motion fender mount and everything works fine, no issues with the Nip & Tuck current draw. The light pattern and output from the Nip light is much better than the cheap headlight.


Last edited:
I make my own taps using other connectors.

This is the way to go for DIY'ers using Bafang BBS mid-drives that want to use an alternative to the low current 6v x 500mA = 3w light connectors coming out of the controller, and instead run lights directly from the battery. I have done this on my 36v BBS01, recently I switched out my headlight from the 1.5w SateLite to the 5.5w Roxim X4.

Peter White Cycles in NH is another reliable supplier of ebike lights and wiring that can connect to OEM mid-drives from Bosch, Shimano Steps, etc.
 
Last edited:
just go to bright leds.com and buy a decent 5-6 led light for a fraction, you can get a convertor for around 10$ and I just use a 4 amp ryobi battery with an adapter to power mine, take my word for it the average layperson is better off leaving the stock wiring alone( I use ryobi tools and always have charged ryobl batteries laying around
 
I got right into my stock wiring. I’ve been wiring things for decades. Got a kit that came with a harness. The harness was too big and I made my own. Making your own connections is cleanest and best. I used all JST connectors, because that’s what the controller uses. Added rear brakelight/tail light, front and rear turn signals, and brighter light with horn. The horn is dinky and I’m getting a louder one. I have this running off a 48v->12v converter. Working great. I’ll wire the horn in place of the existing horn. Just need to redirect the wiring.

IMG_3408.png


IMG_3368.jpeg
 
A a really nice human being. We've been friend for nearly a decade.
Wow. That’s awesome. Would you ask him to please do a video on the difference between controller max amps and motor phase amps. He explains things so well.
 
I was thinking about something like that, but I’d like to hide it. :)

I mean, I guess I could get a front bag and stuff them in there.

I’m getting this one.

IMG_3484.png
 
Back