Mine was too short as well. But my 2022 vado was one of the early ones and is in reality a year old or more. Maybe they updated the cable length later on after the adventure plate design was finalized?Scratching my head as to why mine would be different. It’s a ‘22 Vado 4.
You are using an out of date browser. It may not display this or other websites correctly.
You should upgrade or use an alternative browser.
You should upgrade or use an alternative browser.
Turbo Vado Front Rack
- Thread starter mrkjd
- Start date


JasonEaton
New Member
- Region
- USA
Maybe so. I got mine in June.Mine was too short as well. But my 2022 vado was one of the early ones and is in reality a year old or more. Maybe they updated the cable length later on after the adventure plate design was finalized?
Are the frame sizes different?Scratching my head as to why mine would be different. It’s a ‘22 Vado 4.
Also - @Axis did you remove the left side motor cover and check for more slack cable at the motor?
JasonEaton
New Member
- Region
- USA
Mine is a large.Are the frame sizes different?


jessed
New Member
- Region
- USA
Just got mine back from the LBS rack/light install. They said they looked for extra cable length tucked into the bike but ended up splicing more in.
Took it home and modified the tray to use a MIK adapter. Should be all set for the preschool/work commute!


Took it home and modified the tray to use a MIK adapter. Should be all set for the preschool/work commute!
Last edited:
Thanks for the update Jessed.Just got mine back from the LBS rack/light install. They said they looked for extra cable length tucked into the bike but ended up splicing more in.
Took it home and modified the tray to use a MIP adapter. Should be all set for the preschool/work commute!
View attachment 138320View attachment 138323View attachment 138321View attachment 138322
Can I just check - you had to drill new holes into the adventure plate to be able to use the MIK adaptor?
Such a shame that using a MIK adaptor wasn't a standard option as part of the plate design (if I buy it, my use would likely be as yours - ie using MIK to attach plate or other accessories only when needed.)
Ps a shot of the front rack / mount with the plate off word be of interest.
I was thinking of getting a Turbo Basket, but this looks pretty bad. Some terrible design decisions going on at Specialized.I received the front rack with the adventure plate today. Indeed, the front light cable is too short by a good 4 inches so I cut the cable and spliced an extension cable in.
I decided to mount my front light upside down so that it wouldn't interfere with cargo that could protrude beyond the front of the adventure plate.
I took the adventure plate off and tried the basket. It will only fit backward. I even tried switching the mik adapter but the back part of the basket interferes with the handlebars. The basket is only going to work installed backward as is shown in my photo.
All in all, it is nice I just wish I could have the basket installed the right way.
View attachment 137303View attachment 137304
Skyzipper
New Member
- Region
- USA
Same issue with the too short cable.
Anyone who has spliced in the extra length of wire themselves have any more details on that process, what tools/wire you used, etc...?
It's a long drive for me to get to the dealer, and they're being a little squirrely about how long they'll take/ordering parts, so would like to do it myself.
Thanks!
jessed
New Member
- Region
- USA
Yep, had to drill custom holes in the adventure plate to mount the MIK adapter to it. Hardest part was figuring out where to drill the holes (ended up using a cardboard template).
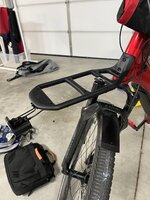
Photo of the rack without the plate attached. I'll prob adjust the light mount so it doesn't stick out so far from the rack.
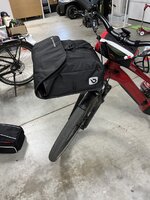
Also, the adventure plate itself is cool, but for my purposes the bungee net was a PITA to use. I ended up mounting another MIK adapter to the back of a Blackburn pannier bag (this one). There is a semi-rigid insert that keeps it from flopping around. It works really well to pack a small backpack, a computer bag, and a couple other things in it.
Photo of the rack without the plate attached. I'll prob adjust the light mount so it doesn't stick out so far from the rack.
Also, the adventure plate itself is cool, but for my purposes the bungee net was a PITA to use. I ended up mounting another MIK adapter to the back of a Blackburn pannier bag (this one). There is a semi-rigid insert that keeps it from flopping around. It works really well to pack a small backpack, a computer bag, and a couple other things in it.
Attachments
I didn’t remove the motor cover but I did remove the battery and looking into the motor didn’t look like any slack was available.Are the frame sizes different?
Also - @Axis did you remove the left side motor cover and check for more slack cable at the motor?
I was thinking of getting a Turbo Basket, but this looks pretty bad. Some terrible design decisions going on at Specialized.
So this new video will show the basket installed the correct way on the adventure plate… Huh maybe I did something wrong and it will work. I’ll try again.
Wire strippers, heat shrink, soldering iron, and about 10” of extra wire. Be cognizant where you cut the wire. I cut mine 5” from the light. Strip the wires, tin them with solder. Then put the heat shrink on, twist the connections together and solder. Last use a lighter or heat gun to get the heat shrink to seal up the connections.Same issue with the too short cable.
Anyone who has spliced in the extra length of wire themselves have any more details on that process, what tools/wire you used, etc...?
It's a long drive for me to get to the dealer, and they're being a little squirrely about how long they'll take/ordering parts, so would like to do it myself.
Thanks!
Allan47.7339
Well-Known Member
I used solder seal butt connectors when I extended the lights on my old Turbo S for a front rack. The solder seal butt joints have low temperature solder in them and when you heat shrink the connector, it also melts the solder. Many different sizes available if you search Amazon with those keywords. When you cut the wire leave enough room to work and if you stagger the connections it will keep the bundle smaller. Don't forget to slide the final shrink tube covering on before you do the splice connections. I would recommend patience, a practice run, small wire strippers, solder seal connectors, and extra wire. I do have a soldering station but for this job I prefered the heat shrink.Wire strippers, heat shrink, soldering iron, and about 10” of extra wire. Be cognizant where you cut the wire. I cut mine 5” from the light. Strip the wires, tin them with solder. Then put the heat shrink on, twist the connections together and solder. Last use a lighter or heat gun to get the heat shrink to seal up the connections.
That's a Como it's mounted on in the video. Angle of VADO headset might be different.So this new video will show the basket installed the correct way on the adventure plate… Huh maybe I did something wrong and it will work. I’ll try again.
Any slack in motor area would be in the space behind the motor, not visible by looking at front of motor from where the battery goes.I didn’t remove the motor cover but I did remove the battery and looking into the motor didn’t look like any slack was available.
I seem to remember a couple inches of slack when I was in there to swap which side of the frame the headlight wire entered.
Although quite popular, not everyone uses MIK stuff. I presume this is why several large rack manufacturers offer adapters to accommodate those situations.Thanks for the update Jessed.
Can I just check - you had to drill new holes into the adventure plate to be able to use the MIK adaptor?
Such a shame that using a MIK adaptor wasn't a standard option as part of the plate design (if I buy it, my use would likely be as yours - ie using MIK to attach plate or other accessories only when needed.)
Ps a shot of the front rack / mount with the plate off word be of interest.
From what I could find the basket only appears on the Como SL on Spesh's website.
Last edited:
It "would" work on the Vado if the handlebars were higher (like the Como). Ah well... :-(That's a Como it's mounted on in the video. Angle of VADO headset might be different.
Did you take off the drive side or non drive side?Any slack in motor area would be in the space behind the motor, not visible by looking at front of motor from where the battery goes.
I seem to remember a couple inches of slack when I was in there to swap which side of the frame the headlight wire entered.
Non drive side since that’s the side where the wires connect to the motor. Plus it’s easier.Did you take off the drive side or non drive side?

So I finally got the rack and installed it but it was more difficult than I envisaged. Didn’t help that Specialized provide zero instructions with the rack. I have a Vado 5.
Firstly I found removing the head tube plate a pain - fiddling around with the hex key until it engaged on the bolt took me 20 minutes as it’s basically invisible and quite deeply recessed down the small hole!
I had enough slack cable for the light but I took off the light mount you get on the Vado 5 from the mudguard retaining bolt and secured it to the rack facing backwards then placing the light on the mount upside down (and without the reflector). This works well as it does not stick out to the extent the ones I have seen in photos. Irritatingly Specialized do not include a bolt for this. I had to rob one of my cage mount bolts to do this. Also, the mudguard bolt becomes too long without the light mount included so I had to use a couple of washers so it tightened up to the guards without grounding.
The washers supplied are shaped and differ. None seemed to fit the lowest bolt that secures the rack to its mount.
The small bolts that fix the light cable run are a nice touch but fiddly.
For £110 quid I found it mean that the rack does not come with sufficient bolts washers and spacers to allow install across the range of models it fits and to provide no instructions is idiotic. I hope this post will help others in fitting their racks
Similar threads
- Replies
- 67
- Views
- 6K
- Replies
- 8
- Views
- 1K