You are using an out of date browser. It may not display this or other websites correctly.
You should upgrade or use an alternative browser.
You should upgrade or use an alternative browser.
Report of my first 4000 miles on a CCS (also my first 5 months of owning it)
- Thread starter Chris Hammond
- Start date


MisterBritcom
Active Member
These Bafang motors have a reputation for being tough, if a bit noisy. I think you could reasonably expect several thousand miles on one, based on what I've read around this forum.thanks for the detailed report... How long does Juiced expect teh geared hub motor to last before the gears need replacing?
I'm thinking I'll disassemble mine for inspection, cleaning and lubrication if I ever manage to wear the back tire out.
Chris Hammond
Well-Known Member
My motor sounds and performs the same as it did from day one. I haven't noticed anything that would lead me to believe it won't last for at least 20,000 miles.
I do some things out of habit to promote longevity. I am changing both gears and assist levels to maximize efficiency. From a start I use Eco mode most often, level 1 on occasion, and generally start out in 3rd gear, but will go lower if I am starting on a hill. I then pedal up through the gears as I accelerate and titrate up the assist level as needed to achieve higher speed. On flat ground this is generally Eco to ~18 mph, level 1 to ~ 22, level 2 to ~26, then level 3 for cruising speed at ~30 mph. This is clearly a more efficient way to use energy from the battery and I want to be in the habit, and it also minimizes heavy loading of the motor.
I almost never start out in high assist levels (if I do its because I forgot to drop it while stopping), and never use the throttle; the only reason I have left the throttle on the bike is for my son when he rides the bike.


My motor sounds and performs the same as it did from day one. I haven't noticed anything that would lead me to believe it won't last for at least 20,000 miles.
I do some things out of habit to promote longevity. I am changing both gears and assist levels to maximize efficiency. From a start I use Eco mode most often, level 1 on occasion, and generally start out in 3rd gear, but will go lower if I am starting on a hill. I then pedal up through the gears as I accelerate and titrate up the assist level as needed to achieve higher speed. On flat ground this is generally Eco to ~18 mph, level 1 to ~ 22, level 2 to ~26, then level 3 for cruising speed at ~30 mph. This is clearly a more efficient way to use energy from the battery and I want to be in the habit, and it also minimizes heavy loading of the motor.
I almost never start out in high assist levels (if I do its because I forgot to drop it while stopping), and never use the throttle; the only reason I have left the throttle on the bike is for my son when he rides the bike.
Those plastic gears are a consumable item that you probably want to stock as spare. Ask the resident Juiced rep on this forum. It should be a user replaceable item
Bruce Arnold
Well-Known Member
The torque sensor needs some time to calibrate before putting any pressure on the pedals. Not much, but some.One annoying thing is if I power up the battery and controller after I am on the bike and pedaling, I must stop pedaling for a few seconds before the bike will provide assist.
Great write-up, I always enjoy your reviews.
Robbie Flick
New Member
Hey @Chris Hammond, did you go tubeless with the original Kenda tires? I've loved my tubeless setup on my mountain bike and am thinking it'd be a good approach for the e-bike. What size tape did you use for the rims?
Thanks as always for the detailed reports!
Thanks as always for the detailed reports!
Chris Hammond
Well-Known Member
Yes I did use the stock Kenda tires. I am actually quite pleased with the performance of these tires overall. Traction is great while cornering at speed. I used 21mm rim tape. Here's the kit I used; https://www.amazon.com/VeloFuze-Cyc...2920744&sr=8-13&keywords=tubeless+sealant+kitHey @Chris Hammond, did you go tubeless with the original Kenda tires? I've loved my tubeless setup on my mountain bike and am thinking it'd be a good approach for the e-bike. What size tape did you use for the rims?
Thanks as always for the detailed reports!
There are a few tricks for sure to make the conversion work. @Reid did a great write up a while back with some helpful hints.
First one is the stock tires have rubber nibs on the bead area that must be cut off flush to allow the bead to seat. Second hint is to apply some sealant to the bead area of the tire before trying to seat it. Third, I had to remove the valve core in order to inflate quickly enough to get the bead to seat. Forth, I then had leaking around the valve stem; needed to dip the bottom of the stem in sealant to get it to seal.
I did the rear tire first and it took way to long with a lot of swearing involved. The learning there made the front go very quick and smoothly.
I am very happy with the conversion. Zero flats since I owned it.

Reid
Well-Known Member
Astonishingly, Schwalbe instructs, that to monitor that there remains an adequate liquid amount of sealant in the tire (sealant tends to dry or coagulate over months), intentionally puncture the tire! I can't bring myself to do it! I'll just take out the valve core at 6PM some day and run in a sounding stick. Although I SHOULD just stick a small nail in the tire! (grins)Yes I did use the stock Kenda tires. I am actually quite pleased with the performance of these tires overall. Traction is great while cornering at speed. I used 21mm rim tape. Here's the kit I used; https://www.amazon.com/VeloFuze-Cyc...2920744&sr=8-13&keywords=tubeless+sealant+kit
There are a few tricks for sure to make the conversion work. @Reid did a great write up a while back with some helpful hints.
First one is the stock tires have rubber nibs on the bead area that must be cut off flush to allow the bead to seat. Second hint is to apply some sealant to the bead area of the tire before trying to seat it. Third, I had to remove the valve core in order to inflate quickly enough to get the bead to seat. Forth, I then had leaking around the valve stem; needed to dip the bottom of the stem in sealant to get it to seal.
I did the rear tire first and it took way to long with a lot of swearing involved. The learning there made the front go very quick and smoothly.
I am very happy with the conversion. Zero flats since I owned it.
https://www.schwalbetires.com/tech_info/tubeless
By using a needle you can easily test, whether the sealing liquid is still functioning. Simply pierce the running surface and let the tire rotate. Refill sealing liquid if the hole does not seal immediately. The “test hole” is repaired with the new sealing liquid.
Chris Hammond
Well-Known Member
Yeah I totally agree. I'm a nurse, and I watched a video a while back of a guy using an 18 gauge needle and 20 cc syringe to inject more sealant into his tire. While I am sure this would work out fine, taking out the valve core and injecting it there seems far more appealing to me.Astonishingly, Schwalbe instructs, that to monitor that there remains an adequate liquid amount of sealant in the tire (sealant tends to dry or coagulate over months), intentionally puncture the tire! I can't bring myself to do it! I'll just take out the valve core at 6PM some day and run in a sounding stick. Although I SHOULD just stick a small nail in the tire! (grins)
https://www.schwalbetires.com/tech_info/tubeless
By using a needle you can easily test, whether the sealing liquid is still functioning. Simply pierce the running surface and let the tire rotate. Refill sealing liquid if the hole does not seal immediately. The “test hole” is repaired with the new sealing liquid.
Reid
Well-Known Member
Hi, public hero RN! My late brother was an RN.Yeah I totally agree. I'm a nurse, and I watched a video a while back of a guy using an 18 gauge needle and 20 cc syringe to inject more sealant into his tire. While I am sure this would work out fine, taking out the valve core and injecting it there seems far more appealing to me.
Have never thought of injecting fresh sealant via a puncturing hypo before. Thank you for the tip.
I should get over needlephobia and follow Schwalbe's advice and yours.
Robbie Flick
New Member
Yes I did use the stock Kenda tires. I am actually quite pleased with the performance of these tires overall. Traction is great while cornering at speed. I used 21mm rim tape. Here's the kit I used; https://www.amazon.com/VeloFuze-Cyc...2920744&sr=8-13&keywords=tubeless+sealant+kit
There are a few tricks for sure to make the conversion work. @Reid did a great write up a while back with some helpful hints.
First one is the stock tires have rubber nibs on the bead area that must be cut off flush to allow the bead to seat. Second hint is to apply some sealant to the bead area of the tire before trying to seat it. Third, I had to remove the valve core in order to inflate quickly enough to get the bead to seat. Forth, I then had leaking around the valve stem; needed to dip the bottom of the stem in sealant to get it to seal.
I did the rear tire first and it took way to long with a lot of swearing involved. The learning there made the front go very quick and smoothly.
I am very happy with the conversion. Zero flats since I owned it.
Nice! Thanks for the info. I've done this a few times with my MTB, with a lot of swearing involved as well. Hopefully that's all behind me now
taking the valve core off is a great trick to get things seated.I agree that intentionally putting a hole in the tire (even if it is to inject sealant) seems crazy. That being said, sealant is pretty magical. I've had a few tires that looked to be more sealant than tire when I retired them, and they were still maintaining pressure just fine.
Good to know you like the Kenda tires. Was thinking about putting on some marathons but would rather keep the price down, and if the performance is acceptable and they work tubeless, I don't see a reason to replace them until they're worn.
Chris Hammond
Well-Known Member
So I actually had a flat this last week. I am guessing I either didn't have enough sealant in the tire in the first place, or riding in 100 degree temps everyday caused it to dry out too soon. At any rate it was of course on the rear tire; (wouldn't want it to be easy); I could've tried to jus add more sealant with it on the bike and reseat, but I wanted to be able to flip the wheel to ensure that sealant recovered the entire bead and everywhere else. At any rate more sealant fixed the problem immediately, The hole in the tire had sealant coming thru for a few seconds then nothing. Holding air well now.
Robbie Flick
New Member
I had this problem when I lived in Denver, the dry air and hot summer temperatures dry up the sealant very fast. I'm sure it's even worse in SLC! Good to hear it was an easy fix.
Chris Hammond
Well-Known Member
Also, FWIW, I have read some mixed reviews on the Marathons, esp related to wet traction. I am planning on these Continentals as my replacements when the time comes. I plan on using the 700/ 47mm width. They have the same puncture resistant layer, Class 3 ebike rated, and are at least 25% less money depending on where you buy them.
(Link Removed - No Longer Exists)
(Link Removed - No Longer Exists)
Bruce Arnold
Well-Known Member
Those Conti's look good. At the rate you burn up the miles, you'll be rocking a set before my Marathons need replacing, and we'll have had your review by then.Also, FWIW, I have read some mixed reviews on the Marathons, esp related to wet traction. I am planning on these Continentals as my replacements when the time comes. I plan on using the 700/ 47mm width. They have the same puncture resistant layer, Class 3 ebike rated, and are at least 25% less money depending on where you buy them.
(Link Removed - No Longer Exists)
john peck
Well-Known Member
At 2200mi. so thought I'd jump in: I am a victim of CTD, a terrible malady for which there is no known cure. I don't know how
many Americans are thus afflicted, But treatment for Compulsive Tinkering Disorder can be expensive. I suffer from the
delusion that there is no such as a completely finished bike. That said, I was racked with anxiety looking for something that
my CCS needed done. At wits end, it finally came to me. Howse about a front rack? Renivigorated, I set to rifling through my
mounds of cycling debris.
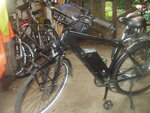
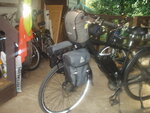
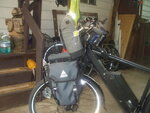
Aha! My eyes fell upon an old Schwinn rat-trap rear rack,(this'll do I thought). Well I wrestled with it, hacked at it, & drilled.
until it disintegrated before my very eyes. Cast from pot metal it &older than dirt, it was a bit brittle. Dispondent, I refused
to accept defeat though the despite the absense of viable mounting points. Selecting another rear rack from the bottom of
the pile, &,after much hacking, drilling, filing, & rearranging this was the end result:
many Americans are thus afflicted, But treatment for Compulsive Tinkering Disorder can be expensive. I suffer from the
delusion that there is no such as a completely finished bike. That said, I was racked with anxiety looking for something that
my CCS needed done. At wits end, it finally came to me. Howse about a front rack? Renivigorated, I set to rifling through my
mounds of cycling debris.
Aha! My eyes fell upon an old Schwinn rat-trap rear rack,(this'll do I thought). Well I wrestled with it, hacked at it, & drilled.
until it disintegrated before my very eyes. Cast from pot metal it &older than dirt, it was a bit brittle. Dispondent, I refused
to accept defeat though the despite the absense of viable mounting points. Selecting another rear rack from the bottom of
the pile, &,after much hacking, drilling, filing, & rearranging this was the end result:
Attachments
Last edited:
I'm over 10k on a replacement wheel received 3/30/17 which was then rebuilt this April with a new rim/spokes. Hoping I can get at least another year out of it because the rebuild cost $250. The freehub is worn a bit evident from the brown crap flowing out after spraying WD40 in it, but it's still works.
The original wheel lasted 10 months/ 6k miles before what sounded like internal gear issues.
Does anyone have an aftermarket source for a new motor?
The original wheel lasted 10 months/ 6k miles before what sounded like internal gear issues.
Does anyone have an aftermarket source for a new motor?
Asher
Well-Known Member
I'm over 10k on a replacement wheel received 3/30/17 which was then rebuilt this April with a new rim/spokes. Hoping I can get at least another year out of it because the rebuild cost $250. The freehub is worn a bit evident from the brown crap flowing out after spraying WD40 in it, but it's still works.
The original wheel lasted 10 months/ 6k miles before what sounded like internal gear issues.
Does anyone have an aftermarket source for a new motor?
Thanks for the info. Curious, what's your weight and typical assist level, if you don't mind?
Why did the rim and spokes need a rebuild? Figured with disc brakes the rims would last a while.
And congrats on the high mileage
.Similar threads
- Replies
- 38
- Views
- 4K
- Replies
- 27
- Views
- 3K
- Replies
- 2
- Views
- 833