You are using an out of date browser. It may not display this or other websites correctly.
You should upgrade or use an alternative browser.
You should upgrade or use an alternative browser.
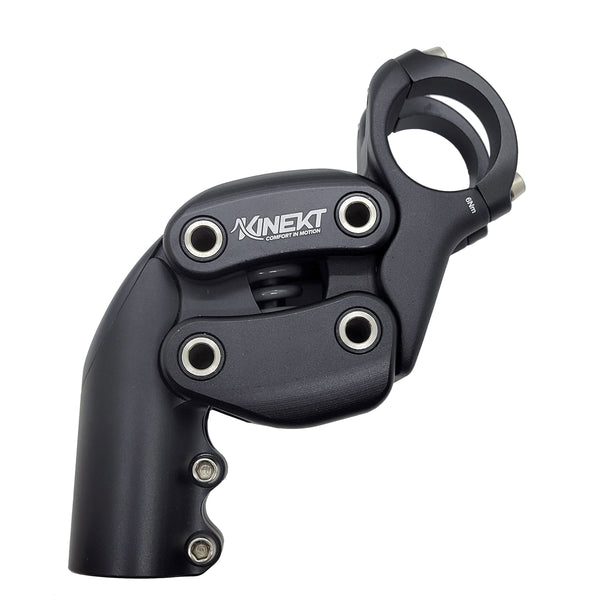
New Kinekt suspension stem
- Thread starter GuruUno
- Start date


GuruUno
Well-Known Member
So I did a 20 mile ride this morning.
In conjunction with the existing suspension fork, I get suspension travel absorption between both the fork and the stem.
I did lock out on the fork for testing purposes, and I can say you definitely appreciate the additional suspension cushioning from the stem.
As shipped from Kinekt, they have the medium spring installed. I changed it t the heavy spring because to me, it felt like the handlebars were bottoming out way too soon, losing some of the capability and purpose of the stem.
All in all I'd have to say it surely is a welcome addition to the overall comfort, as without it, you can tell a difference.
I'm sure those with a standard fork would appreciate it the most, and it's probably overkill for those with a suspension fork.
But heck, why not! Nothing ventured, nothing gained.
As a FYI, I found it a little clumsy to swap out the spring and even after watching the video, it was not easy, but eventually got it.
bob armani
Well-Known Member
Nice setup with all of the suspension points. Really compliments the rest of the bike's components. 
FlatSix911
Well-Known Member
- Region
- USA
- City
- Silicon Valley
It's installed, now the ride this morning......View attachment 64879View attachment 64880View attachment 64881View attachment 64882View attachment 64883
Well done!
FlatSix911
Well-Known Member
- Region
- USA
- City
- Silicon Valley
I just noticed that there are two variants available on the product page... a standard 7' rise and 30' degree for more upright eBikes.
 cirruscycles.com

Suspension Stem
Introducing the Revolutionary Active Suspension Stem that is designed to reduce arm, wrist, and shoulder discomfort for all bikers. Adjustable, Compact, and built to last. The Ultimate Upgrade™
cirruscycles.com
Last edited:
GuruUno
Well-Known Member
What variants will fit Vado without stretching cables?
Obviously, as per the original supplied installed on my Vado 5.0 photo, I opted for the maximum degree rise and I do not have any cables stretched. (30 degree rise, 100 mm length)
As a FYI, I found it a little clumsy to swap out the spring and even after watching the video, it was not easy, but eventually got it.
How did you get the pin out? I took out the screw and can’t get the top part off the stem.
B
BarryS
Guest
Did you loosen the pinch bolts on your stem? There's 2 I believe on teh stem? Did you realize you'll need some spacers and a CAP Also >?How did you get the pin out? I took out the screw and can’t get the top part off the stem.
Did you loosen the pinch bolts on your stem? There's 2 I believe on teh stem? Did you realize you'll need some spacers and a CAP Also >?
i am trying to change the spring, i wanted to go with the heavy spring but having a issue getting the spring out to replace it. Also i took a 10MM spacer out and replaced it with a 3MM spacer.
GuruUno
Well-Known Member
'Tap it' with anything lightly and pull it out.How did you get the pin out? I took out the screw and can’t get the top part off the stem.
GuruUno
Well-Known Member
I too had issues, called the company, they too were a little stymied, and was supposed to send out another. YES, the removal and insertion of the spring is a problem, I found, and there has to be some specific video or directions provided by Kinekt to address the issue.i am trying to change the spring, i wanted to go with the heavy spring but having a issue getting the spring out to replace it. Also i took a 10MM spacer out and replaced it with a 3MM spacer.
Inside the housing the 'top hat' piece that rests inside is a plastic retainer to keep the spring centered. I broke it in 2 places trying to put in the heavier spring.
Finally, after fiddling around and having my wife tap the 'pin' back in while I pushed down on the bars with the heavier spring I got it in, but then realized a small 'purple' plastic spacer inside had fallen out, and had to be taken apart again to reinsert it, etc., and on and on.
Bottom line is it's a great product, works well, but there needs to be specific instructions as to how to get the springs in and out easier as well as to make sure the purchaser know beforehand that they will need cone spacers, washers and/or spacers to install if needed (depending on what it is replacing, etc.)
You mean the spacers on the bottom of the stem, right? Yes, correct. I measured and asked the LBS. (as the 'stem' inside the tube has to be a specific distance from the top, too short or too long are both problematic, from my reading)
The reason you'll need not only the spacers but the bottom "cone" is because the OEM Turbo Vado has a 'teardrop' shaped cone and spacers, which do not mate with the round stem of the Kinekt.
I used 1 spacer (approx. 1/4") and the 'cone (approx. 1")
I asked the LBS about how much space inside the stem that I should have for the tube before I put the cap on and he said as long as the top screw of the stem is parallel to the top of the stem tube it should be fine. And it is. I watched a few YouTube videos to make sure I did it right as the last thing I needed to do was over-tighten, or install improperly anything.
GuruUno
Well-Known Member
(meaning the Kinect....)'Tap it' with anything lightly and pull it out.
FlatSix911
Well-Known Member
- Region
- USA
- City
- Silicon Valley
I too had issues, called the company, they too were a little stymied, and was supposed to send out another.
YES, the removal and insertion of the spring is a problem, I found, and there has to be some specific video or directions provided by Kinekt to address the issue.
Inside the housing the 'top hat' piece that rests inside is a plastic retainer to keep the spring centered. I broke it in 2 places trying to put in the heavier spring.
Finally, after fiddling around and having my wife tap the 'pin' back in while I pushed down on the bars with the heavier spring I got it in, but then realized a small 'purple' plastic spacer inside had fallen out, and had to be taken apart again to reinsert it, etc., and on and on.
Bottom line is it's a great product, works well, but there needs to be specific instructions as to how to get the springs in and out easier as well as to make sure the purchaser know beforehand that they will need cone spacers, washers and/or spacers to install if needed (depending on what it is replacing, etc.)
You mean the spacers on the bottom of the stem, right? Yes, correct. I measured and asked the LBS. (as the 'stem' inside the tube has to be a specific distance from the top, too short or too long are both problematic, from my reading)
The reason you'll need not only the spacers but the bottom "cone" is because the OEM Turbo Vado has a 'teardrop' shaped cone and spacers, which do not mate with the round stem of the Kinekt.
I used 1 spacer (approx. 1/4") and the 'cone (approx. 1")
I asked the LBS about how much space inside the stem that I should have for the tube before I put the cap on and he said as long as the top screw of the stem is parallel to the top of the stem tube it should be fine. And it is. I watched a few YouTube videos to make sure I did it right as the last thing I needed to do was over-tighten, or install improperly anything.
This...
GuruUno
Well-Known Member
This...
I am aware of the video. Unfortunately, it is not truly representative the the real issues.
First, the 'pin' has only 1 indentation, it is not all the way around as shown in the video. I see that as a problem, trust me (see 1:06 to 1:08 to see groove, there is no groove, only a dimple/indentation...so think about that as an alignment issue, potentially for some)
Second, 1:16 to 1:20, 'remove the upper spring guide...that purple piece is easily detached and easily lost, trust me.
Third, 1:23 to 1:24, make sure to center it on the lower spring guide.....yea, let me know how it works for you once you close it and try to push the pin back in......the guide bottom broke in 2 spots...not a big deal, but it broke. ME, MY 2 cents....I think that "guide" should be aluminum as well as the 'purple piece' on the spring guide needs a modification of sorts.
Fourth 1:30 to 1:34....not as easy as they make it seem, that is the actual step that needs to be clarified in a PRECISE video...
So, although a fantastic product that works, we are in actuality still 'field testing' this product and should be compensated for the feedback.
My 2 cents.
ha took me like 3 tires to get the screw on the pin to get aligned.... definitely easier to set in when the indentation goes all the way around instead of in one spot. Once i got the pin out it was plug and play for me to get it to set in. the only problems i ran into was trying to figure out how to get the pin out and getting it to realign. We still have unhealthy air quality so i haven't tested out the heavy/medium spring enough to know which i will like the most.

Cirrus Cycles Kinekt suspension stem review | - gravel bikes comfort challenge
There is much more comfort improving solutions for the back than for the front of the gravel bike. That is why I am always very eager to test something new that promises improved comfort at the handlebar. Kinekt suspension stem from Cirrus Cycles does just that. And it is quite good at it…
 gravelbikes.cc
Interesting review at the above link
FlatSix911
Well-Known Member
- Region
- USA
- City
- Silicon Valley
Cirrus Cycles Kinekt suspension stem review | - gravel bikes comfort challenge
There is much more comfort improving solutions for the back than for the front of the gravel bike. That is why I am always very eager to test something new that promises improved comfort at the handlebar. Kinekt suspension stem from Cirrus Cycles does just that. And it is quite good at it…
Interesting review at the above link
Good comparison... thanks for sharing.
GuruUno
Well-Known Member
So, Cirrus sent me a new replacement unit, as well as an even heavier spring. (Purple stripe).
This is the perfect setup for me.
Leaning forward on the handlebars as most all of us do with the geometry of this Vado 5.0, it does not 'bottom out' like all the other springs, and it offers a comfort to absorb the bumps.
Perfect.
This is the perfect setup for me.
Leaning forward on the handlebars as most all of us do with the geometry of this Vado 5.0, it does not 'bottom out' like all the other springs, and it offers a comfort to absorb the bumps.
Perfect.
Similar threads
- Replies
- 29
- Views
- 4K
- Replies
- 23
- Views
- 3K

