BBS HD - Bottom Bracket Shim (73mm BB)

Driverwanted

New Member
Region
Canada
I'm in the process of building a Ti ebike , picked up a MTB frame from planet x 60% off - even if it falls apart it was worth the try... i'll be taking my BBSHD off my hybrid bike and installing it on this frame.

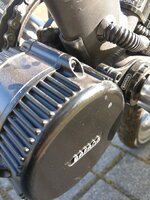
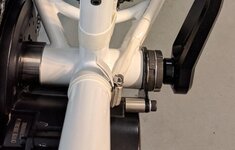
One of my concerns when i build the first bike was the play between the crankshaft of the motor and the bottom bracket , it's only .2mm (BB Standard Dia 33.7mm) (BBS Shaft dia 33.5mm) but im a heavy guy 250lbs 6'6"... i had quite a bit of BB creak and sounds coming from my road bike - could be the chain suck of my luna front ring but it sounds more like metal on metal around the BB (it goes away on really wet rides)

so getting to the point of the thread and the question - has anyone shimmed their BB with any material to cut down on noise ? Silicon tape, Metal, loaded it with grease ? thoughts ? or ideas on if this is crazy or which material might be best ? ty !!

mike
 
Well at 0.1mm at any point around the shaft I'm not sure you have many other options but grease.
These things are not built to NASA Specs and also many bike manufacturers do not have the best quality control. My bbs02b slid in tight and just about required a polish sanding and a light coat of lube.
I would double lock nut it as apposed to lock nut and cover nut and put some hard rubber between the motor and frame at the contact point.
IMAG0866.jpgIMG_20180525_175509.jpg
 
Last edited:
Credit Pedaluma
I had creaking on my dahon jack folder with Tongsheng TSDZ2 mid drive. At first I thought is was the frame but that was all solid. I pulled the motor and used aluminum pop/beer can as a shim. The fit was already so close that I couldn't wrap the entire motor shaft, only about 2/3 and it was an extremely tight fit to get it back in. Solved the creaking.
On another bike I was only able to fit ~1" strip of the aluminum in the bottom of the bottom bracket to make the fit extremely tight. I used silicone grease on the motor shaft as well as coating the bottom bracket and shim otherwise it wouldn't go together.
Hope this helps.
Props to Pedaluma
Now you've made me feel guilty.
I stoll the double lock nut photo from @m@Robertson
Props!
 
thanks !! i just grabed some rubber to use under the tbolt clamps i'm using for my Grin Industries Downtube battery mount... i didn't use any grease the last time and i think it shows... with what you suggested here i think the noise may very well be licked... i'll see if i can fit an aluminum can shim.... but youre right may not work with the tolerances.

ty both !!!

Mike

Pic of the Ti Frame goodness....
IMG_2371 (1).jpg
 
Credit Pedaluma
I had creaking on my dahon jack folder with Tongsheng TSDZ2 mid drive. At first I thought is was the frame but that was all solid. I pulled the motor and used aluminum pop/beer can as a shim. The fit was already so close that I couldn't wrap the entire motor shaft, only about 2/3 and it was an extremely tight fit to get it back in. Solved the creaking.
On another bike I was only able to fit ~1" strip of the aluminum in the bottom of the bottom bracket to make the fit extremely tight. I used silicone grease on the motor shaft as well as coating the bottom bracket and shim otherwise it wouldn't go together.
Hope this helps.
Props to Pedaluma
A quick Google reveals that a typical aluminum can is 0.097mm to 0.102mm.
So it might be worth a try if you can do it without slicing off a finger.
 
Now you've made me feel guilty.
I stoll the double lock nut photo from @m@Robertson
Props!
Except thats an early photo where I had not yet learned that the spacer in between the two inner lock nuts is a bad idea. Kind of negates the jam-nut concept that otherwise works so well.

I like the aluminum can idea, but not sure if it will be of much actual benefit. I've never messed with that aspect of a mount. I did this one just a few weeks ago and used the doubled-inner-locknuts, and the hose clamps, which serve to hold the motor solidly on their own (!). I have done without that secondary motor mount reinforcement for my more recent street builds but for an emtb I wanted both.

PXL_20220327_195532730.jpg


And since we are talking about Ti emtb frames, turning back the clock to 2018 below. Having first used Ti, then chromoly and now alloy, I would not use titanium again. Its beautiful stuff, but the rear triangle is not rigid enough, nor is the bottom bracket.

IMG_20180115_182518.jpg
 
Except thats an early photo where I had not yet learned that the spacer in between the two inner lock nuts is a bad idea. Kind of negates the jam-nut concept that otherwise works so well.

I like the aluminum can idea, but not sure if it will be of much actual benefit. I've never messed with that aspect of a mount. I did this one just a few weeks ago and used the doubled-inner-locknuts, and the hose clamps, which serve to hold the motor solidly on their own (!). I have done without that secondary motor mount reinforcement for my more recent street builds but for an emtb I wanted both.

View attachment 121273

And since we are talking about Ti emtb frames, turning back the clock to 2018 below. Having first used Ti, then chromoly and now alloy, I would not use titanium again. Its beautiful stuff, but the rear triangle is not rigid enough, nor is the bottom bracket.

View attachment 121274
Thanks for the insights ! Can you elaborate on the stiffness issue ? Did you have failure of the frame ? I would expect Ti to be at least as rigid as Alloy but less prone to fatigue - but keen to hear what you witnessed … my overall goal is to reduce noise from the bottom bracket area and make it look as clean as I can… I have seen that hose clamp setup before but it’s a little unsightly , but I may give it a try if you have found it to help though :)
 
further measuring done today....

1) This frame has a 72.48mm Wide Bottom Bracket.
2) This frame does not have a notch at the front of the chainstay.

I may have to space the motor out from the BB to clear the chainstay, thus reducing the threads i will have to double lockring with. Adding in spacers also adds a bunch of metal/metal contact and potentially could exacerbate my creaky bottom bracket noises.

The last Part for me to buy is the battery , so i should be able to start test fitting the motor soon ( i didn't want to take it off my functional bike until i had all the parts.)

44DCFAEE-8A24-4D01-85B1-15E84C6DDC12.jpeg
 
Last edited:
About using an aluminum can as a spacer. If you find the thickness to be a little too much you can easily reduce the thickness using a sheet of very fine sandpaper. It's relatively easy to take a piece of thin aluminum down in thickness using the sandpaper working carefully on a flat surface. It really helps (preventing tearing) to first round the edges and get the sheet of aluminum as flat as possible. This technique also works well to create a custom tapered spacer or shim.
 
Can you elaborate on the stiffness issue ? Did you have failure of the frame ?
Ti frames are flexible, relative to chromoly. So I can stand next to my bike, put one foot on the pedal and push forward. The entire frame from the bottom bracket flexes sideways so long as I do not push so hard as to break traction with the tires. In riding, this evidenced itself particularly in turns where the bike would feel unsettled. It is a high quality USA made frame with Paragon adjustable dropouts, and I reduced this sensation to be unnoticeable by hauling the dropouts in as far as I could to shorten the wheelbase. However, the frame is the frame and the flex is still there. It is, by the way, a Chumba Ursa Major that was in fact made by Lynskey in Tennessee.
I would expect Ti to be at least as rigid as Alloy but less prone to fatigue - but keen to hear what you witnessed …
Yeah its the opposite with regard to rigidity and you will hear this from others. Its been discussed here in two other threads I can think of (one was a WattWagons discussion regarding an upcoming cargo bike prototype in Ti they ended up walking away from).

No failures. Its a great frame for what it is. Ti gives you light weight. I use the bike as a sand crawler where the flex is a non issue as I'm squirming all over the place already on the riding surface.
my overall goal is to reduce noise from the bottom bracket area and make it look as clean as I can… I have seen that hose clamp setup before but it’s a little unsightly , but I may give it a try if you have found it to help though :)
It helps a LOT. I would consider it a requirement if you intend to leave the bike as-is without having to do over the motor installation on an MTB. On a street bike you can do just the dual lock rings. On an MTB that is going to bounce around you absolutely want the backup.
2) This frame does not have a notch at the front of the chainstay.
Thats a bummer for motor spacing. Look up at the pic @Gionnirocket posted of my white Stormtrooper frame. See the metal spacer that moves the motor out to clear the fat stays on that bike? You may need to do something similar. For the Ti bike and this one I used a custom-sized metric press fit bushing from McMaster, where I reduced the diameter of the bushing to more closely fit the BBSHD axle housing, and increased its thickness for a very solid purchase on the bottom bracket. You can see its thicker and thats by design. Let me know if you want links/specifics etc. Its possible you will want to use a 100mm axle size motor so you can space it out on both sides.
I may have to space the motor out from the BB to clear the chainstay, thus reducing the threads i will have to double lockring with. Adding in spacers also adds a bunch of metal/metal contact and potentially could exacerbate my creaky bottom bracket noises.
I should have written my above comment after reading this sentence :) It will not make the creaking worse. Mine does not creak at all and I had to do spacers on both sides since I had to use a 120mm motor on a 100mm BB. However chain alignment came out *perfect*. This is the bike:


Scroll down for the pics of the non drive side and note the order of the spacers. You must put the fixing plate first so it clamps to the BB.

I would bet your creaking is the result of not torqueing the motor solidly to the BB. We're talking 1/2" automotive torque wrench, double nuts and 90 ft lbs (FOOT pounds) to each ring.
 
Ti frames are flexible, relative to chromoly. So I can stand next to my bike, put one foot on the pedal and push forward. The entire frame from the bottom bracket flexes sideways so long as I do not push so hard as to break traction with the tires. In riding, this evidenced itself particularly in turns where the bike would feel unsettled. It is a high quality USA made frame with Paragon adjustable dropouts, and I reduced this sensation to be unnoticeable by hauling the dropouts in as far as I could to shorten the wheelbase. However, the frame is the frame and the flex is still there. It is, by the way, a Chumba Ursa Major that was in fact made by Lynskey in Tennessee.

Yeah its the opposite with regard to rigidity and you will hear this from others. Its been discussed here in two other threads I can think of (one was a WattWagons discussion regarding an upcoming cargo bike prototype in Ti they ended up walking away from).

No failures. Its a great frame for what it is. Ti gives you light weight. I use the bike as a sand crawler where the flex is a non issue as I'm squirming all over the place already on the riding surface.

It helps a LOT. I would consider it a requirement if you intend to leave the bike as-is without having to do over the motor installation on an MTB. On a street bike you can do just the dual lock rings. On an MTB that is going to bounce around you absolutely want the backup.

Thats a bummer for motor spacing. Look up at the pic @Gionnirocket posted of my white Stormtrooper frame. See the metal spacer that moves the motor out to clear the fat stays on that bike? You may need to do something similar. For the Ti bike and this one I used a custom-sized metric press fit bushing from McMaster, where I reduced the diameter of the bushing to more closely fit the BBSHD axle housing, and increased its thickness for a very solid purchase on the bottom bracket. You can see its thicker and thats by design. Let me know if you want links/specifics etc. Its possible you will want to use a 100mm axle size motor so you can space it out on both sides.

I should have written my above comment after reading this sentence :) It will not make the creaking worse. Mine does not creak at all and I had to do spacers on both sides since I had to use a 120mm motor on a 100mm BB. However chain alignment came out *perfect*. This is the bike:


Scroll down for the pics of the non drive side and note the order of the spacers. You must put the fixing plate first so it clamps to the BB.

I would bet your creaking is the result of not torqueing the motor solidly to the BB. We're talking 1/2" automotive torque wrench, double nuts and 90 ft lbs (FOOT pounds) to each ring.


Awesome ! thanks for the additional context .... i don't expect to be doing any crazy amount of single track - but i do enjoy the occasional bunny hop and curb/limb jump - so it sound like the extra support will 100% keep the weight of the motor in check and avoid backing our or loosening of anything. I did the measuring , i need about 8mm of spacers on the drive side to clear the stay , made a template based on caliper measurements.... this leaves me 10mm on the other side for the lockring... might be hard pressed to fit a second on there but i'll try. Do you think this will completely mess up my Q factor ? (Chainline hopefully will be ok i have a luna 42t and i'm only running a HG 9spd cassette.)

Last - ty for the spacer info... i have the alum. set from Luna to work with but i'd much rather have a single solid spacer than 3-4 of them piled up so if you have the info that would be super !
 
Is this the one you used... 33.5mm - it's pretty long unfortunately - doesn't look like they make a smaller one... so did you cut yours ?

 
it sound like the extra support will 100% keep the weight of the motor in check and avoid backing our or loosening of anything.
^^^ This. Exactly. Strictly speaking it will not affect whether the lockring loosens or not (your torque spec and the jam nut arrangement will address that). But its reinforcement that is strong enough to keep the motor from moving if that ever happens, and reduces the stress on the locking plate mated to the bottom bracket since the motor physically cannot move. When I was building the Apostate, for giggles I clamped the motor with the hose clamps only and rocked it around by hand. No movement possible. I'm sure I could fix that with a hammer or something but bottom line is its a very strong solution on its own.
I did the measuring , i need about 8mm of spacers on the drive side to clear the stay ,
Don't use the Luna spacers stacked up. They will shift. The issue is the very one you brought up: The slack in the inside diameter. They will move over time. This link should take you to the custom bushing spot @ McMaster


Don't measure with calipers. Stack up your spacers and then clamp down the motor onto them as if its a final assembly. Clamped, your results will be different. I literally just went thru this again on the red bike. I bought these for my test fit:

I had no intention to use them but I only needed one, plus one more thin Luna 1mm spacer. Clamped, thats about 3mm total and McMaster requires 4mm minimum width. So I had to do what I just told you not to do :D . Also, do not stop your test fit until you also attach your chosen chainring and assess a) how well it clears the stay and b) how well it lines up to the cassette. You could end up moving further outboard, conceivably, and then going to a more hardcore offset ring... like changing from a Lekkie 40T to a Luna Eclipse 42T which will go a few millimeters further in and give you a net inboard benefit despite the outboard movement of the secondary with a bigger spacer.

One thing to be aware of... The Luna Eclipse ring, if thats what you have, provides such a large inset that it often does not clear a chainstay. You could end up shimming that with a chainring shim - they make them for that purpose.


Do you think this will completely mess up my Q factor ?
Yup. Dealing with that is part of the game. Expect a wide Quack Factor. Your crankarms almost certainly cannot be standard bike crankarms and a left offset arm will be a requirement to center the pedals under your torso. I can usually get it to within about 2mm. Here... lookit this. Do this with your crankarms as part of your build fitment. Don't torque them down just put them on firmly so they are both similarly pressed in. Measure the distance of the inside of each arm to the stay. Whats the difference? I learned that on this bike I could not use these crankarms and had to go with an offset pair to fix the off-center issue (totally normal) you see here. Distance is roughly 3.5cm on the non drive side, and almost 5cm on the other. This is why offset crankarms for the BBSHD exist. I used a pair of Lekkie Buzz Bars, which provide 18mm on the non drive side. That creates an imbalance of 3mm. I added a pedal washer on the drive side that is 1.5mm thick, and this puts my pedals only 1.5mm off center under my torso. Good enough.
PXL_20220322_224126590.jpg
 
Is this the one you used... 33.5mm - it's pretty long unfortunately - doesn't look like they make a smaller one... so did you cut yours ?

No. See the link I posted. I used an inside dimension of 34mm (BB spacers are typically 35mm) an outside dimension of 44mm and 9mm thickness. Your thickness will vary after you go thru the exercise I describe above with dummy spacers. The custom bushing is chamfered on the outer edge on one side and chamfered on the inside of the other edge. This outer edge chamfer makes for a perfect mating to the available space on the BBSHD. BTW the length of the pictured spacer on the white bike above is 17mm... that was a big one.

EDIT: Also: Do not use just one nut. If it comes to that, rethink your build with a 100mm motor or abandon the project and go with a Cyc X1 or maybe a TSDZ2. However, despite its appearance, the inner ring does not seem to eat more threads than the cosmetic outer ring, so if you can do it the Bafang way you will not need more threads to do it my way :D
 
The locking plate has 9 teeth that press into the left side of the frame's BB shell. Ti is very hard. I use a shortened hack saw to file in notches 40 degrees apart. I first mount tightly and in the most forward position, then and mark around the shell with a paint pen. This will secure the motor. The beer can idea came from Zen and the Art of Motorcycle Maintenance. One guy did not want to have a beer can shim to secure his BMW's handlebar. So it continued to move around.
1650905629466.jpeg
 
Great info thanks !! i'm in canada so it looks like McMaster don't typically ship to the public - i found a company that does....


this one looks like a good size 34mm ID and 42MM OD , in SS or Aluminum and i can choose the length based on the test fit with the luna spacers.

I do have some of the chainring spacers if it comes to that also.... if this doesn't work out, i think golden motor here in canada may sell the new 68 to 100mm kit... or... i'll leave this on my other bike and buy a new one :D
 
Back