[#8] X52.. Water Bottle holders..Torque Washers.. Step-Over Frame modification.
I thought that I'd go ahead and post this thread because it has some ideas which may be of interest to any ebike owner. You really need to 1st scroll down to the end of this post to examine the photo's. Things will then make more sense.
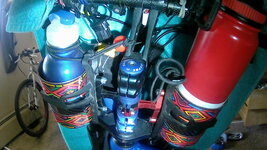
a). Water Bottle holder: As you may already know, water bottle holder placement on the frame of any ebike can be quite a challenge, and on these moped-style frames, even more so. I stumbled upon this method of fastening 1 or 2 units to pretty much any ebike.
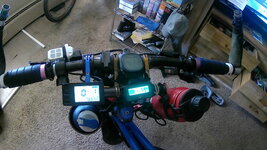
I had already installed this handlebar height extender https://www.amazon.com/dp/B07V3X23ZB/ref=sspa_dk_detail_4? and, as a side benefit, thanks to the multiple shims (3 or more), I was able install 2 of these water bottle holder brackets (1 black and 1 red) in place of 2 of those shims. https://www.amazon.com/gp/product/B08RBWC43B/ref=ppx_yo_dt_b_asin_title_o09_s00?ie=UTF8&th=1
Upon inspecting my 6 ebikes, every one of them has at least a couple of (spacer) shims under the stem. The aforementioned bottle holder bracket(s) are exactly the same width as those shims. Thus, the bracket will just replace the shim(s), as needed. You only need to verify that the side location of the bottle holder won't interfere with side-to-side movement (hit the top tube/bar) when you turn the handlebar.
Once you have the bracket(s) located in a good position, it is time to screw on/attach the water bottle holder to the skinny little bracket. Since I already own these water bottle holders (2 for $11-- not bad) https://www.amazon.com/gp/product/B07CZWQYD7/ref=ppx_yo_dt_b_search_asin_title?ie=UTF8&th=1 they were my logical choice.
Also needed is 1 (or 2) of this particular item: https://www.amazon.com/Progresso-Tr...wder-18-5-Ounce/dp/B00434J53M/ref=sr_1_1_sspa? Why a can of PROGRESSO soup? Because its fatter than normal width (for a soup can) makes it an ideal container in which to insert a typical size water bottle. And, just for you to use as a reference, I actually use this water bottle (among others) https://www.amazon.com/gp/product/B093FJW45Q/ref=ppx_yo_dt_b_search_asin_title?ie=UTF8&psc=1 on numerous occasions and it works just fine. Of course, the shorter water bottles work great, too.
There are a few pre-assembly modifications needed to make this set-up work correctly.
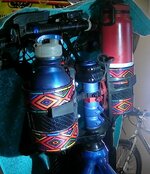
Having the empty soup can, with its pop-top lid off, means that you need to also use a regular can opener to remove the thin sharp rim edge left by the pop-top. Now is also a good time to “personalize” the soup can by removing the original label and applying whatever pattern rocks yer boat. I used contact paper carbon fiber and a 1” strip of multi-color cloth trim.
You might assume that all you need to do now is insert the soup can into the bottle holder, insert the water bottle itself, and you are Good To Go. Not so, young grasshopper. There will be 2 things working against you:
The weight of a full water bottle.
Gravity.
What you now need to do is use a flat blade screwdriver and a hammer to make 2 parallel slits/slots (about 1/4” apart) in the bottom of the soup can (think snake fangs). Now look at the photo of the linked black water bottle holder(s). See how, at the bottom, there is that small “L”? Well, there are also 2 open slots down there. What you need to do is get a ZipTie and run it through the soup can slits and also both of those bottom slots. Doing so will prevent the soup can from being ejected from the holder. However, that, in and of itself ,will only ½ solve the problem.
You will also need to locate a stretchy elastic band-type item (I actually bought these-- they work great) https://www.amazon.com/Revlon-Extra-Black-Elastics-Count/dp/B01F8SRBXC/ref=sr_1_32? This stretchy thing will be inserted along the top edge of the water bottle holder and then wrapped around the water bottle body/top section as needed to prevent “ejection”.. Works like a champ. EasyBreezy.. And there you have it. As a side benefit, you can use the soup can/container to act as a kind of mini-storage compartment. I actually put my keys in one and then set a water bottle on top of the keys to keep them from being ejected.
b). Torque Washers:[This next section, while being useful info all rear hub motor ebike owners, is especially pertinent to owners of the moped-style hot rods using 20” size wheels because those lil' beasts have torque/power output getting to the ground ALOT quicker when compared to the Big Beast 26” fat tire ebikes.]
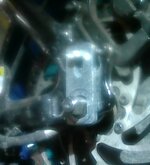
Anyone who has had the opportunity to remove/install the rear wheel of a rear hub motor ebike is familiar with the uniquely shaped washer (s) with an oblong (instead of round) hole and a “tit”. It is called a TorqueWasher and its intended use is to prevent the powerful rear hub motor from twisting the axle within the dropouts. Should a person forget/prefer to not use these specific-use items, the eventual result will be that the entire axle rotates within the dropouts and all those wires (9, I believe) coming from the rear hub axle will be ripped right out of the hub. You will then be left with an ebike turned multi-thousand dollar clothing rack.
I recently read about a fellow ebiker who either forgot or neglected to utilize this washer, ripped out all the wiring, rounded out the oblong dropouts, and is now having an extended wait for the eventual delivery of a new rear wheel/rear motor unit. Damn. Talk about a tough lesson learned. Anyway, along those accident-preventative lines, I have stumbled across these items:
https://www.aliexpress.com/item/3256801933528894.html?spm=a2g0o.order_list.0.0.45ae1802u8zhm1
I went ahead and ordered the 16mm set of 2. I wasn't sure which size is the best fit, but I figure that, if a little “wiggle room” results from using 16mm instead of 14mm, I can live with that. Surely the axle won't be able to rotate 360 degrees. They should be here in a few days.
As far as having a correct/proper location for the smaller “not axle” slot, I'm only concerned about having something (a fat washer/nut,etc) between the frames chain/seat stay to limit the movement of the special torque washer. I'm hoping/intending to leave the (2) original torque washers in place and then use this new item as a replacement for the regular (round) washers. Time will tell. You can never be too cautious.
UpDate: I ordered the oblong/rectangular 16mm items on Aug 24th. They arrived today, Sept. 9th, from China. I installed one washer on the disc brake side of the X52rear axle. There was a certain amount of “wiggle room”, but not near enough to spin the 16mm torque washer. Also, while the provided screws/nuts were totally incorrect (size-wise), the smaller hole aligned perfectly with one of the screw holes already on the frame dropout. I just had to find a correctly sized bolt. I would recommend that, if you do order this item, order the oblong/rectangular 14mm combo instead, regardless of the model of rear hub motor ebike that you own (see the following sentence)..
I also tried this 16mm washer on the rear axle of my 2019 M2S(brand) R750(model) rear motor hub (BaFang 750 watt) fat tire beast. It easily spun completely around. So, I went ahead and ordered the oblong/rectangular 14mm washer combo for 2 reasons: 1). to see how tight the fit on the X52 rear axle will be and, 2), to see if the 14mm unit(s) will be an acceptable fit (maybe just a little wiggle room) on the M2S ebike(s)-- remember, I own 2 of those.
If things work out as expected, I'll just leave the one 16mm washer on the X52 and install one of the 14mm washers on the disc brake side of each of the M2S fat tire beasts rear axle. I'll post an UPDATE addendum to this post when those items arrive and are checked out.
By the way, as far as “quality control” is concerned at ArielRider: The nuts on the FRONT suspension fork axle are 18mm.. The nuts on the REAR motor axle are 22mm. Duh on someone..
c). StepOver Frame modification: I have mentioned in a few of my previous X52 postings that my 30” leg is put to its full outward extension whenever I mount/dismount from my mighty steed (with its mail box modified 39” high seat height). After much thought, I have decided that I am just going to go ahead and REMOVE the “(dual) top tube”. Thus, I will then have a Step-THRU X52 beast. I don't think that the structural integrity will be compromised. As for the open exposed ends of the cut off top tube, I will insert handlebar end plugs in every hole(4).
I already own a step-thru ebike (from a 3rd rate company located in a 3rd world country) and, after careful examination, I believe that my X52 can handle the modification with no problem at all. After all, my riding consists of 99.9% paved bike paths/sidewalks,etc.-- no fancy smancy off road stuff for me. Besides, in regards to other ebikes: I have seen many step-thru designs that use extra bracing-type tubes for frame reinforcement. I have also seen other frames that use no such “extra assistance”. In both cases, I have also seen some rather large mammals astride these ebikes, and all seems to be fine and dandy. If, by chance, a situation does arise whereas I've discovered that the modification was a “duh” idea (crack in the frame, etc), I will either a). re- connect the removed top tube pipes via short steel inserts or, b). insert solid steel rods (from HomeDepot) the entire length or, c). go to a local Metal Fabrication shop and have them weld a re-enforced metal strip along the bottom of the down tube (where the X52 battery is attached) of the frame. Either way. EasyBreezy. A piece of cake.
TaaDaa. I'll see how things go.
Thats all for now..
I thought that I'd go ahead and post this thread because it has some ideas which may be of interest to any ebike owner. You really need to 1st scroll down to the end of this post to examine the photo's. Things will then make more sense.
a). Water Bottle holder: As you may already know, water bottle holder placement on the frame of any ebike can be quite a challenge, and on these moped-style frames, even more so. I stumbled upon this method of fastening 1 or 2 units to pretty much any ebike.
I had already installed this handlebar height extender https://www.amazon.com/dp/B07V3X23ZB/ref=sspa_dk_detail_4? and, as a side benefit, thanks to the multiple shims (3 or more), I was able install 2 of these water bottle holder brackets (1 black and 1 red) in place of 2 of those shims. https://www.amazon.com/gp/product/B08RBWC43B/ref=ppx_yo_dt_b_asin_title_o09_s00?ie=UTF8&th=1
Upon inspecting my 6 ebikes, every one of them has at least a couple of (spacer) shims under the stem. The aforementioned bottle holder bracket(s) are exactly the same width as those shims. Thus, the bracket will just replace the shim(s), as needed. You only need to verify that the side location of the bottle holder won't interfere with side-to-side movement (hit the top tube/bar) when you turn the handlebar.
Once you have the bracket(s) located in a good position, it is time to screw on/attach the water bottle holder to the skinny little bracket. Since I already own these water bottle holders (2 for $11-- not bad) https://www.amazon.com/gp/product/B07CZWQYD7/ref=ppx_yo_dt_b_search_asin_title?ie=UTF8&th=1 they were my logical choice.
Also needed is 1 (or 2) of this particular item: https://www.amazon.com/Progresso-Tr...wder-18-5-Ounce/dp/B00434J53M/ref=sr_1_1_sspa? Why a can of PROGRESSO soup? Because its fatter than normal width (for a soup can) makes it an ideal container in which to insert a typical size water bottle. And, just for you to use as a reference, I actually use this water bottle (among others) https://www.amazon.com/gp/product/B093FJW45Q/ref=ppx_yo_dt_b_search_asin_title?ie=UTF8&psc=1 on numerous occasions and it works just fine. Of course, the shorter water bottles work great, too.
There are a few pre-assembly modifications needed to make this set-up work correctly.
Having the empty soup can, with its pop-top lid off, means that you need to also use a regular can opener to remove the thin sharp rim edge left by the pop-top. Now is also a good time to “personalize” the soup can by removing the original label and applying whatever pattern rocks yer boat. I used contact paper carbon fiber and a 1” strip of multi-color cloth trim.
You might assume that all you need to do now is insert the soup can into the bottle holder, insert the water bottle itself, and you are Good To Go. Not so, young grasshopper. There will be 2 things working against you:
The weight of a full water bottle.
Gravity.
What you now need to do is use a flat blade screwdriver and a hammer to make 2 parallel slits/slots (about 1/4” apart) in the bottom of the soup can (think snake fangs). Now look at the photo of the linked black water bottle holder(s). See how, at the bottom, there is that small “L”? Well, there are also 2 open slots down there. What you need to do is get a ZipTie and run it through the soup can slits and also both of those bottom slots. Doing so will prevent the soup can from being ejected from the holder. However, that, in and of itself ,will only ½ solve the problem.
You will also need to locate a stretchy elastic band-type item (I actually bought these-- they work great) https://www.amazon.com/Revlon-Extra-Black-Elastics-Count/dp/B01F8SRBXC/ref=sr_1_32? This stretchy thing will be inserted along the top edge of the water bottle holder and then wrapped around the water bottle body/top section as needed to prevent “ejection”.. Works like a champ. EasyBreezy.. And there you have it. As a side benefit, you can use the soup can/container to act as a kind of mini-storage compartment. I actually put my keys in one and then set a water bottle on top of the keys to keep them from being ejected.
b). Torque Washers:[This next section, while being useful info all rear hub motor ebike owners, is especially pertinent to owners of the moped-style hot rods using 20” size wheels because those lil' beasts have torque/power output getting to the ground ALOT quicker when compared to the Big Beast 26” fat tire ebikes.]
Anyone who has had the opportunity to remove/install the rear wheel of a rear hub motor ebike is familiar with the uniquely shaped washer (s) with an oblong (instead of round) hole and a “tit”. It is called a TorqueWasher and its intended use is to prevent the powerful rear hub motor from twisting the axle within the dropouts. Should a person forget/prefer to not use these specific-use items, the eventual result will be that the entire axle rotates within the dropouts and all those wires (9, I believe) coming from the rear hub axle will be ripped right out of the hub. You will then be left with an ebike turned multi-thousand dollar clothing rack.
I recently read about a fellow ebiker who either forgot or neglected to utilize this washer, ripped out all the wiring, rounded out the oblong dropouts, and is now having an extended wait for the eventual delivery of a new rear wheel/rear motor unit. Damn. Talk about a tough lesson learned. Anyway, along those accident-preventative lines, I have stumbled across these items:
https://www.aliexpress.com/item/3256801933528894.html?spm=a2g0o.order_list.0.0.45ae1802u8zhm1
I went ahead and ordered the 16mm set of 2. I wasn't sure which size is the best fit, but I figure that, if a little “wiggle room” results from using 16mm instead of 14mm, I can live with that. Surely the axle won't be able to rotate 360 degrees. They should be here in a few days.
As far as having a correct/proper location for the smaller “not axle” slot, I'm only concerned about having something (a fat washer/nut,etc) between the frames chain/seat stay to limit the movement of the special torque washer. I'm hoping/intending to leave the (2) original torque washers in place and then use this new item as a replacement for the regular (round) washers. Time will tell. You can never be too cautious.
UpDate: I ordered the oblong/rectangular 16mm items on Aug 24th. They arrived today, Sept. 9th, from China. I installed one washer on the disc brake side of the X52rear axle. There was a certain amount of “wiggle room”, but not near enough to spin the 16mm torque washer. Also, while the provided screws/nuts were totally incorrect (size-wise), the smaller hole aligned perfectly with one of the screw holes already on the frame dropout. I just had to find a correctly sized bolt. I would recommend that, if you do order this item, order the oblong/rectangular 14mm combo instead, regardless of the model of rear hub motor ebike that you own (see the following sentence)..
I also tried this 16mm washer on the rear axle of my 2019 M2S(brand) R750(model) rear motor hub (BaFang 750 watt) fat tire beast. It easily spun completely around. So, I went ahead and ordered the oblong/rectangular 14mm washer combo for 2 reasons: 1). to see how tight the fit on the X52 rear axle will be and, 2), to see if the 14mm unit(s) will be an acceptable fit (maybe just a little wiggle room) on the M2S ebike(s)-- remember, I own 2 of those.
If things work out as expected, I'll just leave the one 16mm washer on the X52 and install one of the 14mm washers on the disc brake side of each of the M2S fat tire beasts rear axle. I'll post an UPDATE addendum to this post when those items arrive and are checked out.
By the way, as far as “quality control” is concerned at ArielRider: The nuts on the FRONT suspension fork axle are 18mm.. The nuts on the REAR motor axle are 22mm. Duh on someone..
c). StepOver Frame modification: I have mentioned in a few of my previous X52 postings that my 30” leg is put to its full outward extension whenever I mount/dismount from my mighty steed (with its mail box modified 39” high seat height). After much thought, I have decided that I am just going to go ahead and REMOVE the “(dual) top tube”. Thus, I will then have a Step-THRU X52 beast. I don't think that the structural integrity will be compromised. As for the open exposed ends of the cut off top tube, I will insert handlebar end plugs in every hole(4).
I already own a step-thru ebike (from a 3rd rate company located in a 3rd world country) and, after careful examination, I believe that my X52 can handle the modification with no problem at all. After all, my riding consists of 99.9% paved bike paths/sidewalks,etc.-- no fancy smancy off road stuff for me. Besides, in regards to other ebikes: I have seen many step-thru designs that use extra bracing-type tubes for frame reinforcement. I have also seen other frames that use no such “extra assistance”. In both cases, I have also seen some rather large mammals astride these ebikes, and all seems to be fine and dandy. If, by chance, a situation does arise whereas I've discovered that the modification was a “duh” idea (crack in the frame, etc), I will either a). re- connect the removed top tube pipes via short steel inserts or, b). insert solid steel rods (from HomeDepot) the entire length or, c). go to a local Metal Fabrication shop and have them weld a re-enforced metal strip along the bottom of the down tube (where the X52 battery is attached) of the frame. Either way. EasyBreezy. A piece of cake.
TaaDaa. I'll see how things go.
Thats all for now..
Attachments

Last edited:


