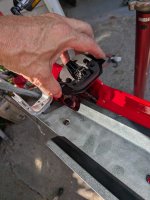
I'm not sure why you would ever need to do this, but just in case you do, here is a DIY on how to remove it.
To understand removal, it helps to see what the battery tray looks like out of the bike:

In the above photograph the battery tray has been disassembled fully, you likely won't need to go that far - this image is just to give you a clue about the basic shape of the battery tray. Notice especially the T-shaped piece at the head.
Now let's take a look inside the head tube with the front fork and the battery tray removed:

Notice especially the vertical slot in the head tube - the T-shaped head of the battery tray engages into this slot, but there is a fundamental problem - the T-shape is wider than this vertical slot. You cannot remove (or install) the battery tray unless you first rotate the tray 90 degrees. This rotation is the secret to removing the battery tray.
Unfortunately, the lock cylinder will not allow you to rotate the tray in it's normal position as shown below:

You can loosen the lock cylinder though, by loosening (just a turn or two) these two screws:

And once these are loose, you can push the lock cylinder towards the centerline of the tray:

Next remove the two screws which secure the charging port to the down tube (just to loosen the port and make more room):

Next remove the two screws which secure bottom plate (where the battery terminals are):

Just set the bottom plate aside, you don't need to disconnect anything. If the cable is too tight, you may need to disconnect the battery connector from the motor.
Now you can push the battery tray up into the head tube, lift the bottom out, rotate the tray 90 degrees and remove the tray. It is a very tight fit.
To understand removal, it helps to see what the battery tray looks like out of the bike:
In the above photograph the battery tray has been disassembled fully, you likely won't need to go that far - this image is just to give you a clue about the basic shape of the battery tray. Notice especially the T-shaped piece at the head.
Now let's take a look inside the head tube with the front fork and the battery tray removed:
Notice especially the vertical slot in the head tube - the T-shaped head of the battery tray engages into this slot, but there is a fundamental problem - the T-shape is wider than this vertical slot. You cannot remove (or install) the battery tray unless you first rotate the tray 90 degrees. This rotation is the secret to removing the battery tray.
Unfortunately, the lock cylinder will not allow you to rotate the tray in it's normal position as shown below:
You can loosen the lock cylinder though, by loosening (just a turn or two) these two screws:
And once these are loose, you can push the lock cylinder towards the centerline of the tray:
Next remove the two screws which secure the charging port to the down tube (just to loosen the port and make more room):
Next remove the two screws which secure bottom plate (where the battery terminals are):
Just set the bottom plate aside, you don't need to disconnect anything. If the cable is too tight, you may need to disconnect the battery connector from the motor.
Now you can push the battery tray up into the head tube, lift the bottom out, rotate the tray 90 degrees and remove the tray. It is a very tight fit.
Attachments
Last edited:
