mojoe
Active Member
- Region
- USA
Here is the beginning of my build, using a Burley Nomad trailer. As others have noted, one drawback of the Nomad, depending on your use, is the nylon floor. The nylon walls should hold up well, but the floor may wear more quickly. I saw a YT video where someone used a single piece of 1/4 inch plywood, and painted it with a rubber waterproofing. I liked the idea, but thought I'd try corrugated plastic, as one of the YT commenters suggested.
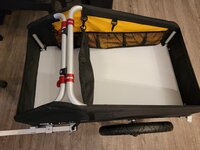
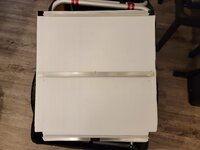
I couldn't find thick, heavy duty corrugated plastic locally, so I bought what they had, and glued three identical pieces together, alternating the corrugations for strength. This gave me a floor that was about 1/4 inch, just like the other guy's plywood, but much lighter. It seemed a little more flexible in the middle than I would have liked, but probably would have been fine with reasonable loads. However, I decided to cut the floor in two, so I wouldn't loose the ability to use the nylon divider that the trailer has. This made the flexibility issue worse. So, back to the store for some angle aluminum (I want to call it angle iron, but it's aluminum)
Attached is a picture of the trailer with the floor installed (minus the cover), and another showing the underside of the large section of floor. Two pieces of aluminum are notched so they rest on the side of the frame, the third is cut short, so it rests on the rear of the frame. The short section of floor doesn't need a center support. I used 3M VHB tape to hold the aluminum, and Velcro to keep the floor pieces from bouncing around. It may look a little rough, but it's the best I could do with a hacksaw and a utility knife. Both sections of floor weigh 40 oz, total. I suspect that this is much less than plywood covered in rubber paint.
Adding a floor does slightly decrease the total cargo capacity, but the front of the trailer is deeper, so you have a hidden storage space beneath that section of floor. I plan on using that space for spare parts, and other items that I will rarely need. Thin items could go beneath the back section of floor.
If anyone is interested, I'll post more pics and info as I build the rest of this project. If that's not wanted, or allowed by the forum, let me know, and I won't.


