Forkliter
New Member
Hi everyone, I was able to get this working and put a test ride on it. Everything works as expected. The remote (Specialized PN S194200007) let's you run up "+" the modes 0 (no assist), 1, 2, 3 and back down again with the "-". Also intact is the Turbo button at the top which takes you from any mode to Turbo. And at the bottom is the walk assist button if you want to walk along side up a hill, etc.
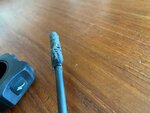
How do you do this? I'm not going into ever excruciating detail but basically here it goes. The remote will plug into the open connector on your TCU (the unit in the top tube)[you need a Torx T-10 to get that open]. I removed the unused port on the left top tube and basically milled it out so that the connector could pass through (too small as it is on the bike).
Then you need to mount the remote. I opted to place it as you can see on the left bar. The remote wants to see a specific mounting condition. A 7/8" dowel or bar. For now I cut off a length of MTB bar to do this. At the end I drilled a hole through all the way so I could pass a cable tie for mounting. I really couldn't find a way to mount this dowel without an exposed cable tie on the drops. I did hide the connector wire under the bar wrap best as I could.
Future plan is to fabricate a black nylon dowel and replace the handlebar end since that has some sharpness against the handlebar and wrap.
My 90 minute test ride was great. Just slip your left hand back a touch on the hood and choose your mode. No more fumbling with the top tube at all. I like to ride with as little assist as possible but have an easy way to adjust the mode, and this does the trick. Wish Specialized had a drop bar solution for us, but for now this is great. Let me know if you have questions.
No programming or anything is required. Power down, connect, power up...it works.