PedalUma
Well-Known Member
- Region
- USA
- City
- Petaluma, CA


Nice looking bikes!OK, i have no idea why it didn't work, so i took the tape off and plugged in the extra ebrake, put the bike up on the stand and powered it up. The bike worked fine. So to prove that it WAS the ebrake, i removed it and it still worked fine! Took it outside and it worked fine when i pedaled. Don't know why it didn't work the first trial. So for now i am fine, both bikes are working as expected:
The wife's bike:
View attachment 108854
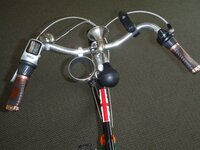
My Bike:
View attachment 108855
Again, thank you all for your help and patience!
Nice looking bike! Love the horn!I use similar ones on my three-speed conversion. They gain a nice patina. Those new ones are going on a cargo bike. The new seat
post arrives next week. That is when I will install them along with nice pedals.
View attachment 108863


Nice post and thread documenting all of your work - very inspiring. I missed it while it was happening. Thanks for putting it up.OK, i have no idea why it didn't work, so i took the tape off and plugged in the extra ebrake, put the bike up on the stand and powered it up. The bike worked fine. So to prove that it WAS the ebrake, i removed it and it still worked fine! Took it outside and it worked fine when i pedaled. Don't know why it didn't work the first trial. So for now i am fine, both bikes are working as expected:
The wife's bike:
View attachment 108854
My Bike:
View attachment 108855
Again, thank you all for your help and patience!
And it cannot be mistaken for a car or anything else.Thank you. That bike also has a coffee cup holder. That is so I can sip my coffee while I use the clown horn as I pass people on $9,700 eBikes who are dressed up in spandex. Everyone likes the clown horn. It is very disarming and does not sound rude, as in get out of my way. It seams friendly. People smile or even laugh.
Thank you! The project is still going on...Nice post and thread documenting all of your work - very inspiring. I missed it while it was happening. Thanks for putting it up.
Nice post and thread documenting all of your work - very inspiring. I missed it while it was happening. Thanks for putting it up.
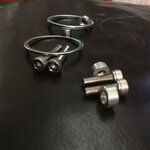
First question: I slid the motor thru the BB and it sticks out 13mm, not the stated 11mm. Is this an issue? I wonder why they specifically state the 11mm number?Ready to get down to business and install this Tongsheng eMotor.
Did they supply washers with two extra-long hex cap 4mm head screws? It would be in a little plastic bag loosely tied closed. You may need to stack two or three lock washers along with the provided spacer. Try this with the one thinner BB washer. Use thread lock on everything, shim the part that goes through the BB with very thin aluminum so that there is no wiggle when you pedal. It is okay that it sticks out more than 11mm on the non-drive side. The problem is if the motor's housing by the chainring touches the bike's frame on the drive side.


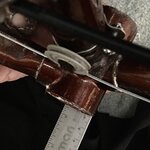
That is right. Look at @EMXG's second photo. Do not use a BB spacer unless needed to prevent the housing at the chainring from hitting the chain stay. Do use blue thread lock. You will not need both side spacers but may want to add two or three lock washers.I'm probably missing something but that doesn't look right for a 68mm bottom bracket unless for some reason you used the spacers on the chainring side. Here are pictures of my 70s bike with a 68mm bottom bracket. Only the 5mm spacers used behind the collar, none on the chainring side.
View attachment 116331
View attachment 116332
I measured the BB again and it is more like 71mm. There is no spacer on the drive side.I'm probably missing something but that doesn't look right for a 68mm bottom bracket unless for some reason you used the spacers on the chainring side. Here are pictures of my 70s bike with a 68mm bottom bracket. Only the 5mm spacers used behind the collar, none on the chainring side.
View attachment 116331
View attachment 116332
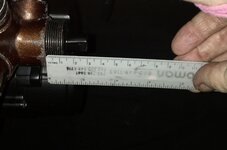
I had to use a 2mm spacer. The only way I see around it is if I file down one of the washer/spacers on either side of the bracket 2mm so that everything fits flush.Correction. 11mm is the minimum number. This bike works great. Here is the non-drive side with a 10mm wrench next to it. Do not use the bb spacer unless you must.
View attachment 116254