RadWagon 3000 Mile Review

Barkme Wolf

Active Member
After 3000 miles the RadWagon is still running great.

I used to drive a 65 Ford Falcon Ranchero- This feels like the bicycle equivalent but without the gas fumes.


Pros:

Solid construction- Have had no issues.

Reliable- After a disastrous run of flat tires (4 in the first month) I got some Mr. Tuffy liners. Since then I have had no issues that kept me from riding regularly.

Great for Cargo- I use cargo nets and a small set of paniers. Have different set ups for commuting, shopping and camping. Once I get the bike going I forget I am even carrying a load. I have not gone camping yet but acquired all of the necessary gear.

Electronics: Everything is working perfectly. Have had no power surges or drops. Batteries seem to be holding a charge as long as ever, although I have not been monitoring the distance per charge all that well. Never run out of power in assist level 2 and get 25 miles with lots to spare. Recently I upped the assist to level 3 and get 19 miles almost exactly. That said, there isn’t a flat road on my entire commute so I work those batteries. I have 2 batteries and alternate regularly.

Fun: I have lots of fun riding my RadWagon. It has improved my quality of life. I quit driving a few years ago and the bus system here has rapidly declined in quality of service so having this bike has been a great addition to my world.


Cons:

The shifters where a little hinky from the get go, the lower gears are jumpy and it won’t stay in the first gear on the back (1/1 2/1 3/1) and I have to hold the left shifter up a bit with my thumb to keep the chain from rubbing in first gear (1/2-1/7). This is a bit of a bother because I have some big hills to tackle everyday (Renton to Redmond WA daily- 48 miles round trip). My LBS says I just need better equipment; they have tuned it as well as possible.

I have had some trouble with the spokes breaking. This is due mostly to the torque from the motor but was exacerbated by all the hills. I have it in for regular maintenance and trueing. It seems like I am ready for a total re-thread of the back tire soon. This may be expected after 3000 miles. Spoke repair is one of the few things I had not taken into consideration before buying the bike.

The only other problem I have is that it rides a little rough. I have to be ready for bumps in the trail and avoid curbs all together. This will be solved when I get one of those fancy seat posts.

Now that the weather is better it won’t take long before I have a 6000 mile update-

Ride Safe- Be Seen!
 

Attachments

  • 5443336921746994810-account_id=1.jpg
    5443336921746994810-account_id=1.jpg
    38 KB · Views: 695
Great news!

FWIW, the LBS is right, the OE rear derailleur is marginal at best, I replaced it with this one, https://www.amazon.com/gp/product/B003OWPRLI/ref=oh_aui_detailpage_o03_s00?ie=UTF8&psc=1
Now it shifts quickly, precisely, and silently without any need to fiddle with the levers, jumping, or grinding.

Super easy to do, only tools needed are a chain breaker and Allen wrench. Break chain, disconnect cable, remove and replace derailleur, adjust high, low, and "b" screws, attach cable in high gear without slack or tension, attach chain with reusable "missing link" fine tune with cable adjuster.
http://www.parktool.com/blog/repair-help/rear-derailleur-adjustment#article-section-7

I have a set of 13g Sipam spokes in reserve just in case, but at 450 miles so far, so good.

The only Issue I've had other than the derailleur has been the rear axle nuts working loose That was easily solved by replacing them with high quality axle nuts from Problem Solvers.
http://www.jensonusa.com/Hub-Small-Parts/Problem-Solvers-Axle-Nuts
 
Last edited:
Great news!

FWIW, the LBS is right, the OE rear derailleur is marginal at best, I replaced it with this one, https://www.amazon.com/gp/product/B003OWPRLI/ref=oh_aui_detailpage_o03_s00?ie=UTF8&psc=1
Now it shifts quickly, precisely, and silently without any need to fiddle with the levers, jumping, or grinding.

Super easy to do, only tools needed are a chain breaker and Allen wrench. Break chain, disconnect cable, remove and replace derailleur, adjust high, low, and "b" screws, attach cable in high gear without slack or tension, attach chain with reusable "missing link" fine tune with cable adjuster.
http://www.parktool.com/blog/repair-help/rear-derailleur-adjustment#article-section-7

I have a set of 13g Sipam spokes in reserve just in case, but at 450 miles so far, so good.

The only Issue I've had other than the derailleur has been the rear axle nuts working loose That was easily solved by replacing them with high quality axle nuts from Problem Solvers.
http://www.jensonusa.com/Hub-Small-Parts/Problem-Solvers-Axle-Nuts
Which axle nuts? I assume 10mm?
 
How hard would it be to upgrade the front suspension? I've tried commuting to work with my front suspension locked on my Radrover. It is suppose to be more "efficient" compared to having the front tire bounce and lose forward momentum on every pedal stroke. It was too rough and it transmitted too much vibration to my arms. Keeping the suspension open and adjusting the amount of rebound to a min added a lot of comfort along with the suspension seat post.

I tried the Suntour NCX SP-12 and it was big improvement over the standard fixed seatpost. Decided to give the Bodyfloat v2.0, orange springs, a try and this was an improvement over the Suntour. The Bodyfloat does a much better job of reducing what you feel with small road imperfections over wavy concrete, uneven side walk cracks, broken/cracked asphalt, and washboard hardpacked trails. I now spend about 90-95% of my time on my seat instead of lifting up over every little bump before I tried the suntour or bodyfloat.

I too would like to change out my front forks, raise my handlebars and get one of those fancy seat posts. If there were only some way to add shocks or something to the rear. I think that would definitely give me some more life on my spokes. I think the only way to do it would be a structural change to the frame itself.
 
Checked out your video and you have the same type of issue I have with road commuting. I just don't have to deal with the rain in the southwest; but, I have 15-25 mph headwinds with gust +30 mph in the afternoons sometimes. I also doubled up on front and rear lights, loud jackets, big butt comfy seat, spare battery, and you can never have too much storage. I never realized how hard a car suspension is working until I road the same streets on a bike.

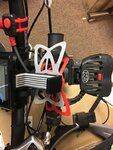
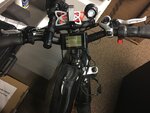
I did the BM Works Speed Extender for extra space on my handlebars. I just didn't have enough space for my toys and the curved handlebars make it hard to add an extra light at the right angle. The Extender fit perfectly within the space under the Radrover LCD screen.

BM Works, Amazon, $22: https://www.amazon.com/gp/product/B00M13QMVA/ref=oh_aui_detailpage_o00_s01?ie=UTF8&psc=1

BM Works.jpg BM Works III.jpg
 
Checked out your video and you have the same type of issue I have with road commuting. I just don't have to deal with the rain in the southwest; but, I have 15-25 mph headwinds with gust +30 mph in the afternoons sometimes. I also doubled up on front and rear lights, loud jackets, big butt comfy seat, spare battery, and you can never have too much storage. I never realized how hard a car suspension is working until I road the same streets on a bike.

I did the BM Works Speed Extender for extra space on my handlebars. I just didn't have enough space for my toys and the curved handlebars make it hard to add an extra light at the right angle. The Extender fit perfectly within the space under the Radrover LCD screen.

BM Works, Amazon, $22: https://www.amazon.com/gp/product/B00M13QMVA/ref=oh_aui_detailpage_o00_s01?ie=UTF8&psc=1

View attachment 15867 View attachment 15868
More pics please. What is the bag on your frame?
 
Checked out your video and you have the same type of issue I have with road commuting. I just don't have to deal with the rain in the southwest; but, I have 15-25 mph headwinds with gust +30 mph in the afternoons sometimes. I also doubled up on front and rear lights, loud jackets, big butt comfy seat, spare battery, and you can never have too much storage. I never realized how hard a car suspension is working until I road the same streets on a bike.

I did the BM Works Speed Extender for extra space on my handlebars. I just didn't have enough space for my toys and the curved handlebars make it hard to add an extra light at the right angle. The Extender fit perfectly within the space under the Radrover LCD screen.

BM Works, Amazon, $22: https://www.amazon.com/gp/product/B00M13QMVA/ref=oh_aui_detailpage_o00_s01?ie=UTF8&psc=1

View attachment 15867 View attachment 15868
 
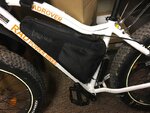
The triangle bag on my Radrover is from Luna Cycles, $25: https://lunacycle.com/batteries/battery-bags/luna-cycles-triangle-battery-bag/

I don't see why it wouldn't fit on the Radwagon also? I got the bag to help keep the battery warm in winter commuting and keep the dust off the battery during trail riding. It should work with Seattle rain and adding a little water proofing spray to the outside wouldn't hurt. I had to cut 3 holes in the bottom of the bag to fit the battery tray inside. I cut another hole towards the bottom rear for the battery tray power cable to exit. There are vent holes top and bottom. The bag also has a double zipper on the left side to access the battery power button, battery charging port, or unzip a little more if it is really hot outside. It also has pockets on both sides with velcro (I use to store extra zip ties and velcro strips). I ended up cutting out the velcro strips on the inside of the bag because they were just in the way. Closing in on 6 months with the bag and had zero issues with it.

I used a black marker to color in the white Luna Cycle logo:
Luna Cycle.jpg
 
Back