I hope this will be of interest to anyone wanting a motorised workshop stand, who can’t afford to pay the extremely high cost of a professional stand and has a reasonable amount of basic DIY skills.

The project started as I have a Riese and Muller Superdelite e-bike on order and have had serious concerns about lifting it on to a workshop stand for cleaning and maintenance. Physically lifting a 35 kgs e-bike high enough to comfortably work on it while simultaneously tightening a clamp is getting near impossible for an older person. A solution was called for.
Two problems concerned me. Firstly, the raising of a heavy e-bike and secondly where on the bike to support it safely. I do not feel happy about supporting from the seat post as it is not the natural balance point and would put unnecessary strain in the post and the stand so somewhere along the top tube would be better. As a dropper post will be fitted this makes the seat post an even more undesirable lifting point.
I wanted a workshop stand that would fold, be easily transportable and not take up much space in the workshop. The Park Tool PRS-25 is lightweight stand that can take the weight of an e-bike (max weight 45 kgs (100lbs) and seemed the most appealing for my purpose so one was ordered to replace a cheap Chinese stand that was barely sufficient for my hybrid bike.
The PRS-25 is adjustable in height from 114 – 152 cm (45” – 60”) and this adjustable portion seemed right for motorised lifting the e-bike on the basis that I could lift the bike a reasonable height on to the stand and then the motor could do the rest.
List of parts – stand
1500N (150 kgs – 340 lbs) Linear Actuator 12V
Heavy Duty 400mm (16”) stroke length (from Ebay) £33.24
https://www.ebay.co.uk/itm/393021506792
Controller with remote control
(from Ebay) (optional) £18.89
https://www.ebay.co.uk/itm/393021506792
Pair 65mm heavy duty u bolt exhaust clamps
(only 1 required) (from Amazon) £7.50
https://www.amazon.co.uk/gp/product/B07V1YNZ46/ref=ppx_yo_dt_b_asin_title_o03_s00?ie=UTF8&psc=1
Pair crocodile clips (from Amazon) £5.19
https://www.amazon.co.uk/gp/product/B07V1YNZ46/ref=ppx_yo_dt_b_asin_title_o03_s00?ie=UTF8&psc=1
Length 2 core cable (from Amazon) £8.95
https://www.amazon.co.uk/gp/product/B07KCD1CTQ/ref=ppx_yo_dt_b_asin_title_o01_s00?ie=UTF8&psc=1
Odd pieces of wood, plywood, screws, car battery, S hook (butcher’s hook), hitch pin etc.
(in stock so put to good use) £---
TOTAL £73.77
Assembly
A thick triangle shaped plywood base was cut and shaped to rest on the support legs of the Park Tool stand and 2 battens were screwed to the underside to aid alignment.


An upright was cut at an angle so that it would stand upright on the plywood base. A piece of wood was shaped and securely screwed to the top to ensure the upright was distanced correctly from the vertical tube of the Park Tool stand. It was important to cut the upright to the correct length so the linear actuator at its lowest position coincided with the Park Tool stand at is lowest adjustable point.

The u bolt clamp was drilled through its base to accommodate the hole in the top bracket if the linear actuator. One end of the bracket fits on one of the u bolt studs and the other fits on a bolt in the drilled hole. A filed down head of an 8mm bolt was fitted from the inside of the u bolt base and the bracket secured with a nut. The u bolt was then clamped to the top of the Park Tool stand just behind the rotary point of the Park Tool clamp.


The lower bracket of the linear actuator was then screwed to the top of the wooden support and the supplied cotter pin fitted to join the bracket and actuator. The actuator bracket top cotter pin was replaced with a spring hitch pin so it could easily be removed and refitted by hand.
A large S hook (butcher’s hook) was rubber covered by slipping on a length of sleeving (any protective tape would suffice) and this just slips on the actuator tube and the stand tube to ensure they do not part during a heavy lift.

The actuator was plugged into the controller and the cable extended and fitted with crocodile clips to fit a car battery. A hook was screwed to the side of the wooden upright for cable storage and the controller taped in an inverted plastic bag (to ensure no water ingress) to the back of the wooden upright.

NOTE. The controller (and its remote control) is not absolutely necessary and it can be substituted with a polarity reversal switch or even omitted and the lift operated in each direction by switching the polarity of the supply leads. The linear actuator stops itself at the top and bottom so there is no chance of over-run or damage.
Assembly for final use
Unfold the Park Tool stand and secure the lower quick release lever. The upper one must be left loose to enable the lifting operation to work correctly. Locate the wooden base and connect the upper actuator pivot with the hitch pin. Slip the S hook in place and connect the battery – that is it!
Disassembly is the reverse of above
List of parts – frame lift adapter
1x Doughty long tee T10400 (steel not aluminium) £9.18
http://www.proproduction.co.uk/doughty-t10400-long-tee.html
2x Doughty short tee T10100 (steel not aluminium) £11.50
http://www.proproduction.co.uk/doughty-t10100-short-tee.html
Scaffold protection 50mm x 14mm yellow (from Ebay) £7.00
https://www.ebay.co.uk/itm/254810655220
48mm end caps £2.24
https://www.keyclampstore.com/plastic-end-cap-48mm-133-48-d
Length of 48mm aluminium tube 3mm
(in stock so put to good use) £---
TOTAL £29.92
Assembly
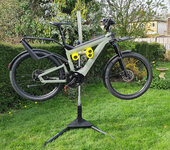
The photos show the frame lift adapter in an unfinished state as it will be modified explicitly to fit one e-bike. Once the e-bike is available then adjustments will be made before final cutting of the tubing and pinning the joints.
Assembly is as seen but note that a double tube has been fitted to one side as the top frame tube is not horizontal and I want to lift the e-bike squarely. The distance between the supports will be adjusted to ‘trap’ them within the e-bike frame. The lifting upright will be moved to the e-bikes natural balance point. Once this is achieved all joints will be drilled, tapped and pinned as the grub screw clamps should not be relied on for stopping rotary movement. I will also add a clamp or through-bolt to the lifting upright as an added safety measure to stop the upright slipping down through the stands clamp. The final weight of this adapter will be less than 5 kgs (11 lbs)

Last note.
The stand was intentionally overloaded in excess of 65 kgs (145 lbs) and tested for operation and stability. It works flawlessly and is very stable. I will have no hesitation in using it and feel sure the mechanism could be adapted to suit other makes of stand.
Please do let me know if you decide to give this a try and please post photographs too.
Graham
The project started as I have a Riese and Muller Superdelite e-bike on order and have had serious concerns about lifting it on to a workshop stand for cleaning and maintenance. Physically lifting a 35 kgs e-bike high enough to comfortably work on it while simultaneously tightening a clamp is getting near impossible for an older person. A solution was called for.
Two problems concerned me. Firstly, the raising of a heavy e-bike and secondly where on the bike to support it safely. I do not feel happy about supporting from the seat post as it is not the natural balance point and would put unnecessary strain in the post and the stand so somewhere along the top tube would be better. As a dropper post will be fitted this makes the seat post an even more undesirable lifting point.
I wanted a workshop stand that would fold, be easily transportable and not take up much space in the workshop. The Park Tool PRS-25 is lightweight stand that can take the weight of an e-bike (max weight 45 kgs (100lbs) and seemed the most appealing for my purpose so one was ordered to replace a cheap Chinese stand that was barely sufficient for my hybrid bike.
The PRS-25 is adjustable in height from 114 – 152 cm (45” – 60”) and this adjustable portion seemed right for motorised lifting the e-bike on the basis that I could lift the bike a reasonable height on to the stand and then the motor could do the rest.
List of parts – stand
1500N (150 kgs – 340 lbs) Linear Actuator 12V
Heavy Duty 400mm (16”) stroke length (from Ebay) £33.24
https://www.ebay.co.uk/itm/393021506792
Controller with remote control
(from Ebay) (optional) £18.89
https://www.ebay.co.uk/itm/393021506792
Pair 65mm heavy duty u bolt exhaust clamps
(only 1 required) (from Amazon) £7.50
https://www.amazon.co.uk/gp/product/B07V1YNZ46/ref=ppx_yo_dt_b_asin_title_o03_s00?ie=UTF8&psc=1
Pair crocodile clips (from Amazon) £5.19
https://www.amazon.co.uk/gp/product/B07V1YNZ46/ref=ppx_yo_dt_b_asin_title_o03_s00?ie=UTF8&psc=1
Length 2 core cable (from Amazon) £8.95
https://www.amazon.co.uk/gp/product/B07KCD1CTQ/ref=ppx_yo_dt_b_asin_title_o01_s00?ie=UTF8&psc=1
Odd pieces of wood, plywood, screws, car battery, S hook (butcher’s hook), hitch pin etc.
(in stock so put to good use) £---
TOTAL £73.77
Assembly
A thick triangle shaped plywood base was cut and shaped to rest on the support legs of the Park Tool stand and 2 battens were screwed to the underside to aid alignment.
An upright was cut at an angle so that it would stand upright on the plywood base. A piece of wood was shaped and securely screwed to the top to ensure the upright was distanced correctly from the vertical tube of the Park Tool stand. It was important to cut the upright to the correct length so the linear actuator at its lowest position coincided with the Park Tool stand at is lowest adjustable point.
The u bolt clamp was drilled through its base to accommodate the hole in the top bracket if the linear actuator. One end of the bracket fits on one of the u bolt studs and the other fits on a bolt in the drilled hole. A filed down head of an 8mm bolt was fitted from the inside of the u bolt base and the bracket secured with a nut. The u bolt was then clamped to the top of the Park Tool stand just behind the rotary point of the Park Tool clamp.
The lower bracket of the linear actuator was then screwed to the top of the wooden support and the supplied cotter pin fitted to join the bracket and actuator. The actuator bracket top cotter pin was replaced with a spring hitch pin so it could easily be removed and refitted by hand.
A large S hook (butcher’s hook) was rubber covered by slipping on a length of sleeving (any protective tape would suffice) and this just slips on the actuator tube and the stand tube to ensure they do not part during a heavy lift.
The actuator was plugged into the controller and the cable extended and fitted with crocodile clips to fit a car battery. A hook was screwed to the side of the wooden upright for cable storage and the controller taped in an inverted plastic bag (to ensure no water ingress) to the back of the wooden upright.
NOTE. The controller (and its remote control) is not absolutely necessary and it can be substituted with a polarity reversal switch or even omitted and the lift operated in each direction by switching the polarity of the supply leads. The linear actuator stops itself at the top and bottom so there is no chance of over-run or damage.
Assembly for final use
Unfold the Park Tool stand and secure the lower quick release lever. The upper one must be left loose to enable the lifting operation to work correctly. Locate the wooden base and connect the upper actuator pivot with the hitch pin. Slip the S hook in place and connect the battery – that is it!
Disassembly is the reverse of above
List of parts – frame lift adapter
1x Doughty long tee T10400 (steel not aluminium) £9.18
http://www.proproduction.co.uk/doughty-t10400-long-tee.html
2x Doughty short tee T10100 (steel not aluminium) £11.50
http://www.proproduction.co.uk/doughty-t10100-short-tee.html
Scaffold protection 50mm x 14mm yellow (from Ebay) £7.00
https://www.ebay.co.uk/itm/254810655220
48mm end caps £2.24
https://www.keyclampstore.com/plastic-end-cap-48mm-133-48-d
Length of 48mm aluminium tube 3mm
(in stock so put to good use) £---
TOTAL £29.92
Assembly
The photos show the frame lift adapter in an unfinished state as it will be modified explicitly to fit one e-bike. Once the e-bike is available then adjustments will be made before final cutting of the tubing and pinning the joints.
Assembly is as seen but note that a double tube has been fitted to one side as the top frame tube is not horizontal and I want to lift the e-bike squarely. The distance between the supports will be adjusted to ‘trap’ them within the e-bike frame. The lifting upright will be moved to the e-bikes natural balance point. Once this is achieved all joints will be drilled, tapped and pinned as the grub screw clamps should not be relied on for stopping rotary movement. I will also add a clamp or through-bolt to the lifting upright as an added safety measure to stop the upright slipping down through the stands clamp. The final weight of this adapter will be less than 5 kgs (11 lbs)
Last note.
The stand was intentionally overloaded in excess of 65 kgs (145 lbs) and tested for operation and stability. It works flawlessly and is very stable. I will have no hesitation in using it and feel sure the mechanism could be adapted to suit other makes of stand.
Please do let me know if you decide to give this a try and please post photographs too.
Graham