I bought a Grin Satiator equivalent for $77 CAD

PCeBiker

No-Hands No-Pedaling No-Credentials
Region
Canada
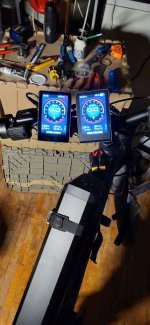
It's a Mean Well 240 Watt 4.45 amp 54 Volt LED driver with adjustable voltage and current output.

I need to set the levels manually.
They are not programmable.
(YAY !!)


Screenshot_20260222_165353_DuckDuckGo.jpg
20260224_155533.jpg
20260224_213253.jpg
Screenshot_20260224_212724_Gallery.jpg
Screenshot_20260224_212849_Gallery.jpg


It turns out that it only has a 3.34 amp output with a standard 120 VAC North American outlet.

I could wire it into my 240 VAC circuits for my stove or clothes dryer to get the full 4.45 amps, but I'm not going to bother.

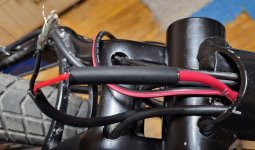
I think I'm going to install one on my downtube in front of my new BBS02B mid-drive motor?

I'll use it as a bash gaurd to protect my motor.

A Mean Well LED driver is damn near bomb-proof.

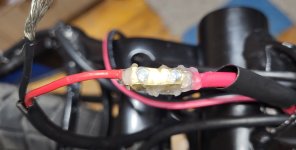
It's only rated IP65, but I can seal the potentiometer ports to bring it up to IP67, they I can submerge my ebike in a meter of water for half an hour, while still charging the battery.

Just need a waterproof plug. 😁
 
I powered up my "Battery Charger" to check the voltage, and it goes all the way to 59 Volts, so it can charge a 52 Volt battery as well,..


20260225_151333.jpg


And it goes down to 44.34 Volts.

20260225_151350.jpg


I decided to use it to power my LED lights.
The lights operate at ~19 Volts so I should be able to hook up three in series to match the voltage of my Mean Well driver.

My closet is all wired for 20 volt with three vertical strips perfectly set up to easily change to a series connection with simple rewiring.


20260225_165329.jpg


It took me over 2½ hours to finally convert the three strips on the left to a series connection, with Every Possible wrong combination imaginable.
(I smoked some Vado for breakfast. 😁)

I ended up with a short circuit about half a dozen times, and I applied 60 Volts to my 20 Volt strips about a dozen times.

I'm glad to know that my new lighting system is now idiot proof, cuz nuthin blowed up.🧨 😁

Maybe in the spring I can idiot proof it as a battery charger the same way? 💥 🤯


20260225_165357.jpg


I'm growing more Vado.

This is 1½ week old White Widow Feminized Autoflower


20260225_165404.jpg
20260225_165415.jpg
20260225_165428.jpg


I've gotta get the lights finished while there's still room to reach them. 😁
 

Attachments

  • Screenshot_20260225_185042_Gallery.jpg
    Screenshot_20260225_185042_Gallery.jpg
    215.3 KB · Views: 0
Hard wired is the best choice. Wireless motors are always unreliable because of EMI from the magnets interfering. I can tell you have been around that block a few times.
 
I upgraded the battery wires from 14 gauge to 12 gauge but the new wire is as Fat AF!! 😁


20260214_201506.jpg


I wanted to get both battery outputs and both motors switchable from the top tube, and I managed to maintain the original connectivity of the Reention battery connectors by resoldering an old butchered up connector,..


20260214_203437.jpg

20260213_153318.jpg


I couldn't figure out why I couldn't get it soldered, then realized that I was using the shitty solder.
So I threw it away and used the right stuff and got it half-assed connected.

(It only looks like a cold solder joint because of the shitty solder that's mixed in.)

20260213_153406.jpg
20260213_153415.jpg
20260213_162032.jpg


I glued the XT socket to the top tube with black hot glue (removeable with some effort) at the right twist angle to allow the socket to flex enough to disconnect from the battery.

Then I applied more Shoe Goo to seal and stabilize the socket in place.
The battery wires were live, and shoe goo doesn't conduct electricity, but the Aluminum Shoe Goo tube does a fine job of shorting out the terminals. 😁


20260213_162613.jpg


I didn't see that coming.
I guess I shudda?? 😁


20260213_163507.jpg


20260214_201043.jpg


I intend to wrap the top tube with velcro or neoprene or at least color the red wires black so it doesn't look so bad.

The over-molded XT 60 cables are Fricken Huge!! 😁
 
I am sure @PedalUma could tell you how to hide those wires.

I used a lot of @PedalUma 's tricks to try and keep things as neat as possible.

I want to keep my battery wire connections small and removeable without soldering, and I came up with this,..

20260225_213042.jpg


It's a 10 amp brass butt connector, but I can only get the ends of each wire under a single screw.


20260225_213056.jpg


I've got a bunch of round 60 amp butt connectors, but they're Honkin' Huge too,..


20260225_213119.jpg


So I ordered a bunch of 20 amp square butt connectors so I can stuff both wires completely through the connector and get two screws on both wires and both wires squeezed together.

That aughta do it. 😁


Screenshot_20260224_094341_AliExpress.jpg
Screenshot_20260224_094345_AliExpress.jpg


The square 20 amp butt connectors should be small enough to fit the 4:1 shrink tube over it with enough shrinkage available to seal up around the 12 gauge wire.

The 4:1 shrink tube is double walled with glue, but the glue doesn't stick if I coat everything with Dielectric Silicone Grease first.

The tube shrinks around the grease, squeezing it out, then seals it with the grease inside.

I can cut the shrink tube off without cutting into the wires to disconnect everything.


It's amazing how little Vado it takes to over-think the living s*it outta sumthing. 😁
 
Back