How to adjust belt tension on Delite?

sakumar

New Member
Using a Kriket measuring tool, I checked the Gates belt tension on my Delite and it is lower than spec -- it currently stands at 22 lbs or so.
It's supposed to be between 28 and 40 lbs.
How do I go about tensioning the belt? Can someone point me to a video or other resources showing how it's done?
(I did find some videos but they were for other kinds of bikes and so the procedure was different and didn't seem directly applicable to a Delite.)

Thanks.
 
Hi, Does your bike have a belt tensioner? Or does it have nuts at the very back of the "chain stays" for belt adjustment? Please include photos.
 
Hi, Does your bike have a belt tensioner? Or does it have nuts at the very back of the "chain stays" for belt adjustment? Please include photos.
Yes, there is a pulley connected to a spring via a lever that maintains tension. Also, near the hinge point of the lever there is a slot but it doesn't quite look like that hinge point travels in that slot.

In the videos on YouTube that I alluded to, they were adjusting the tension by turning a couple of screws at the rear of the frame back and forth -- nothing like what this bike has.

Here are some photos:

IMG_1996.jpeg
IMG_2002.jpeg
IMG_1994.jpeg
IMG_1987.jpeg
 
Good job with the photos. That helps a lot. The tensioner has two arms. One arm has the belt pully. Do not concern yourself with that one. The other has a spring that tensions the tensioner. That is the one to focus on. Follow the spring coming down from it under the chain stay where there is a 5 or 6 mm hex head screw. I do not own one of these bikes but am mechanical and work on bikes everyday. I would inspect that screw to see in screwing it out 1/2 turn increases tension. This could be made easier by placing a one-inch piece of soft wood between the chain stay and the pully, pushing the pully gently up. This experiment will cause no harm. Then check the tension again. Did it increase slightly?
 
Good job with the photos. That helps a lot. The tensioner has two arms. One arm has the belt pully. Do not concern yourself with that one. The other has a spring that tensions the tensioner. That is the one to focus on. Follow the spring coming down from it under the chain stay where there is a 5 or 6 mm hex head screw. I do not own one of these bikes but am mechanical and work on bikes everyday. I would inspect that screw to see in screwing it out 1/2 turn increases tension. This could be made easier by placing a one-inch piece of soft wood between the chain stay and the pully, pushing the pully gently up. This experiment will cause no harm. Then check the tension again. Did it increase slightly?
Thanks for your reply.

The screw is kind of perpendicular to the spring's axis. But I think tightening / loosening the screw will perhaps fine tune the tension.


IMG_1993.jpg


However, I didn't examine the rear hub closely enough. Turns out there is a mechanism to adjust the tension back there. See below.

(1) Loosen the Torx screws on both sides of the hub (highlighted in red)
(2) Adjust tension by turning the socket head screws on both sides. (highlighted in green)
(3) Tighten the Torx screws after checking belt tension.

I still have questions though:
(1) How do I ensure that I've moved both sides equally? Counting turns? Otherwise, (among other problems) the rear disk brake will start binding.​
(2) What is the torque setting for the big Torx screws?​
(3) Should I remove the rear wheel to do these adjustments?​
IMG_2008.jpeg
View of the setup from the reverse side.​
IMG_2011.jpeg
IMG_2013.jpeg

Left side of hub.
IMG_2018.jpeg
 

Attachments

  • IMG_2011.jpeg
    IMG_2011.jpeg
    274.4 KB · Views: 273
  • IMG_2018.jpeg
    IMG_2018.jpeg
    278.1 KB · Views: 244
Last edited:
Good Job! With this updated information, I would advise not messing with the tensioner. I do not know the torque settings. I work by feel. Use the feel of how much force you need to Release the torx screws and apply that amount when Tightening them. The two on the left and the two on the right will only need to be loosened by about 1&3/4 turns before tightening in the tensioning screws, left and right. Tighten these 1/2 turn left, 1/2 turn right back and forth so that they are tensioned evenly. You want to keep the wheel even and straight. The brake rotor will also stay straight this way. It looks like the brake pads will not require an adjustment but will need to be ridden gently for about the first dozen stops. Groves in the rotors are like the groves in an LP record. These match the groves in the pads. They will need to reset and you will hear when they do. When you check the tension of the belt make the goal to put it in the mid-range of specification, about 34 pounds or 36. The temptation it to put it at the upper end but the belt will not last as long that way. Please post your results. I wish others would join in on this thread.
 
When you re-tighten the large torx screws use 15Nm torque (a T40 size). The "tensioner" has nothing to do with setting the actual belt tension. You need the rear wheel on the bike since the axle is what is actually being adjusted when you tighten the tensioning screws (3 mm allen key). As mentioned by PedalUma, increase tension by turning the screws the same amount on each side until you achieve the desired tension. Measure the tension at least four times (1/4 turn of belt and measure 4 times). Once you are happy with the tension re-tighten the torx screws. The wheel should rotate freely (brake pads not rubbing) when you are finished. Go for a ride and then check the tension again just to be sure all is okay.
 
 
How to adjust Gates belt tension on R&M Delite.

Tools Needed:
1) T30 Torx Bit and torque wrench
2) 3mm Allen hex key
3) Gates Kriket Belt tension gauge
4) flashlight
SCicI.jpeg

The recommended belt tension is between 28 lbs and 40 lbs. My gauge had graduations at 30 lbs, 40 lbs, 50 lbs and so on. I decided as long as it read between 30 and 40 lbs I'd be OK.
IMG_2049.jpeg


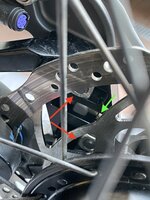
1. Loosen the four T30 Torx bolts -- two on each side of the bike (circled in red below). This allows the two brackets that hold the rear wheel hub to move back and forth.
DlxYC.jpeg


IMG_2044.jpeg


2. There is a hex socket head screw on each side (circled in green above) that when turned moves a shuttle that, in turn, moves the brackets. Using the 3mm hex key turn the socket head screws to loosen or tighten the belt as needed. If you need to change the direction that you want the bracket to move, turn the screw in the other direction. However, for several turns you won't feel any resistance and the bracket won't reverse direction. Eventually the shuttle reaches the other side and then the bracket begins to move again.

IMG_2011.jpeg


IMG_2052.jpeg

First focus on the right side (where the belt is) and adjust the tension till the Kriket gauge shows the correct tension. Lightly tighten the two right side Torx T30 bolts.

3. Now adjust the left side bracket to make sure the wheel is running true. It helps to have the ebike upside down and use your fingers (there is a more or less fingerwidth gap on each side) to make sure that the tire is equidistant between each of the two forks. Now lightly tighten the two T30 Torx bolts on this side as well.

4. Check the belt tension again to make sure it is still where you want it and then tighten each of the 4 Torx bolts to 15 N-m.
IMG_2045.jpeg


5. The Torx bolts are supposed keep the brackets in position, not the mechanism that uses the 3mm socket head screw to move the brackets, so to relieve stress on those hex socket head screws, I decided to loosen them a bit as a final step.

Notes: You may find the rear brake disk is binding. This is easily fixed using the procedure shown here:
If your bike has mudguards you may find they are now rubbing against the tires. They can be adjusted with a 2.5mm hex wrench.
 
Last edited:
Thanks to the above contributors for a very useful account. Here are a few comments from what I did on my 2020 R&M Superdelite GX Rohloff at about 10,000km. Despite a careful (to avoid brake contamination) application of WD40 to the 3mm adjustment screw and the the sliding parts of the adjuster it was reluctant to move; when doing the adjustment (anticlockwise to tighten) I found gentle use of a soft faced hammer to the black block, whilst applying torque to the 3mm screw did the trick. Without that, I think there was a real risk of damage to the 3mm screw. The black block referred to has the wheel axle clamped to it as well as the mounting for the brake calliper, so these are all fixed in relation to each other and there was no need to do any brake adjustments. I went from a very low 20lb on my Krikit gauge to 30/35lb and the belt noise has almost disappeared. I have learned the hard way that low belt tension causes premature belt wear - my other e-bike is a Kalkhoff Impulse Evo, also with a Gates belt and an 8 speed Nexus hub, which was looked after by a dealer who seemed to treat the belt as if it were a chain. I was slow to pick up on this very slack belt, and had horrendous noise with the belt shot at just 10,000 km. I have now got my own Krikit gauge and it is set at 30/35lb, and it runs silently. Sadly, the Kalkhoff sits in disgrace in my garage as it is on its fourth motor, but that's another story.
Maybe I'm not alone with noisy mudguards. Turns out that the mudguards themselves come from SKS but R&M did their own thing on the fixings. The P-clips holding the wire supports to the guard are made of plastic and can never be made tight, so the guard flaps from side to side as the suspension moves. Since that's a bit irritating I have replaced the plastic clips with metal and they are now tight and silent.
There is one other rattle from the back that still eludes me. I read above this might be from the motor, but I have assumed it was the spring loaded prop stand which is mounted at the flappy end of the suspension arm, and seems designed to rattle about. I wonder in someone has fixed this?
 
Back