You are using an out of date browser. It may not display this or other websites correctly.
You should upgrade or use an alternative browser.
You should upgrade or use an alternative browser.
Do I need new pads?
- Thread starter Enargins
- Start date
Sierratim
Well-Known Member
- Region
- USA
- City
- Nevada City, CA & Paradise Valley, AZ
It's a bit hard to tell what the actual material layers are from the pic. The best thing to do is pull the pads and measure the thickness of the pad material. Most manufacturer's recommend a minimum thickness of 0.5mm.I have a hard time telling when a brake pad needs to be replaced. Can someone take a look at this picture and tell me if you think the pad needs to be replaced? Thanks!View attachment 72111
Enargins
Member
Thanks! that's interesting. in a park tools video, they said change at 1 mm, and that 3 business cards stacked on top of each other = 1 mm, so you could use that to tell. But that's good to know that you could go down to 0.5 mm.It's a bit hard to tell what the actual material layers are from the pic. The best thing to do is pull the pads and measure the thickness of the pad material. Most manufacturer's recommend a minimum thickness of 0.5mm.
Sierratim
Well-Known Member
- Region
- USA
- City
- Nevada City, CA & Paradise Valley, AZ
Yep, the spreader spring is under 0.5mm thick so it all works out...yeah 0.5mm is good thickness to replace.
I used to try to use all the pad, but it was impossible because this metal spring thing will interfere with the disc.

Stefan Mikes
Gravel e-biker
- Region
- Europe
- City
- Mazovia, PL
A good indication -- I think -- of the last moment to replace the pads is when the brake lever suddenly feels like it had a deep sag on breaking. Here is a totally worn pad:

RandallS
Well-Known Member
- Region
- Canada
- City
- Calgary
Just back from LBS and heading out to garage to do my first ever pad change.
Pads = Check
Gloves = Check
Pliers = Check
Plastic tire levers = Check
Isopropyl = check
Paper Towels = Check
Bike repair rack = Check (makeshift)
Space heater = Check
Vest and jacket = Check
Tablet (for Youtube videos) = Check
Pads = Check
Gloves = Check
Pliers = Check
Plastic tire levers = Check
Isopropyl = check
Paper Towels = Check
Bike repair rack = Check (makeshift)
Space heater = Check
Vest and jacket = Check
Tablet (for Youtube videos) = Check
linklemming
Well-Known Member
Thanks for posting a pic.A good indication -- I think -- of the last moment to replace the pads is when the brake lever suddenly feels like it had a deep sag on breaking. Here is a totally worn pad:
View attachment 72132
One thing to note about this is that the pad wear isnt always 100% even, so while the OP picture looks ok, the actual wear could be different in several spots due to less than perfect pad alignment. Pads also tend to wear more at the back even(where the disc first touches the pad as shown in this pic) when properly aligned .
The inside and outside pads might wear differently as well duw to pad alignment.
All this is likely only an issue when the pad is pretty worn down though, the OP picture looks fine
rich c
Well-Known Member
Plastic tire levers? You're going to take off a tire to remove brake pads?Just back from LBS and heading out to garage to do my first ever pad change.
Pads = Check
Gloves = Check
Pliers = Check
Plastic tire levers = Check
Isopropyl = check
Paper Towels = Check
Bike repair rack = Check (makeshift)
Space heater = Check
Vest and jacket = Check
Tablet (for Youtube videos) = Check
RandallS
Well-Known Member
- Region
- Canada
- City
- Calgary
Useful tool to depress the brake pistons before fitting pads. You want to use plastic, not metal to do that.Plastic tire levers? You're going to take off a tire to remove brake pads?
RandallS
Well-Known Member
- Region
- Canada
- City
- Calgary
I will post a really good example of uneven wear later tonight or tomorrow. Just finished doing my rear pads and I think i caught them JUST in time.Thanks for posting a pic.
One thing to note about this is that the pad wear isnt always 100% even, so while the OP picture looks ok, the actual wear could be different in several spots due to less than perfect pad alignment. Pads also tend to wear more at the back even(where the disc first touches the pad as shown in this pic) when properly aligned .
The inside and outside pads might wear differently as well duw to pad alignment.
All this is likely only an issue when the pad is pretty worn down though, the OP picture looks fine
rich c
Well-Known Member
I use the shipping wedge that came in the brakes. I don't think my tire levers will even fit in there.Useful tool to depress the brake pistons before fitting pads. You want to use plastic, not metal to do that.
RandallS
Well-Known Member
- Region
- Canada
- City
- Calgary
Sometimes that's not quite enough. Like today... it was so close ...I use the shipping wedge that came in the brakes.
RandallS
Well-Known Member
- Region
- Canada
- City
- Calgary
Not planning on spending Park Tool prices on stuff I have that works OK. If i had a shop and did that for a living I'd probably have one already, but the tire lever worked fine. Not saying i don't have some pretty specialised tools already in my tool kit, but a lot of those had no easy work arounds. Thanks anyways.Amazon.com : BW MTB Disc Brake Piston Press Tool – Pad Spreader for Hydraulic Disk Brake Bike Calipers : Sports & Outdoors
Amazon.com : BW MTB Disc Brake Piston Press Tool – Pad Spreader for Hydraulic Disk Brake Bike Calipers : Sports & Outdoorswww.amazon.com
Sierratim
Well-Known Member
- Region
- USA
- City
- Nevada City, CA & Paradise Valley, AZ
I use a generic version of the Park Tool PP-1.2 Piston Press. It's shape allows it to be inserted between the worn pads and move the pistons back to their fully retracted positions avoiding any possible damage to the piston faces.
RandallS
Well-Known Member
- Region
- Canada
- City
- Calgary
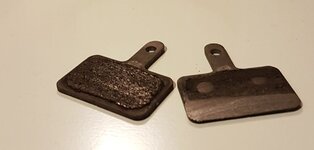
Ok, here goes the pad replacement from yesterday.
First off - I think I was maybe a touch late. Disc brakes are new to me on a bicycle.
These pads are toast - and should have been replaced about 200km ago I think.
That's Lesson #1.
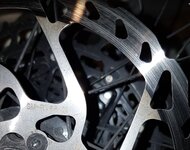
Rotor is slightly scored, and I'll order one and change it out. $40 Canadian is one of the cheaper lessons I've learned lately.
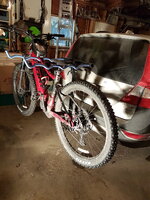
Process - first I put the bike up on my makeshift maintenance stand. This is borrowed from a friend as I have a platform hitch rack.
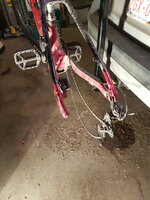
Then wheel off.
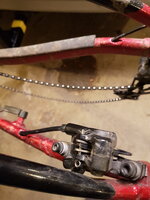
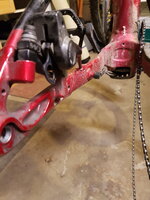
I didn't take any picture of removal, but the above show the new pads and spring in place.
NOTE - the spring is a complete PITA to deal with, and in those photos, it's not sitting correctly.
I was using the shipping wedge to reset spacing and it wasn't right (and didn't feel right) and trying to replace wheel confirmed it wasn't right...
Took it apart again, reset the spring and put it back together - much better.
The process of getting that right are lessons 2 through 11... and wheel slid in relatively easily.
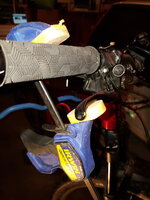
As the old pads had uneven wear, I thought I might be best served to do a caliper realignment.
So loosened the bolts, squeezed and held lever to centre the caliper, and refastened and retorqued the caliper.
My lever helper:
All in all, pretty simple. I really took my time and it took about 45 minutes. That was about 5 minutes video review, 5 minutes of disassembly (including rear wheel removal), 30 minutes of fiddling around re-compressing pistons and trying to get spring and new pads assembly back in place and 5 minutes realigning caliper.
Next time, I expect to be well under 10 minutes as this really is a pretty simple procedure. BTW - I did use this opportunity to clean up the frame as it was rather dirty.
And whoever invented the derailleur lock should get a Knighthood or Medal or at least a beer of their choice - could have used that feature a few times over the last 50 years!
First off - I think I was maybe a touch late. Disc brakes are new to me on a bicycle.
These pads are toast - and should have been replaced about 200km ago I think.
That's Lesson #1.

Rotor is slightly scored, and I'll order one and change it out. $40 Canadian is one of the cheaper lessons I've learned lately.

Process - first I put the bike up on my makeshift maintenance stand. This is borrowed from a friend as I have a platform hitch rack.

Then wheel off.


I didn't take any picture of removal, but the above show the new pads and spring in place.
NOTE - the spring is a complete PITA to deal with, and in those photos, it's not sitting correctly.
I was using the shipping wedge to reset spacing and it wasn't right (and didn't feel right) and trying to replace wheel confirmed it wasn't right...
Took it apart again, reset the spring and put it back together - much better.
The process of getting that right are lessons 2 through 11... and wheel slid in relatively easily.
As the old pads had uneven wear, I thought I might be best served to do a caliper realignment.
So loosened the bolts, squeezed and held lever to centre the caliper, and refastened and retorqued the caliper.
My lever helper:

All in all, pretty simple. I really took my time and it took about 45 minutes. That was about 5 minutes video review, 5 minutes of disassembly (including rear wheel removal), 30 minutes of fiddling around re-compressing pistons and trying to get spring and new pads assembly back in place and 5 minutes realigning caliper.
Next time, I expect to be well under 10 minutes as this really is a pretty simple procedure. BTW - I did use this opportunity to clean up the frame as it was rather dirty.
And whoever invented the derailleur lock should get a Knighthood or Medal or at least a beer of their choice - could have used that feature a few times over the last 50 years!
Akrotiri
Well-Known Member
- Region
- Europe
Can you explain what you mean in the picture about the rotor being “scored”?Ok, here goes the pad replacement from yesterday.
First off - I think I was maybe a touch late. Disc brakes are new to me on a bicycle.
These pads are toast - and should have been replaced about 200km ago I think.
That's Lesson #1.
View attachment 72294
Rotor is slightly scored, and I'll order one and change it out. $40 Canadian is one of the cheaper lessons I've learned lately.
View attachment 72295
Process - first I put the bike up on my makeshift maintenance stand. This is borrowed from a friend as I have a platform hitch rack.
View attachment 72296
Then wheel off.
View attachment 72297 View attachment 72298 View attachment 72299
I didn't take any picture of removal, but the above show the new pads and spring in place.
NOTE - the spring is a complete PITA to deal with, and in those photos, it's not sitting correctly.
I was using the shipping wedge to reset spacing and it wasn't right (and didn't feel right) and trying to replace wheel confirmed it wasn't right...
Took it apart again, reset the spring and put it back together - much better.
The process of getting that right are lessons 2 through 11... and wheel slid in relatively easily.
As the old pads had uneven wear, I thought I might be best served to do a caliper realignment.
So loosened the bolts, squeezed and held lever to centre the caliper, and refastened and retorqued the caliper.
My lever helper:
View attachment 72301
All in all, pretty simple. I really took my time and it took about 45 minutes. That was about 5 minutes video review, 5 minutes of disassembly (including rear wheel removal), 30 minutes of fiddling around re-compressing pistons and trying to get spring and new pads assembly back in place and 5 minutes realigning caliper.
Next time, I expect to be well under 10 minutes as this really is a pretty simple procedure. BTW - I did use this opportunity to clean up the frame as it was rather dirty.
And whoever invented the derailleur lock should get a Knighthood or Medal or at least a beer of their choice - could have used that feature a few times over the last 50 years!
Similar threads
- Replies
- 16
- Views
- 1K
- Replies
- 3
- Views
- 2K
