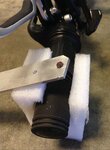
Adjusting the disk brake pads on a hub motor bike.

Brian(J)

Active Member
I'm finding it a bit of a challenge adjusting the pad clearance.

The caliper is a Shimano M375 on a Dash E3. The deal is, the caliper is 'adjusted' by setting the caliper body such that the outboard pad is pretty close to the rotor and then using a 5mm hex wrench to adjust the inboard pad to the correct gap. In the case of the front caliper you run the hex wrench in through the spokes from the opposite side of the wheel. The rear caliper adjusting bolt is blocked by the hub motor leaving about 3/16" (4.8mm) of space, too little by far to get a hex wrench into. I made up a custom tool but I'm wondering if I missed some more obvious meathod.
 
I certainly don't see an alternative, but this is the first bike I've had that had disc brakes and I'm no expert.
However, after looking at my rear brake, I see that it is so out of adjustment that the rotor gets really bent when the brakes are applied. The outboard brake pad has no clearance and the inboard pad has way too much clearance. Looks like REI didn't even look at the brake adjustment before they gave the bike to me. I've got some work to do! I may have to adjust the brake mount first and then do the fine adjustments.

So, did you cut off an L-shaped allen wrench to make a stuby or did you use an allen bit and a wrench to get to the adjustment screw?

Thanks Brian for bringing this to the groups attention.
 
Avid BB5s have a thumbwheel on the backside of the caliper.. don't know why every mechanical brake doesn't.
 
Last edited:
Well, that back screw is pretty tough to get to and my brake was way out of adjustment, so I tried a different approach. Here's what I ended up doing.
  1. Measured the rotor thickness to be 1.85mm
  2. Removed the caliper using the two mounting screws in the slotted caliper holes.
  3. Since the minimum space between the rotor and pads should be 0.2mm, I added (2 x 0.2) to 1.85 which equals 2.25mm.
  4. I then added feeler guages to give 2.25mm (0.80mm + 0.75mm + 0.70mm)
  5. Inserting the 2.25mm between the pads I adjusted the back screw tight and then backed off to the first detent.
  6. I installed the caliper back on with the slotted screws about 1/4 turn loose so the caliper mount can slide.
  7. I applied the rear brake several times and then held it tight with a vecro strap.
  8. Then I tightened the 2 screws at the slotted holes mount.
  9. Released the brake and spun the wheel to check brake pad clearances and they are equal and not touching the rotor.
My rear brake now works great and the brake pad spacing looks perfect.
 
Charly,

took a scrap of aluminum 1/8" x 3/4" x 8" long, drilled a 3/16" hole in it, countersunk it slightly, sawed off a 3/16" length of (old, cheap, therefore soft) hex wrench. Then I used a vise to push the newly cut (therefore sharp) hex right through the 3/16" hole, it sticks real good. Took about 10 minutes. The idea is now I can make adjustments easy whenever I want without removing anything. I was in a hurry, so the tool is a little rough.

Here's a picture that also shows the tool and the handlebar pads I made from some rigid packing foam, I save it instead of tossing it, seem to find a lot of uses for it. I just carry it around as part of my flat repair kit. Makes it easier to work on the bike upside down, doesn't slip around as much.

Brake tool.JPG

In conclusion, and perhaps the most important tip: AVID BB7 brakes are $65/set on Ebay. I'm getting them.
 
Awesome tool. I'll have to make me a tool like that.

My rear brake was so out of whack that it needed the caliper frame moved, not just the pads. Plus, I wanted to remove the brake so I could get a close look and understand exactly how the brake works. Now that it's set up correctly, I think I can just use your tool to adjust the brake as the pads wear.

Sure doesn't seem as though these brakes were meant to work with electric hub motors. Hope the Avids work out for you.

P.S. I like your handlebar protection.
 
This morning I remembered a while back I did a test of ebike rear wheel spin vs regular bike rear wheel spin. When I did the test the Dash wheel stopped after about a 1/2 turn. At the time I thought it was because of the motor drag. However this morning I decided to try the same test again now that my brakes are adjusted correctly. And now the Dash rear wheel spins about 4 revolutions before it stops. Obviously, I've been riding with my rear brake dragging and the drag from the motor is very little.

Thanks to Brian(J) I found out about my brake problem and got it fixed. I'm a happy camper!
 
Back