The reality of these “ebike” moped cycles with their 34” (or less) high non-adjustable seat: You are NOT gonna be doing much pedaling. Its kind of like sitting on the toilet and also trying to actually pedal. Not gonna work out too well. So, the thumb/twist throttle will be your best buddy. I advise you to buy at least one spare of whichever throttle your ebike comes equipped with. The reason being is that you are gonna wear the unit out sooner, rather than later. So, like a Boy Scout, be prepared. By the way, some units wiring harness have a male connector and some have a female connector.
You really should just go ahead and adapt your lil' ebike to 99% MOtoring and 1% PEDaling. How to do that? Well, you just need to re-align your pedaling system via a slight modification.
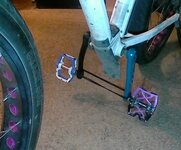
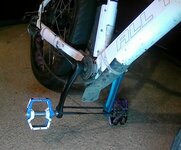
The right side of the crankset/pedal unit (the side with the big sprocket) is the “drive” side. The left side is the non-drive side. All you need to do is
a). remove the left side crank arm. https://www.amazon.com/Park-Tool-CCP-22-Crank-Puller/dp/B001VS1M20/ref=sr_1_3?
b). re-position it so that it is parallel with the right side crank arm (instead of 180 degrees opposite). EasyBreezy. You can then keep both legs extended (to the extent possible).
You then have the following options:
Use a small bungy cord fastened around both crank arms. Then, wrap the bungy cord around the ebikes bottom bracket area. By doing so, you can actually “pedal” (push) both crank arms forward and the bungy cord will then pull them rearward. You can repeat this forward/rearward operation as needed/desired to actuate the ebikes “cadence/torque sensor” throttle assist (PAS) sensor.
If you want to go a step further, completely remove the following items from the drivetrain. ( NOTE: by doing the following modifications, you won't be able to use the bungy cord option mentioned above in the sense that the PAS system will be de-activated-- but the bungy cord will still serve as a form of resistance AND limit crank arm travel. But, what the hey):
a). unbolt/remove the large front sprocket (but not the crank arm or pedal).
b). remove the chain.https://www.amazon.com/Oumers-Reliable-Hardwearing-Bicycle-Splitter/dp/B07HHS254V/ref=sr_1_10?
c). remove the rear derailleur.
d). remove the 7or8or9 speed gear selector (its up on the handlebar) and its silver internal multi-thread cable. Leave the black outer cable housing as is since it runs internally thru the ebike frame. That way, if you ever want to re-install the aforementioned items, you will be way ahead of the game. You should insert a small screw/nail into each end of that black outer cable after first spraying some lubricant into the cable hole. It keeps out moisture. Also, as soon as you remove the silver cable, dip the end into a container of glue (or apply a dab of SuperGlue) – doing so will keep the many strands of cable wire from unraveling (a real bummer deal fer sure).
By performing the afore-mentioned operations, you will now have a real mini-motorcycle, kinda sorta. No more always having one knee pressed up against your chin—extend both legs out and go-go-go.
As far as the rear wheel cassette (the thing with all the rows of teeth) is concerned, just leave it as is. It still makes for an excellent “washer/spacer” of sorts to keep the very complex rear hub unit tight.
You will still have the PAS cadence/torque sensor option available if you revert back to the original setup.
If you do perform all these modifications, I seriously doubt that you will be quizzed by the general public about them. After all, you know as well as me, that you seldom actually rotate those pathetic little crank arms when motoring about.
In regards to the crank remover tool and the chain breaker tool: If you don't want to spend the $$$ on the tools, you might be able to get your local ebike shop to do the procedures for you. It will only take about 10 minutes total. Of course, they will think you are outta yer friggin' mind, but who cares. Bring along a ziploc bag to store the removed chain in.
[ UPDATE ] I stumbled across this YT video last week. Instead of posting another separate thread, I'm just gonna insert it here. It appears to really be DaBomb.. And you get a see a bare nekked X52 monster.
Two items of interest:
1). According to this company website https://www.horsepowerlogic.com/product-page/x-class-60v-controller-and-display ,the upgrade modification requires a different connector if your X52 is equipped with the version2 rear hub motor, which is the newest BaFang blade 1000w motor. If you have the original "metal gears" motor (mine is that), then be sure to specify same at ordering time.
2). the price, for only the controller AND the handlebar mounted computer display unit (cdu) combo, is $400.. The 60v battery will be an additional cost.
[ end of update ]
Winter riding tips:
Even during those cold snowy months, I still do 40-50 mile rides. Too much fun. I find that I expend much more energy just due to the fact that I really must stay focused on the route ahead. And sometimes, I really pay a price, crash-wise. Ouch.
Crashes happen “quick like a bunny” in winter conditions. Something as trivial as a slight downslope, or off-camber ridge, will have you eating that tasty yellow snow. And always try to cross snow mounds/rows at a 90 degree head-on angle. Otherwise you'll be titz up pronto.
Also, these mighty lil' ebike beasts only have “off” and “on”. The resistance/traction utilized to accomplish forward motion will suddenly disappear when that rear wheel encounters ice or, worse yet, ice under snow cover. Suddenly that motor will be singing at full throttle trying to find the nonexistent traction. Boom!! Flat on yer keister, dancing with an angry 80 pound beast. I ride often during the snowy winter months and I usually eat the snow at least 5 times per season. And that is when proceeding at slow speed. These ebikes are beasts, but they are also very finicky.
Some more winter tips:
a). Remove the rear foot pegs. Otherwise you will just shear one/both off when you take the inevitable snow/ice crash.
b). Remove any rearview mirrors.
c). Install bar ends to protect all the expensive stuff on your handlebar area “dashboard”..
d). If, like me, you have installed a different crankset/pedals than original, remove them and re-install the original generic items. No use ruining the good stuff.
e). DO NOT under-inflate your rear tire. I learned this the hard way. I usually keep tire pressure at 14-20 psi. After a recent snow trip in 5” deep powder, I made the mistake of forming a thought: “What if I reduced the tire pressure down to 8psi. I bet traction would really be awesome.” So be it. I went out there playing in the snow and eventually I wasn't going forward AT ALL. All kinds of motor noise, but no movement. I looked at the rear wheel. The wheel/rim was spinning like a beast. However, the tire was motionless.. A flat tire. The motors torque had sheared the inner tube valve stem right the heck off. A hard lesson learned. So, keep the psi at 15-20psi year round and ya can't go wrong. I wouldn't try the reduced psi on beach sand, etc. either or else you'll end up with the same results...
Another interesting winter riding combo. How about some of these items to snazz up your riding adventures (think frozen lakes, etc). Why pay $100-$200 per studded tire when you can go this route instead?? Ice traction screws https://www.denniskirk.com/kold-kut...ice-screws-kk038-8-250.p080913.prd/080913.sku mounted on a pair of these tires (size 3.00-16) https://www.chapmoto.com/shinko-244-series-dual-sport-front-rear-tire.html Or these puppies (also size 3.00-16) https://www.chapmoto.com/shinko-sr241-series-dual-sport-front-rear-tire.html .. You be stylin', fer sure.
More later.
You really should just go ahead and adapt your lil' ebike to 99% MOtoring and 1% PEDaling. How to do that? Well, you just need to re-align your pedaling system via a slight modification.
The right side of the crankset/pedal unit (the side with the big sprocket) is the “drive” side. The left side is the non-drive side. All you need to do is
a). remove the left side crank arm. https://www.amazon.com/Park-Tool-CCP-22-Crank-Puller/dp/B001VS1M20/ref=sr_1_3?
b). re-position it so that it is parallel with the right side crank arm (instead of 180 degrees opposite). EasyBreezy. You can then keep both legs extended (to the extent possible).
You then have the following options:
Use a small bungy cord fastened around both crank arms. Then, wrap the bungy cord around the ebikes bottom bracket area. By doing so, you can actually “pedal” (push) both crank arms forward and the bungy cord will then pull them rearward. You can repeat this forward/rearward operation as needed/desired to actuate the ebikes “cadence/torque sensor” throttle assist (PAS) sensor.
If you want to go a step further, completely remove the following items from the drivetrain. ( NOTE: by doing the following modifications, you won't be able to use the bungy cord option mentioned above in the sense that the PAS system will be de-activated-- but the bungy cord will still serve as a form of resistance AND limit crank arm travel. But, what the hey):
a). unbolt/remove the large front sprocket (but not the crank arm or pedal).
b). remove the chain.https://www.amazon.com/Oumers-Reliable-Hardwearing-Bicycle-Splitter/dp/B07HHS254V/ref=sr_1_10?
c). remove the rear derailleur.
d). remove the 7or8or9 speed gear selector (its up on the handlebar) and its silver internal multi-thread cable. Leave the black outer cable housing as is since it runs internally thru the ebike frame. That way, if you ever want to re-install the aforementioned items, you will be way ahead of the game. You should insert a small screw/nail into each end of that black outer cable after first spraying some lubricant into the cable hole. It keeps out moisture. Also, as soon as you remove the silver cable, dip the end into a container of glue (or apply a dab of SuperGlue) – doing so will keep the many strands of cable wire from unraveling (a real bummer deal fer sure).
By performing the afore-mentioned operations, you will now have a real mini-motorcycle, kinda sorta. No more always having one knee pressed up against your chin—extend both legs out and go-go-go.
As far as the rear wheel cassette (the thing with all the rows of teeth) is concerned, just leave it as is. It still makes for an excellent “washer/spacer” of sorts to keep the very complex rear hub unit tight.
You will still have the PAS cadence/torque sensor option available if you revert back to the original setup.
If you do perform all these modifications, I seriously doubt that you will be quizzed by the general public about them. After all, you know as well as me, that you seldom actually rotate those pathetic little crank arms when motoring about.
In regards to the crank remover tool and the chain breaker tool: If you don't want to spend the $$$ on the tools, you might be able to get your local ebike shop to do the procedures for you. It will only take about 10 minutes total. Of course, they will think you are outta yer friggin' mind, but who cares. Bring along a ziploc bag to store the removed chain in.
[ UPDATE ] I stumbled across this YT video last week. Instead of posting another separate thread, I'm just gonna insert it here. It appears to really be DaBomb.. And you get a see a bare nekked X52 monster.
Two items of interest:
1). According to this company website https://www.horsepowerlogic.com/product-page/x-class-60v-controller-and-display ,the upgrade modification requires a different connector if your X52 is equipped with the version2 rear hub motor, which is the newest BaFang blade 1000w motor. If you have the original "metal gears" motor (mine is that), then be sure to specify same at ordering time.
2). the price, for only the controller AND the handlebar mounted computer display unit (cdu) combo, is $400.. The 60v battery will be an additional cost.
Winter riding tips:
Even during those cold snowy months, I still do 40-50 mile rides. Too much fun. I find that I expend much more energy just due to the fact that I really must stay focused on the route ahead. And sometimes, I really pay a price, crash-wise. Ouch.
Crashes happen “quick like a bunny” in winter conditions. Something as trivial as a slight downslope, or off-camber ridge, will have you eating that tasty yellow snow. And always try to cross snow mounds/rows at a 90 degree head-on angle. Otherwise you'll be titz up pronto.
Also, these mighty lil' ebike beasts only have “off” and “on”. The resistance/traction utilized to accomplish forward motion will suddenly disappear when that rear wheel encounters ice or, worse yet, ice under snow cover. Suddenly that motor will be singing at full throttle trying to find the nonexistent traction. Boom!! Flat on yer keister, dancing with an angry 80 pound beast. I ride often during the snowy winter months and I usually eat the snow at least 5 times per season. And that is when proceeding at slow speed. These ebikes are beasts, but they are also very finicky.
Some more winter tips:
a). Remove the rear foot pegs. Otherwise you will just shear one/both off when you take the inevitable snow/ice crash.
b). Remove any rearview mirrors.
c). Install bar ends to protect all the expensive stuff on your handlebar area “dashboard”..
d). If, like me, you have installed a different crankset/pedals than original, remove them and re-install the original generic items. No use ruining the good stuff.
e). DO NOT under-inflate your rear tire. I learned this the hard way. I usually keep tire pressure at 14-20 psi. After a recent snow trip in 5” deep powder, I made the mistake of forming a thought: “What if I reduced the tire pressure down to 8psi. I bet traction would really be awesome.” So be it. I went out there playing in the snow and eventually I wasn't going forward AT ALL. All kinds of motor noise, but no movement. I looked at the rear wheel. The wheel/rim was spinning like a beast. However, the tire was motionless.. A flat tire. The motors torque had sheared the inner tube valve stem right the heck off. A hard lesson learned. So, keep the psi at 15-20psi year round and ya can't go wrong. I wouldn't try the reduced psi on beach sand, etc. either or else you'll end up with the same results...
Another interesting winter riding combo. How about some of these items to snazz up your riding adventures (think frozen lakes, etc). Why pay $100-$200 per studded tire when you can go this route instead?? Ice traction screws https://www.denniskirk.com/kold-kut...ice-screws-kk038-8-250.p080913.prd/080913.sku mounted on a pair of these tires (size 3.00-16) https://www.chapmoto.com/shinko-244-series-dual-sport-front-rear-tire.html Or these puppies (also size 3.00-16) https://www.chapmoto.com/shinko-sr241-series-dual-sport-front-rear-tire.html .. You be stylin', fer sure.
More later.
Attachments
Last edited:

