Kyogiro
Member
- Region
- Europe
- City
- Paris (France)
So first things first. I can do the basic stuff on my bikes if I have too. Changing tires/tubes, changing drive system/cassette/freewheel, changing cables, replacing the chain, etc.... but I don't like it at all and I wouldn't say I'm good at it. I learned the basics because I used to be a non professional triathlete and I didn't want to be stuck away from home during my training because of the flat.
1) Tubeless tires
So, 3 months ago, I first turn my tires into tubeless using the "ghetto" split tube method. I was planning to take my Rhino on some long trips and I could anticipate that removing the rear wheel would have been a hassle. Fixing flat on tubeless tires wouldn't require to remove the wheel nor the tire if the hole wouldn't be too big. So far, I didn't need to worry about that since I remain flat free (for now).


2) Bolton Upgrade Controller
So after 3 long months, I finally received my Bolton Controller. Already had the 750W bafang motor (you can also see the stock Rhino motor and the 750W side by side). I tried the Rhino with stock motor and the upgraded controller for a day. Installation was smooth and easy.

3) Bafang 750W Hub Motor
Here is where things get "interested". So at first, after trying to unscrew the old motor, I figured I didn't have the right tool (I would advise anyone to watch the CitizenCycle video first on YouTube in order to get the right tools and not afterwards like I did). So fast forward an hour and I purchased the right tool to do the job.
3.1) Unscrewing the new motor : easy. The Motor is out.


3.2) Unscrewing the old motor... and things turn for the worse, the first time I tried to unscrew it with the wrong tool, I ended up damaging its head. Then I watched a bunch of YouTube videos and I brought the hammer trying the recreate somehow the shape of the original head.
Oh but that is only the beginning, even with the right tool, I went on damaging 2 more screws (not as much as the first one). 3 were removed and 3 stayed in.
Not knowing how I could resolve this on my own, I called a friend whose brother is like Superman with tools (he repairs buses for a living).
3.3) So today, during his lunch break, no less, he asked me if I need the old freewheel which I didn't, so he just cut it to easily access the last problematic screw (he removed the first two ones with ease with his tools). He reshaped the head with a small electric saw and we finally swap the motors.
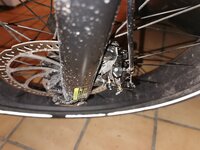
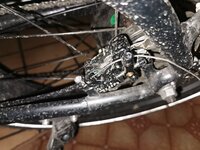
3.4) Is that a job well done ? On my friend's brother (let's call him Jay) part, of course. On mine... not so much. When I first remove the motor, I lost a small piece in my garage which connects the motor to the wheel. Otherwise, the motor is turning and functioning but it doesn't drag along the wheel with it, quite useless in this state.
After removing again the new motor and comparing the old and the new side my side, Jay figures out in less than 2 minutes that a small piece is missing in the new motor. Quite frankly, I don't think I would have noticed it even with ample time. We salvage it from the old one and put it in the new one and everything ends up working fine. I took some large photos of the missing piece in case some of you would be as careless as I was.


Anyway here are the performances of my Rhino :
These are cruising speeds, easily sustained, I can go a bit higher when hard cycling but this is not a realistic experience. I am currently still using the stock battery (48V, 14 Ah)
Stock Motor & Stock Controller : 35 km/h (21.75 mph)
Stock Motor & Upgraded Controller : 40 km/h (24.85 mph)
Upgraded Motor & Upgraded Controller : 45 km/h (28 mph)
The time save while commuting in Paris is marginal since traffic is quite dense.
PS : this is not my complete first round of upgrades. I am still waiting for some key pieces (ordered them at the same time in early July) to fully complete this first step.
I'll probably upgrade the brakes for hydraulic ones for more braking power and less maintenance (tightening every now and then the brakes' cables). But this is going on the 2nd round of upgrades, next spring maybe ?


1) Tubeless tires
So, 3 months ago, I first turn my tires into tubeless using the "ghetto" split tube method. I was planning to take my Rhino on some long trips and I could anticipate that removing the rear wheel would have been a hassle. Fixing flat on tubeless tires wouldn't require to remove the wheel nor the tire if the hole wouldn't be too big. So far, I didn't need to worry about that since I remain flat free (for now).
2) Bolton Upgrade Controller
So after 3 long months, I finally received my Bolton Controller. Already had the 750W bafang motor (you can also see the stock Rhino motor and the 750W side by side). I tried the Rhino with stock motor and the upgraded controller for a day. Installation was smooth and easy.
3) Bafang 750W Hub Motor
Here is where things get "interested". So at first, after trying to unscrew the old motor, I figured I didn't have the right tool (I would advise anyone to watch the CitizenCycle video first on YouTube in order to get the right tools and not afterwards like I did). So fast forward an hour and I purchased the right tool to do the job.
3.1) Unscrewing the new motor : easy. The Motor is out.
3.2) Unscrewing the old motor... and things turn for the worse, the first time I tried to unscrew it with the wrong tool, I ended up damaging its head. Then I watched a bunch of YouTube videos and I brought the hammer trying the recreate somehow the shape of the original head.
Oh but that is only the beginning, even with the right tool, I went on damaging 2 more screws (not as much as the first one). 3 were removed and 3 stayed in.
Not knowing how I could resolve this on my own, I called a friend whose brother is like Superman with tools (he repairs buses for a living).
3.3) So today, during his lunch break, no less, he asked me if I need the old freewheel which I didn't, so he just cut it to easily access the last problematic screw (he removed the first two ones with ease with his tools). He reshaped the head with a small electric saw and we finally swap the motors.
3.4) Is that a job well done ? On my friend's brother (let's call him Jay) part, of course. On mine... not so much. When I first remove the motor, I lost a small piece in my garage which connects the motor to the wheel. Otherwise, the motor is turning and functioning but it doesn't drag along the wheel with it, quite useless in this state.
After removing again the new motor and comparing the old and the new side my side, Jay figures out in less than 2 minutes that a small piece is missing in the new motor. Quite frankly, I don't think I would have noticed it even with ample time. We salvage it from the old one and put it in the new one and everything ends up working fine. I took some large photos of the missing piece in case some of you would be as careless as I was.
Anyway here are the performances of my Rhino :
These are cruising speeds, easily sustained, I can go a bit higher when hard cycling but this is not a realistic experience. I am currently still using the stock battery (48V, 14 Ah)
Stock Motor & Stock Controller : 35 km/h (21.75 mph)
Stock Motor & Upgraded Controller : 40 km/h (24.85 mph)
Upgraded Motor & Upgraded Controller : 45 km/h (28 mph)
The time save while commuting in Paris is marginal since traffic is quite dense.
PS : this is not my complete first round of upgrades. I am still waiting for some key pieces (ordered them at the same time in early July) to fully complete this first step.
I'll probably upgrade the brakes for hydraulic ones for more braking power and less maintenance (tightening every now and then the brakes' cables). But this is going on the 2nd round of upgrades, next spring maybe ?