(Jan 2021 update: I am attaching the following link to my posting(s) located over at the BikTrix ebike companys' EBReview forum site:
https://electricbikereview.com/foru...-sensor-bottom-bracket-price-is-200-00.40097/
As of today, Jan 5th, it is a work-in-progress. It should make current M2S ebike owners really appreciate their very correct ebike purchase. I also realize that many potential ebike buyers cruise these forums as an aid in their search for the ideal ebike at the most practical price. They also need to be made aware of “brand service after the sale”, or lack/deception thereof. After all, an ebike purchase of $1,500+ is no small investment. You be the judge.)
ADDENDUM on Jan 10, 2020: Since I now have numerous threads posted (sorry about that), I want to let viewers know their chronological sequence, thus every thread title will begin with (# ).
Reader: You REALLY do need to first read my other recently posted thread (#5) Some more M2S KUSH/ebike bits of info for all.. Sept 11,2019 , so that this thread will make complete sense to you.. One without the other is rather "lacking" in regards to information given in this one.
I have made mention on items/ways to help safeguard your ebikes' electrical stuff. In this thread I hope to further elaborate, and will also include some photo's.
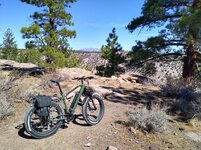
The blue frame/red stem ebike is my 2018 KUSH dual suspension 750w rear hub (Bafang) toy. It was delivered on April 30, 2018 and now has 9,120 miles on the odometer.
The white frame/blue stem ebike is my 2019 R750 hardtail (front suspension only) 750w rear hub (Bafang) toy. It was delivered on July 11, 2019 and has 1,425 miles on the odometer. Since I am not exactly crazy about the model name “R750”, I have nicknamed it WhiteyFord since it has the white frame color.
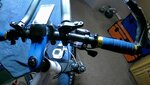
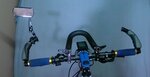
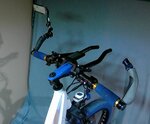
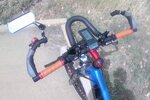
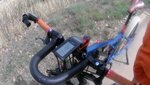
As you will see in the photo's, I have ALOT of stuff on my handlebar area. Most of the items are safety-related; blue lens tinted headlight (flashes), dingle bell, bar ends, rearview mirror, and a U-shaped OR double straight bar triathlon bars converted to bumper/protector for the many handlebar electronic/mechanical items. The red stem bike also has a small Battery Capacity Indicator voltage/battery% LCD monitor/indicator.
There is also a pair of handcuffs, attached to each ebikes seat rails via round key rings and held taunt by a hair scrunchy thingie on a hook.
I will give a breakdown on each of the aforementioned items.
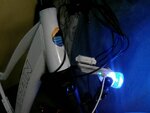
Blue Lens Tinted Headlight: (this item is actually mounted on the suspension fork cross bar) Though the M2S ebikes come standard with a headlight, it does not have a “flash/strobe” feature. I try to ride 50 miles every day. 90% of those miles are done on paved/concrete dedicated bike/multi-use paths. These paths have tunnels, underpasses, shady areas-- in other words lots of light/dark/light/dark scenarios. Like 99% of all bike riders, I wear sunglasses for glare and for bug protection. The only downside of those sunglasses is that, when you go into a dark area, you can't see anything that might be in there with you. The use of the flashing headlight is a great attention getter and gives a courtesy “heads up” to others about my presence. https://www.aliexpress.com/item/32731128032.html?spm=a2g0s.13010208.99999999.264.UZVGZ6
This headlight is awesome. It is also VERY bright; so much so that I would occasionally have opposite direction trail users hold up their hand over their eyes to insinuate “Brite Lite, Brite Lite”. I eventually formed a thought and stumbled upon some pill holders (blue) at WalMart. I glued the two lid halves together and then glued the whole container to the rim of the headlight rim. By the way, these headlights are so inexpensive that I buy them 4 at a time (also because I own multiple bikes); it just takes them about four weeks to arrive-- as does any item purchased thru AliBaba website (such as Reention Dorado 48volt batteries and Bafang 750w rear hubs/wheels). Hmmm.
You may also notice a white object on top of the blue lensed headlight. That is the face-only of an LCD wristwatch that I glued to the lites' topside.
Bar Ends: I have been riding mountain bikes since 1983. Any of you viewers/readers who have been riding for awhile know that “lighter (weight) is better” in any matter pertaining to bicycles in general. Want to lose 2 pounds off that old school bikes' weight? Pay an additional $2,000 for the titanium/carbon fiber frame version, etc. etc. During all of my old school bike (any bike NOT an ebike) riding years, such was a part of the “religion”. The ONLY exception I ever made to the lighter/minimalist mindset was the use of bar ends. They are just fantastic for assisting a rider during climbs. Most of my many bikes over the past 36 years, including the current 7 bikes, have had bar ends installed.
https://www.amazon.com/gp/product/B002I7PRUQ/ref=ppx_yo_dt_b_asin_title_o05_s00?ie=UTF8&psc=1
But now, with the advent of the ebike, bike weight just does not matter-- that little electric motor will get you going, and keep you going, for forever and a day.. Even if YOU get F-A-T.
In my case, since I ride so many miles on such a regular basis, I love to use the bar ends to mix up my hand positions as I ride. A real godsend at my age (68). On a 50 mile bike ride, I probably spend 70% of the time gripping those bar ends. I even installed handlebar grips on them-- work awesomely, too.
However, as you can see from the photo's, those bar ends are also a great location for a dingle bell and/or a rearview mirror AND they serve to protect all of those ebike items attached to your handlebar area.
Another advantage to this item is that you can flip your bike upside down and still be assured that all the stuff on your handlebar will be protected. I am religious in using this very technique ( wheelying/walking back/flipping da ebike) when dealing with tire swap-outs-- at least 30 times between both M2S ebikes.. You'll just need to loosen/re-position whatever is attached to the barends (rearview mirrors, etc.).
The only real downside to bar ends is that you have to move every item on your handlebar inward 1/2”-1” to accommodate the bar ends, too. No big deal, though.
Dingle bell: What Can I say? These little rascals are a godsend for providing a courtesy shout-out to other trail users. They are not too large and not too loud. https://www.amazon.com/gp/product/B074TC9K5T/ref=ppx_yo_dt_b_asin_title_o03_s00?ie=UTF8&psc=1
I have always gotten upset by other riders who passed me and didn't give a ”on your left” call-out or a dingle bell ring. Jesus Christ, how lazy/disrespectful can a person be?? Very.. Luckily, I am NOT one of those azzwholes. I only recently went from the call-out to the bell ring alert.
RearView Mirror: Only within the past week have I been using these rascals. I occasionally ride with another (very much novice) ebike rider. I was constantly having to look back to be sure that said ebiker hadn't driven off the trail/ridden into the side of a bus due to whatever. The only problem with looking back is that, if I turned around to the left, I would veer left.. turned to the right, veer right. Not good AND I'm not used to monitoring another rider. This person has a mirror attached to the end of the handlebar-- it sticks out about 4”-- and he swears by it in affording a view of upcoming riders about to overtake us.
Last week, I FINALLY broke down and bought a pair (one mirror for the left side of each M2S ebike).
https://www.amazon.com/gp/product/B07D9JD8YD/ref=ppx_yo_dt_b_asin_title_o06_s00?ie=UTF8&psc=1 Now, I am a convert. The local bike paths can get very busy at times and I have always been “conditioned” to turning my head just enough to see out of my peripheral vision as to what/who is behind me. I stumbled across these very well made mirrors (no plastic—all metal) and decided to give them a test ride.
I like having them mounted on my bar ends in a way that allows them to be much higher than handlebar end units AND still not needing to protrude way out beyond the end of the handlebar (no more than 1”).
Also, to my amazement, “shudder/shake” is minimal-- almost non-existent. I even use the white frame ebike (WhiteyFord) in full “rigid” mode (front suspension fork is locked out) and everything is still just fine and dandy. I am quite satisfied with this safety assistant item.
Rearview Mirror UpDate on April 26, 2020: The following is my April 24, 2020 AMAZON review on these excellent mirrors;
"I first ordered a set of these in color BLACK. Riding mountain bikes since 1983, and then, progressing (?) onward to electric bikes (EBikes), I finally, in summer of 2019, installed this 1st ever (for me) wonderful mirror on my left side handlebar bar end. I like the "set of 2" , even tho I only use one because, in the case of breakage (crash/stupidity/etc), I would still have a complete mirror to use for parts, etc. Everything about this black mirror set was "5 stars", fer sure. The construction is 100% metal and glass (NO plastic anywhere).
So, I decided to also order a set in BLUE and a set in RED, with the intent of "mixing things up" colorwise. You know how some people take a perfectly good automobile and, the second they take ownership, things immediately start to get swapped out for customized items? Well, I am like that with my bicycles (7 so far, of which 4 are ebikes).
Anyway, the BLACK set, and everything about them, was/is top-notch.
However, when I got the BLUE set and the RED set, out of a total of 4 mirrors, 3 had a defect in the form of the two little screws that attach the mirrors body to the long arm. The screws (2) would very easily strip out when you went to tighten the mirror. Then, to make things worse, there is a little nut (2) inside the mirror body that will become dislodged and flop around inside the mirror body, making a constant little rattling that you will quickly tire of hearing.
So, after forming a thought, I located some Elmers glue and squeezed a decent amount into one of the screw holes in the mirror body. I then determined which side of the mirror would be the top side of the (eventually) installed mirror when fastened onto the handlebar/bar end. I marked the bottom side with a marker/ink pen and then turned the mirror body so that the glue and , by default, the little nuts, would be along the bottom side. I then gently jiggled the mirror body until the "nut noise rattle" disappeared. Thus the glue had captured the nut(s) and rattle was gone-gone..
Now, on to the screws themselves. Go to Lowes/ HomeDepot/etc and get a 6-pack of HILLMAN METAL Pan Phillips #12x 3/4 inch screws for $1.28 (item # 490221).. Use those metal screws in place of the original units. You will need a total of 4 screws IF both mirrors suffer from the "stripped out" . So, the 6-pack means you will be ahead of the game.
I know that having to deal with the aforementioned defect is a slight inconvenience but, the reality is that for the price, this pair of mirrors REALLY ROCK. By the way, if I had not bought the 2 additional (blue and red) sets, I would have probably never encountered the screw strippage with the BLACK set. So, though I can't give this item "5 stars, I won't give it less than "4 stars" either because it really is a very nice set of mirrors."... end of my April 24, 2020 AMAZON review...
Hand Cuffs-- Talk Dirty, I Love It: The handcuffs mounted under/behind the saddles of the 2 ebikes serve 2 real purposes:]
https://electricbikereview.com/foru...-sensor-bottom-bracket-price-is-200-00.40097/
As of today, Jan 5th, it is a work-in-progress. It should make current M2S ebike owners really appreciate their very correct ebike purchase. I also realize that many potential ebike buyers cruise these forums as an aid in their search for the ideal ebike at the most practical price. They also need to be made aware of “brand service after the sale”, or lack/deception thereof. After all, an ebike purchase of $1,500+ is no small investment. You be the judge.)
ADDENDUM on Jan 10, 2020: Since I now have numerous threads posted (sorry about that), I want to let viewers know their chronological sequence, thus every thread title will begin with (# ).
Reader: You REALLY do need to first read my other recently posted thread (#5) Some more M2S KUSH/ebike bits of info for all.. Sept 11,2019 , so that this thread will make complete sense to you.. One without the other is rather "lacking" in regards to information given in this one.
I have made mention on items/ways to help safeguard your ebikes' electrical stuff. In this thread I hope to further elaborate, and will also include some photo's.
The blue frame/red stem ebike is my 2018 KUSH dual suspension 750w rear hub (Bafang) toy. It was delivered on April 30, 2018 and now has 9,120 miles on the odometer.
The white frame/blue stem ebike is my 2019 R750 hardtail (front suspension only) 750w rear hub (Bafang) toy. It was delivered on July 11, 2019 and has 1,425 miles on the odometer. Since I am not exactly crazy about the model name “R750”, I have nicknamed it WhiteyFord since it has the white frame color.
As you will see in the photo's, I have ALOT of stuff on my handlebar area. Most of the items are safety-related; blue lens tinted headlight (flashes), dingle bell, bar ends, rearview mirror, and a U-shaped OR double straight bar triathlon bars converted to bumper/protector for the many handlebar electronic/mechanical items. The red stem bike also has a small Battery Capacity Indicator voltage/battery% LCD monitor/indicator.
There is also a pair of handcuffs, attached to each ebikes seat rails via round key rings and held taunt by a hair scrunchy thingie on a hook.
I will give a breakdown on each of the aforementioned items.
Blue Lens Tinted Headlight: (this item is actually mounted on the suspension fork cross bar) Though the M2S ebikes come standard with a headlight, it does not have a “flash/strobe” feature. I try to ride 50 miles every day. 90% of those miles are done on paved/concrete dedicated bike/multi-use paths. These paths have tunnels, underpasses, shady areas-- in other words lots of light/dark/light/dark scenarios. Like 99% of all bike riders, I wear sunglasses for glare and for bug protection. The only downside of those sunglasses is that, when you go into a dark area, you can't see anything that might be in there with you. The use of the flashing headlight is a great attention getter and gives a courtesy “heads up” to others about my presence. https://www.aliexpress.com/item/32731128032.html?spm=a2g0s.13010208.99999999.264.UZVGZ6
This headlight is awesome. It is also VERY bright; so much so that I would occasionally have opposite direction trail users hold up their hand over their eyes to insinuate “Brite Lite, Brite Lite”. I eventually formed a thought and stumbled upon some pill holders (blue) at WalMart. I glued the two lid halves together and then glued the whole container to the rim of the headlight rim. By the way, these headlights are so inexpensive that I buy them 4 at a time (also because I own multiple bikes); it just takes them about four weeks to arrive-- as does any item purchased thru AliBaba website (such as Reention Dorado 48volt batteries and Bafang 750w rear hubs/wheels). Hmmm.
You may also notice a white object on top of the blue lensed headlight. That is the face-only of an LCD wristwatch that I glued to the lites' topside.
Bar Ends: I have been riding mountain bikes since 1983. Any of you viewers/readers who have been riding for awhile know that “lighter (weight) is better” in any matter pertaining to bicycles in general. Want to lose 2 pounds off that old school bikes' weight? Pay an additional $2,000 for the titanium/carbon fiber frame version, etc. etc. During all of my old school bike (any bike NOT an ebike) riding years, such was a part of the “religion”. The ONLY exception I ever made to the lighter/minimalist mindset was the use of bar ends. They are just fantastic for assisting a rider during climbs. Most of my many bikes over the past 36 years, including the current 7 bikes, have had bar ends installed.
https://www.amazon.com/gp/product/B002I7PRUQ/ref=ppx_yo_dt_b_asin_title_o05_s00?ie=UTF8&psc=1
But now, with the advent of the ebike, bike weight just does not matter-- that little electric motor will get you going, and keep you going, for forever and a day.. Even if YOU get F-A-T.
In my case, since I ride so many miles on such a regular basis, I love to use the bar ends to mix up my hand positions as I ride. A real godsend at my age (68). On a 50 mile bike ride, I probably spend 70% of the time gripping those bar ends. I even installed handlebar grips on them-- work awesomely, too.
However, as you can see from the photo's, those bar ends are also a great location for a dingle bell and/or a rearview mirror AND they serve to protect all of those ebike items attached to your handlebar area.
Another advantage to this item is that you can flip your bike upside down and still be assured that all the stuff on your handlebar will be protected. I am religious in using this very technique ( wheelying/walking back/flipping da ebike) when dealing with tire swap-outs-- at least 30 times between both M2S ebikes.. You'll just need to loosen/re-position whatever is attached to the barends (rearview mirrors, etc.).
The only real downside to bar ends is that you have to move every item on your handlebar inward 1/2”-1” to accommodate the bar ends, too. No big deal, though.
Dingle bell: What Can I say? These little rascals are a godsend for providing a courtesy shout-out to other trail users. They are not too large and not too loud. https://www.amazon.com/gp/product/B074TC9K5T/ref=ppx_yo_dt_b_asin_title_o03_s00?ie=UTF8&psc=1
I have always gotten upset by other riders who passed me and didn't give a ”on your left” call-out or a dingle bell ring. Jesus Christ, how lazy/disrespectful can a person be?? Very.. Luckily, I am NOT one of those azzwholes. I only recently went from the call-out to the bell ring alert.
RearView Mirror: Only within the past week have I been using these rascals. I occasionally ride with another (very much novice) ebike rider. I was constantly having to look back to be sure that said ebiker hadn't driven off the trail/ridden into the side of a bus due to whatever. The only problem with looking back is that, if I turned around to the left, I would veer left.. turned to the right, veer right. Not good AND I'm not used to monitoring another rider. This person has a mirror attached to the end of the handlebar-- it sticks out about 4”-- and he swears by it in affording a view of upcoming riders about to overtake us.
Last week, I FINALLY broke down and bought a pair (one mirror for the left side of each M2S ebike).
https://www.amazon.com/gp/product/B07D9JD8YD/ref=ppx_yo_dt_b_asin_title_o06_s00?ie=UTF8&psc=1 Now, I am a convert. The local bike paths can get very busy at times and I have always been “conditioned” to turning my head just enough to see out of my peripheral vision as to what/who is behind me. I stumbled across these very well made mirrors (no plastic—all metal) and decided to give them a test ride.
I like having them mounted on my bar ends in a way that allows them to be much higher than handlebar end units AND still not needing to protrude way out beyond the end of the handlebar (no more than 1”).
Also, to my amazement, “shudder/shake” is minimal-- almost non-existent. I even use the white frame ebike (WhiteyFord) in full “rigid” mode (front suspension fork is locked out) and everything is still just fine and dandy. I am quite satisfied with this safety assistant item.
Rearview Mirror UpDate on April 26, 2020: The following is my April 24, 2020 AMAZON review on these excellent mirrors;
"I first ordered a set of these in color BLACK. Riding mountain bikes since 1983, and then, progressing (?) onward to electric bikes (EBikes), I finally, in summer of 2019, installed this 1st ever (for me) wonderful mirror on my left side handlebar bar end. I like the "set of 2" , even tho I only use one because, in the case of breakage (crash/stupidity/etc), I would still have a complete mirror to use for parts, etc. Everything about this black mirror set was "5 stars", fer sure. The construction is 100% metal and glass (NO plastic anywhere).
So, I decided to also order a set in BLUE and a set in RED, with the intent of "mixing things up" colorwise. You know how some people take a perfectly good automobile and, the second they take ownership, things immediately start to get swapped out for customized items? Well, I am like that with my bicycles (7 so far, of which 4 are ebikes).
Anyway, the BLACK set, and everything about them, was/is top-notch.
However, when I got the BLUE set and the RED set, out of a total of 4 mirrors, 3 had a defect in the form of the two little screws that attach the mirrors body to the long arm. The screws (2) would very easily strip out when you went to tighten the mirror. Then, to make things worse, there is a little nut (2) inside the mirror body that will become dislodged and flop around inside the mirror body, making a constant little rattling that you will quickly tire of hearing.
So, after forming a thought, I located some Elmers glue and squeezed a decent amount into one of the screw holes in the mirror body. I then determined which side of the mirror would be the top side of the (eventually) installed mirror when fastened onto the handlebar/bar end. I marked the bottom side with a marker/ink pen and then turned the mirror body so that the glue and , by default, the little nuts, would be along the bottom side. I then gently jiggled the mirror body until the "nut noise rattle" disappeared. Thus the glue had captured the nut(s) and rattle was gone-gone..
Now, on to the screws themselves. Go to Lowes/ HomeDepot/etc and get a 6-pack of HILLMAN METAL Pan Phillips #12x 3/4 inch screws for $1.28 (item # 490221).. Use those metal screws in place of the original units. You will need a total of 4 screws IF both mirrors suffer from the "stripped out" . So, the 6-pack means you will be ahead of the game.
I know that having to deal with the aforementioned defect is a slight inconvenience but, the reality is that for the price, this pair of mirrors REALLY ROCK. By the way, if I had not bought the 2 additional (blue and red) sets, I would have probably never encountered the screw strippage with the BLACK set. So, though I can't give this item "5 stars, I won't give it less than "4 stars" either because it really is a very nice set of mirrors."... end of my April 24, 2020 AMAZON review...
Hand Cuffs-- Talk Dirty, I Love It: The handcuffs mounted under/behind the saddles of the 2 ebikes serve 2 real purposes:]
- a deterrent to possible casual theft. A person who sees them just might think twice about stealing a bike (any bike) that could very possibly belong to a police person. Extra effort/diligence would to forthcoming in regaining possession of the stolen(police persons) ebike.[/FONT]
- I never ever lock my 2 M2S fat tire ebikes because I NEVER EVER ride them somewhere that requires a lock-up/time spent away scenario. However, at age 68, I could at any moment, have a “senior moment” and need to make a hasty detour to da terlet. In that case, my absence will be short lived (unless I doze off), BUT I will still need to secure the Mighty Beast. Thus the hand cuffs. They weigh very little and they only cost $12. Each of my bikes has their own dedicated set of cuffs (I got tired of constantly transferring them from bike to bike). I use key rings attached to the saddle rails to insert the cuff arm through and a scrunchie on a hook to attach the other cuff to the frame. Tension keeps the cuffs from clanging around, plus they are always easily seen by other riders, etc.. Food For Thought..
LCD monitor for voltage/battery % remaining: The M2S computer display unit (CDU) display will show “188%” when you first power up the ebike. It quickly disappears. The owners manual/ quick reference placard states: “ *188% & DST need BMS support. Not currently available “.. Give Me A Break.. It's not rocket science and we are not NASA. Lets face it ,I've grown tired of the inaccuracy of the 5-bar “battery remaining” displayed on the cdu. You know, if I go 20 miles before bar #5 disappears, that should mean that I will be able to go a total of 100 miles before bar #1 goes away (5 bars, each @20 mp bar= 100 miles total). In other words, linear dissipation-- BUT NO, it is not to be!! Now, whenever a bar disappears, I'll just light up the ole LCD and see what it says in regards to “% of battery remaining” . Those ebike factory computer displays SHOULD be able to give better/more concise % readout information-- lord only knows that there is a multitude of other bull$hit information readily available within their “menu” pages. Anyway, for the next 1,000 miles I'll evaluate the accuracy/potential of this small Battery Capacity Indicator monitor. https://www.amazon.com/Icstation-Ca...=B07CHM3NHH&psc=1&refRID=CFCSECQBAEFSP1J5NT4E
SideNote: the actual display has green background with black digits/battery outline-- the reverse of what is shown on the internet.
I have installed this on the red stem ebike. It is directly below the ebikes computer display screen. This little monitor is more of a curiosity satisfy-er than anything else. Since I do not use the M2S factory installed headlight, I have some extra power wires just hanging around-- so, I hooked them up to this little rascal just for yitz n' wrenz. Ya don't even need to cut/splice any wiring because the headlight wires have the female end of the connection-- just insert the little LCDs wires into them and U B stylin'.
Instead of needing to press a button on the LCDs display box, I only need to press-and-hold (for 2 seconds) the “+” button on my ebikes computer. Doing so “turns on” the ebike headlight/computer display unit backlight, thus ALSO illuminating the LCD display for 10 seconds before it automatically shuts off (it may then be necessary to again quick- press the + button to activate the green LCD display). After checking the LCDs “battery% / volts” I then have to manually turn off the headlight/computer display unit (cdu) backlight.
I have already discovered that the little LCDs “type battery” selection, as shown in the paper/website instructions, is completely BOGUS-- there is not even a “li” (for lithium) selection option. So, since I have 2 batteries of identical spec's, I went on my daily ride and ran the 48v 16ah black battery down to “1 battery bar” and then continued on for another 4 miles. It never started blinking/flashing, indicating that the battery was VERY SOON to be completely exhausted, but it couldn't have been too much farther. Now I was back to the condo with two batteries; 1 was 100% freshly charged and 1 was just about out of juice. Now it was just a matter of inserting the red(+) and black (-) wires into the battery holes and then going thru the little LCD monitors' menu and seeing which setting shows “100%” and “53.4 volts” when reading the fresh battery and then swapping out for the nearly exhausted battery to get a logical reading from it. JACKPOT!! Eventually I got a low battery display of “4%” and “44.0 volts”. I WIN!! I did the swap out thing 3 times just to be sure. The menu setting of “12C” is the winner for the 16ah battery pack] So, if you want to invest in this lil' monitor toy, you are now very far ahead of the game as far as installation/setup are concerned. Also, during battery recharging, during its 4.5 hour refilling, I can check the monitor to see what it reads as battery% and voltage are increased. Sure nuff, both items show a gradual increase as the recharging progresses. I'll be installing one on WhiteyFord, too because toyz iz toyz. The little LCD monitor only weighs about as much as a bunny fart, so using Gorilla HeavyDuty duct tape to connect it to the bottom of the ebikes cdu display is a piece of cake-- plus, if you need access to the back of the monitor, just flip it up and over. Too cool.
I will give you an update when I post the “10,000 mile” thread in a few months. - ADDENDUM on Jan 1, 2020: If you buy this type led monitor, you may as well go ahead and buy this connector, too E-flite Y-Harness, HD 6" (2): Universal Light Kit, EFLA617. It is actually used for radio controlled airplane lighting systems. I broke one of the wires at the male connecter (the wires are very fragile/delicate) and had to do ALOT of searching to find the correct type harness. The added bonus with this particular harness is that it a 2 male plugs AND the package contains 2 sets of wiring AND the wires are twice is thick as those included with the lcd monitor. Thats all for now. I hope that the photo's are gonna post otay. Sic Puppy..
Attachments
Last edited: