Homemade. Show us your stuff!

PDXzap

Well-Known Member
I've been a DIY guy for a long time and that trait followed me when I got into ebikes.
I'm not opposed to "factory made" but many times I find I can make something similar. Sometimes I can make it cheaper, sometimes I can make it better, and sometimes it's neither better nor cheaperšŸ™„ and sometimes it's an altogether flopšŸ˜–!

Sometimes maybe what you're looking for doesn't even exist so you whipped something up?

Maybe you've done something as simple as a Velcro strap around a battery, found the perfect size stick to hold your bike up or made the perfect repair stand?

So let's see some of the things you've made for your ebike.

To get the ball rolling let's look @6zfshdb talent with his easy loading Truck bed bike rack. A wonderful piece of engineering and fabrication IMO!

AND his improved version...
 
I DIY because itā€™s the only way to get what I want. I figure I am about the only person with a torque assist emtb with Chris King hubs/Carbon Fiber rims running mullet on a hardtail and one of very few that use front hub motor drop bar bikes and wouldnā€™t use anything else for roadish use.
 
PDR_1064.JPG

This is how I was haulin' stuff 10 years ago.

An all plastic milk crate cut in half, pop riveted to an aluminum channel from an old screen door then screwed to an old seat post rack with coroplast for the outside walls. More of the old screen door for the supports and some 1/4" Lauan from an old door for reinforced liners in the bottom.
The battery box was homemade also out of plexiglass from an old big screen TV.

That rig hauled a lot of cargo.
 
Although I put a Currie drive on a 29ā€er in 01ā€™ itā€™s 24v SLA battery just didnā€™t provide enough saddle time to satisfy. I looked into ICE motors and didnā€™t like the 2stroke options and 4cycle kits were not well developed.

Ended up owning and riding this for many years until I figured that e tech had evolved enough to get back to it. The Hispanic caretaker that owns this now uses it every day

C04BAAE4-B9FA-4DD5-9872-7E6739ADECBE.png
 
View attachment 46762
This is how I was haulin' stuff 10 years ago.

An all plastic milk crate cut in half, pop riveted to an aluminum channel from an old screen door then screwed to an old seat post rack with coroplast for the outside walls. More of the old screen door for the supports and some 1/4" Lauan from an old door for reinforced liners in the bottom.
The battery box was homemade also out of plexiglass from an old big screen TV.

That rig hauled a lot of cargo.
What is that that "Electro Drive " doing hanging way back there?
 
@JRA you've been in the game a long time!šŸ‘

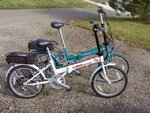
About the time you were installing the Currie I was gathering information about recumbents. I really wanted to try one but couldn't really afford any of them and a few years later I ended up building a couple. Scrounging for parts I ran across this pair of Currie folders and the price was too good to resist.
46778
Almost immediately I unlaced one of the motors and laced it back up in my old GT Outpost. It worked but the drive was set up for the 20" wheels of the folder so the experience wasn't great. I later found the Currie eMtb and put the folder's drive back in. The SLA's in both were still strong enough for extended test drives and I sold them easily.

What is that that "Electro Drive " doing hanging way back there?
That was how Currie set up all their bikes back then. It's was actually a pretty good design. I still have that eMTB but don't ride it much. It probably has a thousand and a half miles on it but still looks good.
 
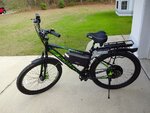
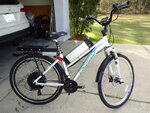
These are both new Schwinn bikes purchased pretty reasonably from Walmart. Both with 1500w direct drive rear hubs and 15ah batteries from Amazon. Mens was a 29'er and too tall for me, so it was replaced with a now much modified Rad City. Wife won't let me replace her's... Materials were about 1200 each.


4678346784
 
Last edited:
I've been a DIY guy for a long time and that trait followed me when I got into ebikes.
I'm not opposed to "factory made" but many times I find I can make something similar. Sometimes I can make it cheaper, sometimes I can make it better, and sometimes it's neither better nor cheaperšŸ™„ and sometimes it's an altogether flopšŸ˜–!

Sometimes maybe what you're looking for doesn't even exist so you whipped something up?

Maybe you've done something as simple as a Velcro strap around a battery, found the perfect size stick to hold your bike up or made the perfect repair stand?

So let's see some of the things you've made for your ebike.

To get the ball rolling let's look @6zfshdb talent with his easy loading Truck bed bike rack. A wonderful piece of engineering and fabrication IMO!

AND his improved version...

Thanks for tagging me on this thread. I've seen quite a few useful ideas posted here on EBR. It's an excellent place to share and show off your inventions!

Here's one I posted a while back which continues to be useful for a variety of projects:

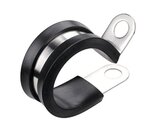
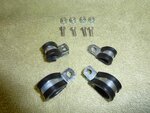
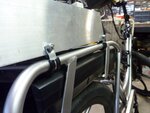
Many e-bikes have wider, non standard rear racks and thicker frame tubing which can make it difficult to attach things like trunk bags or panniers. These handy insulated cable clamps can be used in a variety of ways to attach items to your bike:


46817 46818


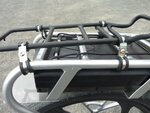
This is a rear rack adapter I made to use my Bontrager trunk bags on a non standard bike frame:

46819 46827 46828


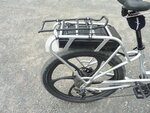
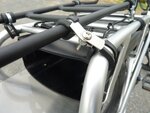
The frame tubing on my ebike is too thick for my quick attach Arkel panniers so I made this adapter using the above clamps and a piece of 1/2" aluminum tubing:

46823 46825 46824 46826


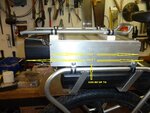
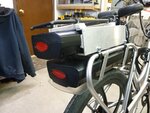
A spare battery box mounted to the rear rack using the same principle:

46822 46821 46820
 
Many bikes don't come from the factory with the ability to carry much more than the rider and even if the bulk of your bike trips are recreational it's usually not long before you're taking enough things on your ride that you realize your bike needs to be able to carry more... stuff.

DIY panniers.
My milk crate panniers above served admirably for quite a while, many times carrying over 50 lbs. When I got the Evelo Orion I immediately started looking for ways to carry more... stuff.
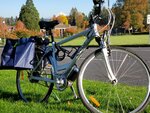
My Orion had a rack and I had a few reusable grocery bags that were fairly large. I did some measuring then designed and printed some hooks on the 3d printer. Knowing I needed to keep the bags "stiff" I made a back and bottom out of some corrugated polycarbonate and hinged them so they could fold up with the bag and added some velcro in strategic places.

Right side with a partial load.
46923

This is looking down inside one of the bags showing the polycarbonate sheets.
46924
The black buttons at the top are a couple of Chicago screws I printed up that hold the polycarbonate to the shopping bag... remove those and the polycarbonate can be removed from the bags. The green strips are cut from another bag and support the bottom shelf, they hold the bottom at 90 degrees when opened and fold up and out of the way when the bag is folded up.


The rack had a bar at the bottom, I assume for some kind of hook. I printed a bracket that slides up and down the bar so with varying weights the bag is still attached and won't swing out. All the clips were glued to the bag with E6000 glue.
46927

Here's a picture of the bar on the rack.
46928

Another picture from the opposite side showing the bracket on the bar.
46929

Here's a couple of pictures showing how a velcro strap holds the bag to the rack and also holds it down and keeps it from moving up and flying away. The first pic shows the velcro strapped down, the second shows it undone and ready to remove from the rack.
46931
46932

And finally a picture of the bag folded flat.
46930
 
It still isn't finished. I hate sewing on doodads like buckles, buttons, zippers, etc. Those things scare me so I will need to buck up and sew on the buckles soon. In the meantime, I don't need those to go play music.

It has two colors because I messed up on the first attempt. The fabric is pretty cheap at the local Walmarche and I made the pattern using a discontinued Huffy bag as a model.

46964
 
@fooferdoggie I'll need to keep an eye out for that "trunk" when I'm out and about, should be easy enough to spot! šŸ‘


Begin photojournal:

46961
46962
46960

End photojournal.

In other words... don't just toss those old tubes in the trash!

@Cowlitz NICE WORK! I don't care too much for sewing either... old thick fingers... and it's hard to find a thimble that fits!!!
I've come to rely on glue more and more, good thing is "they" seem to make the glue better every year.
 
I've owned a handful of bike trailers. The first was a steel Bell kid trailer with 20" tires that I got from a trash pile. I figured I could use parts off of it for something but once I got it home I found it was in near new shape. There was a bike near by that I wanted to pick up but really didn't want to fire up the truck so I bolted an old front axle on to the trailer and drug the trailer behind me to get the bike. Took off the front wheel of the "new" bike and hooked the forks to the axle and towed the "new" bike home.

I always like the single wheel Bob trailer but they were too pricey for me... this is a current project.

"Piccolo payload" partial progress.

This Piccolo was a 5 speed, after I stripped all "kid carrying parts" it weighed around 11lbs.

piccolo freight.jpg

"Piccolo payload" problems.

That bike stand in the picture is from a Europa but I didn't like the small ground clearance in the up position so I have been mulling over different ideas.
If the trailer was left attached to the bike it really wouldn't require any stand but I like the idea of being able to bring this in a store for shopping... so the search continues.

The Burley Piccolo requires a special rack in order to mount it to a bike.
piccolo hitch.jpg


I wanted to have the ability to tow the trailer with different bikes so I designed, 3d printed, and assembled a hitch that would fit the Evelo Orion.
piccolo hitch print.jpg


The hitch attached to the Orion. It just slides on and the Velcro straps hold it from sliding forward. The Orion's battery is removed in this photo but when installed it poses no problem.
orion printed hitch.jpg


I got the trailer in the Fall and haven't done any test hauls yet. The fabricated hitch seems like it will be strong enough (printed using ABS) but time will tell.
 
A small thing, but with all the clutter on the handlebars, it's sometimes hard to locate a bell close to the grip. My wife never lets go of her grips to ring her bell, and that's too bad. Now she has no excuse, after I raised her bell with a chunk of plastic.
47255

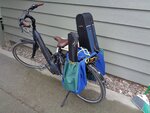
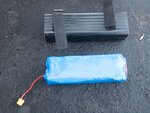
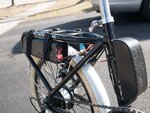
Same bike. When I learn how to 3D. I will make a better box, but I used some plastic drainpipe to hold two 36V5AH 2- cell packs on the luggage rack of her converted Schwinn folder. The black box in front contains the 17A controller.

47256 47257

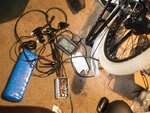
Here's the electronics, sensors, and one of the batteries used to convert a regular bike to an ebike. And the bike itself.

47258 47259
 
A switch mount with a voltmeter. The bicycle has two batteries. A solution I find easier than messing with parallel batteries. Bracket made from PVC parts. 3 position switch. on-off-on
.
IMG_1702.jpeg
 
I got back into cycling around 15 years ago and found my habit of often checking my mirrors while driving transferred to my bike riding. Problem was my bikes didn't have any mirrors.
I'd seen other riders with the mirrors on their helmets and liked the idea... except for the fact I rarely wore a helmet.

After surfing the web for different designs (and not really wanting to pay those prices) I made a few designs and this is the one I ended up using... all the time.
origmirrorglasses.jpg


It's a simple coat hanger wire bent to shape with a mirror hot glued on one end. I found the mirror at walmart in the craft section, I think it was a dollar or two for a pack of half a dozen or so.
origmirror.jpg

That mirror has watched probably 4K miles and 15 years disappear behind me. You might be able to see where the glass has chipped in the upper right side in the picture which translates to the upper left under use but in the years since I made it I've managed to misplace the bag of mirrors and honestly it really doesn't effect it's use enough to replace it.

After moving to Oregon and riding the crazy hills and roads along with the even more crazy drivers I decided to look for a replacement helmet after mine was lost in the move. I also realized that I rarely needed sunglasses here because the sun so often refuses to shinešŸ˜ 
Even though the sunglasses work with the helmet... I needed a mirror for my helmet.

After a few hours on the CAD program...
A few re-purposed broken spokes and some adhesive foam tape.
A square cut from a plastic mirror.
Some E6000 glue.
helmet mirror.jpg

It works well enough but I might try to redesign it in the future.
 
Thanks @Thomas Jaszewski
I'm still a little surprised at how well that mirror has held up. It might need a little tweaking to fit but I think the pair shown is the third or fourth pair of sunglasses that mirror has been on. It's outlasted them all!
 
Back