Ebike Addict
Member
This will be of special interest to owners of Hydra bikes equipped with a Kindernay IGH. There was significant interest some time ago to the possibility of replacing the Hydra chain drive with a belt drive assembly. The difficulty was the non-availability of a belt tensioner that could accommodate variations in the length of the chainstay caused by the action of the rear suspension. A belt tensioner is required to keep a constant tension in the belt irrespective of what the rear shock does. Such a tensioner has now been developed by Perrin Rodriguez Innovations PRI (pr-innovations.com). It is an elegant design, easy to install and it simply replaces the original chain tensioner. More on the tensioner further down.

Listed below are the belt assembly components:
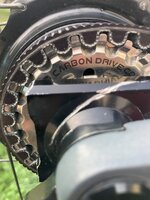
Rear Sprocket:
Kindernay recommends the Gates 22T CDX rear sprocket, part no. CDX CT1122HMN.
Front Sprocket:
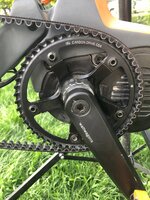
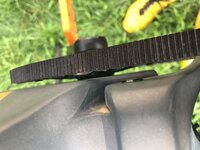
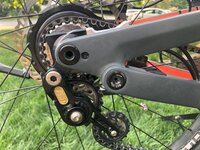
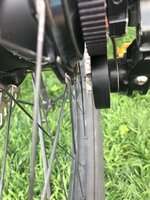
The original gear ratio of the chain was 2.44 (44T/18T). For the belt, I chose a 50T front sprocket, resulting in a gear ratio of 2.27 (50T/22T), which comes close to the original gear ratio of the stock chain setup. The Hydra stock setup utilizes a 5-bolt spider which works seamlessly with Gates CDX part no CT11505AA. Its tooth outer diameter (OD) is 173.2mm which is slightly smaller than the original 44T chainring OD at 183mm. As can be seen on the picture below, there is sufficient gap between the front sprocket and the bike structure to allow free motion of the belt. Note: The Kindernay Hub utilizes a 45.5mm beltline. In order to achieve this with the front sprocket, the side labelled “A” must be facing outboard (see pic). For my case no shimming was needed.
CDX Carbon Belt
Gates provides a calculator (Gates® Carbon Drive™ Bicycle Calculator (gatescarbondrive.com) that estimates the belt length based on the sizes of front/rear sprockets and the length of the chainstay. In the case of bikes with rear suspension, the maximum length of the chainstay has to be used, which happens when the rear shock is fully compressed. My Hydra is equipped with a Rockshox Super Deluxe Ultimate (230/65). One way to measure the full extent of the chainstay consists in removing the air from the Rockshox using a shock pump. When the Rockshox is fully compressed, the chainstay on my bike is measured at 510mm, a 20mm extension from the uncompressed length. Depending on the rear suspension specifications, this may vary a little. Also, I am using a medium size (M) Hydra and I don’t know if the chainstay length varies with the sizes of the bike.
The Gates calculator will provide a first estimate for the belt length; however, the use of a tensioner will require some additional length. The appropriate belt length was determined in consultation with PRI. A Gates CDX belt of 130T (1430mm) was chosen. The corresponding Gates part no is 11M-130T-12CTS.
If your setup differs from what is described above, please feel free to consult with PRI to determine the optimal belt length or for engineering time for designing custom hangers and parts.
The tensioner
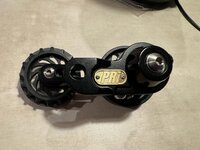
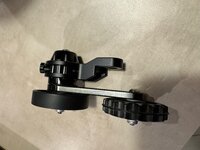
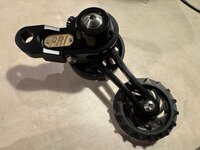
The tensioner (called B-DATS) has been designed and produced by Perrin Rodriguez Innovations PRI (pr-innovations.com). It is shown in the pictures below. It comes with a universal mounting clamp which bolts directly to the existing derailleur hanger. The main components include a snubber that ensures the belt is firmly engaged in the rear sprocket and a lower cog that applies the tension on the belt and helps keeping the belt in place.
Perrin Rodriguez Innovations has produced a video that explains in detail how to install the tensioner Installation: PRI Universal Belt Drive Tensioner (youtube.com). I found the installation to be very straightforward and only requires a couple of easy adjustments.
Belt installation
I followed a simple procedure to install the belt:
Preventive Measures
Gates indicates that the CDX line of products is approved for mid-drive motors not exceeding 100Nm of torque. The Bafang M620 can exceed that value. In order to limit premature wear of the belt, I programmed the Archon X1 controller to limit the maximum output current to 30A for all assistance levels and to 15A for the throttle.
Use Case
I have now ridden in excess of 300 miles with the belt assembly. I ride exclusively in forest trails at speeds ranging from 10 to 20 mph. The packed dirt trails present lots of bumps and rapid +/-5% terrain grade variations. So, my rides are usually not aggressive mountain biking rides but they are not smooth street rides either. So far, the tensioner and the other belt components have been rock-solid and very reliable. I have not experienced any belt slippage or slapping. I am quite happy with the installation since it cuts down on regular maintenance and renders the rides a bit quieter and smoother when compared to rides using a chain drive.
Listed below are the belt assembly components:
Rear Sprocket:
Kindernay recommends the Gates 22T CDX rear sprocket, part no. CDX CT1122HMN.

Front Sprocket:
The original gear ratio of the chain was 2.44 (44T/18T). For the belt, I chose a 50T front sprocket, resulting in a gear ratio of 2.27 (50T/22T), which comes close to the original gear ratio of the stock chain setup. The Hydra stock setup utilizes a 5-bolt spider which works seamlessly with Gates CDX part no CT11505AA. Its tooth outer diameter (OD) is 173.2mm which is slightly smaller than the original 44T chainring OD at 183mm. As can be seen on the picture below, there is sufficient gap between the front sprocket and the bike structure to allow free motion of the belt. Note: The Kindernay Hub utilizes a 45.5mm beltline. In order to achieve this with the front sprocket, the side labelled “A” must be facing outboard (see pic). For my case no shimming was needed.


CDX Carbon Belt
Gates provides a calculator (Gates® Carbon Drive™ Bicycle Calculator (gatescarbondrive.com) that estimates the belt length based on the sizes of front/rear sprockets and the length of the chainstay. In the case of bikes with rear suspension, the maximum length of the chainstay has to be used, which happens when the rear shock is fully compressed. My Hydra is equipped with a Rockshox Super Deluxe Ultimate (230/65). One way to measure the full extent of the chainstay consists in removing the air from the Rockshox using a shock pump. When the Rockshox is fully compressed, the chainstay on my bike is measured at 510mm, a 20mm extension from the uncompressed length. Depending on the rear suspension specifications, this may vary a little. Also, I am using a medium size (M) Hydra and I don’t know if the chainstay length varies with the sizes of the bike.
The Gates calculator will provide a first estimate for the belt length; however, the use of a tensioner will require some additional length. The appropriate belt length was determined in consultation with PRI. A Gates CDX belt of 130T (1430mm) was chosen. The corresponding Gates part no is 11M-130T-12CTS.
If your setup differs from what is described above, please feel free to consult with PRI to determine the optimal belt length or for engineering time for designing custom hangers and parts.
The tensioner
The tensioner (called B-DATS) has been designed and produced by Perrin Rodriguez Innovations PRI (pr-innovations.com). It is shown in the pictures below. It comes with a universal mounting clamp which bolts directly to the existing derailleur hanger. The main components include a snubber that ensures the belt is firmly engaged in the rear sprocket and a lower cog that applies the tension on the belt and helps keeping the belt in place.
Perrin Rodriguez Innovations has produced a video that explains in detail how to install the tensioner Installation: PRI Universal Belt Drive Tensioner (youtube.com). I found the installation to be very straightforward and only requires a couple of easy adjustments.


Belt installation
I followed a simple procedure to install the belt:
- Remove rear the wheel and replace the chain sprocket with the Gates rear sprocket
- Open up the rear triangle and remove the chain along with the chain tensioner
- Replace the chain ring with the Gates front sprocket on the original spider. (I removed the right crank for ease of work).
- Insert the belt through the open rear triangle and close the rear triangle
- Put back the rear wheel
- Install the tensioner on the derailleur hanger
- Follow the tensioner adjustments procedure explained in the PRI video


Preventive Measures
Gates indicates that the CDX line of products is approved for mid-drive motors not exceeding 100Nm of torque. The Bafang M620 can exceed that value. In order to limit premature wear of the belt, I programmed the Archon X1 controller to limit the maximum output current to 30A for all assistance levels and to 15A for the throttle.
Use Case
I have now ridden in excess of 300 miles with the belt assembly. I ride exclusively in forest trails at speeds ranging from 10 to 20 mph. The packed dirt trails present lots of bumps and rapid +/-5% terrain grade variations. So, my rides are usually not aggressive mountain biking rides but they are not smooth street rides either. So far, the tensioner and the other belt components have been rock-solid and very reliable. I have not experienced any belt slippage or slapping. I am quite happy with the installation since it cuts down on regular maintenance and renders the rides a bit quieter and smoother when compared to rides using a chain drive.