Aventure Bottom Bracket change...

Dingo

Member
Region
USA
City
Corona Del Mar
I'm on a quest to change out the BB and the cranks for better quality ones. There's only one problem - I don't know what I need! Well, I know I need the special tool to remove the nut on the drive side of the crank, but beyond that, what should I be looking for in a BB? Has anyone done this already? and if so, what did you install? Thanks for any input!!
 
Well, as it turns out, and based on the views with no responses, I seem to be the first one attempting to do this. I'm learning a ton about bottom brackets and spindles and crank sets. I do know the unit is a 100mm. Once I remove it I'll know if its an English style or press fit.
 
I swapped out the cranks on mine, but not the BB. Honestly unless you're having actual problems with the stock one, I wouldn't bother swapping it out. Seems to be a normal well working square taper, so the door is open to 90%+ of the useful cranks out there. It's one area that "from the factory" you're usually ok... though any experts out there feel free to correct me, I'm still learning this stuff too. My BB experience prior to this e-bike was a ashtabula to BB conversion I did on my regular 26" cruiser twelve years ago.

Thus why mine got converted to 130mm with a 53 tooth chainring with zero hassles. There's something about only having four connection points that irritates the crap out of my inner engineer.

driveTrain.jpg

I didn't look closely enough at the existing BB but with everything else in the drivetrain being Shimano, that's probably what it is.

If you do take the plunge could you please take some pictures of the process -- or even make a video? Help the next poor sod along? I really wish Aventon wasn't so painfully vague about the exact model parts used, but I guess like Apple that's how they can change vendors on the fly in the "race to the bottom" on parts quality.

Thus why even the cheapest parts off Amazon seem to be a better quality. I really should have done a DIY, but in hindsight the experience with this one means when it comes time to replace it, I'll be much better versed in choosing parts.
 
Yeah, I'm on a mission... I need to know what it is! I have some of the tools, the 16mm 1/2" drive hex socket should arrive tomorrow that'll allow me to remove the crank. I'll take pics and post what I find for sure. I haven't been able to find anywhere on the internet, what BB is installed on the bike. We shall soon find out!

As far as the unit I'll install, I'm still researching cranks and kits. I want to get 150+/-mm cranks but that may be a stretch. I might just settle for what's widely available and looks the part in 160 or 165mm.
 
What an Aventure so far... with trying to get this crank apart and the BB out!! The first crank puller tool I purchased ended up stripping the threads on the crank - this Sunlite product I cannot recommend. I returned it (and the 14mm hex bit socket I also bought for it) and purchased this from Amazon - worked like a charm and pulled the crank off the BB in less than one full rotation of the screw. Now I just have to get the other pedal off before I'm able to completely remove the BB. I'll tackle that tomorrow.
 
This is basically the kit I use:


I've not used the bb tool on the Aventure, but it worked a treat when I did the ashtabula to BB conversion on my cruiser. Part of why I've got so many square taper parts and prefer it over other BB / crank connection types. And why I didn't feel the need to dick with that part of it.

The crank puller worked fine for me. Admittedly, my kit is about 12 years old now, but that's the same brand.

Side note, did you know "Aventure" is actually a word? Archaic, but it means "to cause the non-criminal death of another".

This is why you don't just drop letters to match your branding and go "ooh, cool!"
 
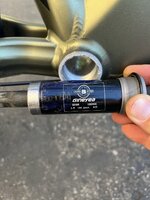
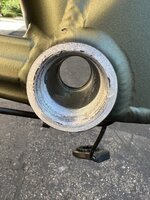
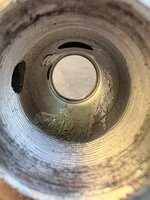
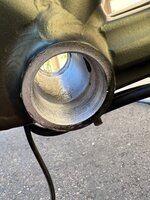
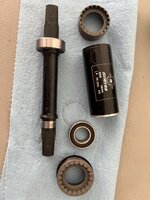
OK - you've all waited long enough... I finally had the time, and the proper tools, to take out the bottom bracket on my Aventure. Here's the pics... You can see in the 2nd pic the R side threaded screw is holding the entire piece together. I used the puller to separate the bearing from the screw, and it all came apart pretty easily, you can see in the next to last pic. Does anyone have any thoughts on this thing? It's essentially 2 bearings with an aluminum tube sandwiched between them, and then pressed into the screws.
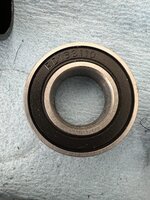
And how about these bearings, they really feel like crap when I spin them in my hand.

I'm wondering where I go from here to get a better feel while pedaling. Do I just replace the bearings or do I get all new spindle and bottom bracket?
 

Attachments

  • IMG_0482.JPG
    IMG_0482.JPG
    178.7 KB · Views: 479
  • IMG_0483.JPG
    IMG_0483.JPG
    232.3 KB · Views: 461
  • IMG_0485.JPG
    IMG_0485.JPG
    407.7 KB · Views: 473
  • IMG_0486.JPG
    IMG_0486.JPG
    298.7 KB · Views: 391
  • IMG_0487.JPG
    IMG_0487.JPG
    422.8 KB · Views: 404
  • IMG_0488.JPG
    IMG_0488.JPG
    396.6 KB · Views: 435
  • IMG_0490.JPG
    IMG_0490.JPG
    375.1 KB · Views: 406
  • IMG_0491.JPG
    IMG_0491.JPG
    380.3 KB · Views: 486
Generally speaking that's a "sealed bottom bracket", generally you don't crack those open. It's part of why I wouldn't have bothered going that deep in the first place on a new bike. If it feels scratchy or there's significant resistance I'd just grab another one since they're like $20-$30 for a 100mm unit. The sealed bearing units aren't really meant to be serviced.

Though everything looks really rough and scratched up... not sure if you did that, or it came from the factory like that... or maybe "camera flaw" where it's showing stuff the eye can't see... but damn. Even the welds on your frame look janky, and I'm not used to seeing that in a Aventon.

100x159.5 is a bit of a wonk... More used to seeing 100x155, which would probably work you'd just have a lot less thread engaging.
 
I'm very familiar with bearings, and know these sealed bearings are at the low end of the spectrum with regard to quality. I also know they can't be serviced and are a replaceable part. Also, what I believe you're referring to being scratched up is in fact grease smears? There's no scratches on anything in the pics other than the steel shaft with the bearing still on one end. Perhaps you haven't seen the welds up so close before... these pics were taken with an iPhone 13PRO.

So I basically confirmed this BB is garbage and needs to be replaced.
 
Update:

Besides the orginal BB that came in the bike, there's only 2 other alternatives that fit - not counting a custom made Phil Wood unit, or the like. I'm waiting for an email from Aventon detailing what those 2 other units are. I will post back when I have more info.
 
I'm very familiar with bearings, and know these sealed bearings are at the low end of the spectrum with regard to quality. I also know they can't be serviced and are a replaceable part.
I think you missed my meaning. Your picture 0490? You took it apart too far. They're not meant to be cracked open like that. I've encountered them that were actually glued together so you couldn't go that far, though THANKFULLY that particular practice seems to have died off in the ten years since I did bike stuff regularly.
So I basically confirmed this BB is garbage and needs to be replaced.
100 x 159.5 is unusual, but this probably would be a 1:1


Silly question, but were you actually having problems with it before you started screwing around with it? I mean bearings are NOT rocket science. It still seems odd to me you'd have dug into it that deep in the first place.
 
Just found another seller that has them, though the price is so low it's sketchy.


A lot of EU sellers seem to have them too. This M-Wave brand seems to be the most common maker.

 
I never did get exact details on replacement units - details good enough to purchase one. They sent me a new OEM BB under warranty that I installed today.
 
Dingo, You say you are waiting on them to get back to you. I asked them a few questions and the reply I got back today about swapping parts out is this:
Hello Chris,

Thank you for reaching out; no you would not void the warranty if you assemble the bike yourself; however, if you do any modifications to the bike, it would void the warranty. We have youtube videos showing how to assemble every bike on our website.

We hope this helps,
Tyler
--
Aventon Support
I do change out a lot of parts to make MY bike Mine. I always go higher quality if I can. With bottom brackets on a fat tire bike we are limited. I would like a Higher end Shimano square taper like an Ultegra Level BB but they don’t make these square taper. I have thought about going Hollowtech Bottom bracket and a matching crank arms to really drop wait but I have no clue yet how to work around the cadence sensor.
 
I wonder how douchy they are in their definition of "Swapping parts". Are they total pedantic asses over something stupid like grips or bars, or do you have to go as hardcore as I have with things like ... well... both chainring and cogset?
 
I swapped out the cranks on mine, but not the BB. Honestly unless you're having actual problems with the stock one, I wouldn't bother swapping it out. Seems to be a normal well working square taper, so the door is open to 90%+ of the useful cranks out there. It's one area that "from the factory" you're usually ok... though any experts out there feel free to correct me, I'm still learning this stuff too. My BB experience prior to this e-bike was a ashtabula to BB conversion I did on my regular 26" cruiser twelve years ago.

Thus why mine got converted to 130mm with a 53 tooth chainring with zero hassles. There's something about only having four connection points that irritates the crap out of my inner engineer.

driveTrain.jpg

I didn't look closely enough at the existing BB but with everything else in the drivetrain being Shimano, that's probably what it is.

If you do take the plunge could you please take some pictures of the process -- or even make a video? Help the next poor sod along? I really wish Aventon wasn't so painfully vague about the exact model parts used, but I guess like Apple that's how they can change vendors on the fly in the "race to the bottom" on parts quality.

Thus why even the cheapest parts off Amazon seem to be a better quality. I really should have done a DIY, but in hindsight the experience with this one means when it comes time to replace it, I'll be much better versed in choosing parts.
My BB got changed out two months after I got the bike. The wrench said it had been installed wrong, but I need to change it out again (10 months later) because of an insane amount of creaking again. I'll try one of the BB in this thread.
 
OK - you've all waited long enough... I finally had the time, and the proper tools, to take out the bottom bracket on my Aventure. Here's the pics... You can see in the 2nd pic the R side threaded screw is holding the entire piece together. I used the puller to separate the bearing from the screw, and it all came apart pretty easily, you can see in the next to last pic. Does anyone have any thoughts on this thing? It's essentially 2 bearings with an aluminum tube sandwiched between them, and then pressed into the screws.
And how about these bearings, they really feel like crap when I spin them in my hand.

I'm wondering where I go from here to get a better feel while pedaling. Do I just replace the bearings or do I get all new spindle and bottom bracket?

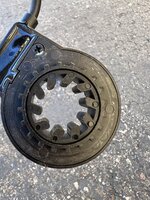
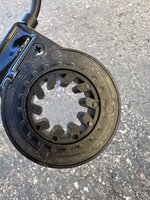
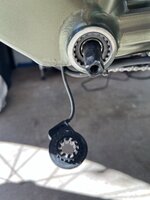
Anything complicated involved in pulling the cadence sensor, or putting it back on?
 
Anything complicated involved in pulling the cadence sensor, or putting it back on?
Nope, it's a compression fitting and can be pulled right off with a thin metal spatula. They're also sold as a replacement part for like $15 I think.
 

Attachments

  • IMG_0487.JPG
    IMG_0487.JPG
    422.8 KB · Views: 170
Nope, it's a compression fitting and can be pulled right off with a thin metal spatula.
Aka "Wishful thinking fitting" and "we're too cheap to tap a hole and add a bolt"

What's the old joke about "snap together?" It also snaps apart!
 
Anyone found another bottom bracket that fits? I've ordered one of the $9 bikeinn brackets, but I'm skeptical. The other link above is for an ebay vendor who is on vacation.

Also, where did this size info (100/159.5) come from? I didn't see it anywhere on aventon info, and they haven't gotten back to me in eight days since I sent in a query.
 
Back