#2.. X48/X52 Stem and ChainRing modifications..
It is snowing today, so I will commence another thread detailing modifications that I have made to my blue 2021 X52 Lil' Mini-Beast.
It is to your advantage to first go ahead and scroll down to the end of this post and examine the photo's. That way, my info will make more sense from the git-go..
Again, my specifics are: age 70.. Height 5'9”.. Inseam 30”.. Out-the-door riding weight 200 pounds.. I include that info so that you, the reader, can make your own determinations/adjustments in regards to your world.
In thread #1, you were made aware of my improvements (at least in my situation) to the stock/original ebike set-up. I was actually able to increase the seat/saddle height from a pathetic 34” top height up to 39” (mailbox only) and/or 41.5” (cushioning device added). The additional increase enabled me to attain a perfect proper full-leg extension when pedaling. I can't tell any difference between this ebike and my other most excellent ebike beasts(there are 2 other good ones).
The trade-off is that I am now at absolute full extension when I need to sling my leg up and over said X52 beast in order to mount/dismount. But, everything is gonna be a trade-off and that particular one is worth the effort. However, if, at age 70, I should ever pull a muscle/sprain a leg joint/splode a 'roid, etc., I am gonna be a screwed pooch (more on that potential/eventual modification/remedy in a later separate thread posting).
Also, since my seat height went up, my handlebar area needed to be heightened, too-- otherwise I would be in a very uncomfortable stooped-over riding position (in thread #1, see the photo of the black toolbox/original stem configuration- - way too low). Naturally, a riders first thought is to buy a new handlebar with a 6”+ rise and install it. That, of course, entails removing every item from the original (most excellent) 2” riser handlebar, and then the handlebar itself, and then installing the replacement handlebar, and then re-installing/adjusting all of those components. Too much fun..
OR, you can do as I did and just purchase this item:
https://www.aliexpress.com/item/100...5f35-b3ee-4b16-bc46-485a3fcefac3-16&pdp_ext_f={"sku_id":"12000020822743201"}
In my situation, I ordered “7 upgraded blue” because I wanted the extra 20mm/5 spacers of height.
No components need to be dealt with at all. Loosen/remove original stem.. Install the riser.. Adjust height as preferred by repositioning the various spacers.. re-install/fasten stem.. Easy Breezy.. And it is awesome!!
I also purchased this following item because I installed one of my carbon fiber flat (no rise at all) handlebars (me likes me carbon fiber) on the X52. I wasn't sure if the stock length stem would be long enough:
https://www.aliexpress.com/item/1005001612302258.html?spm=a2g0s.9042311.0.0.4f9e4c4dZwWJfe
And, since it, too, is visible in the photo's below:
https://www.aliexpress.com/item/32993817080.html?spm=a2g0s.9042311.0.0.4f9e4c4dZwWJf
All of these items ship from across the great blue sea, so allow 3 to 4 weeks for their arrival to the good ol' A.
In regards to the stem extender: You can accomplish the entire swap-out in less than 10 minutes.. If you want to swap out the stem itself (as I did) just add another 10 minutes. Off and on.. Quick like a bunny..
By the way, the new handlebar height is PURRFECTO, baby!!
Onward and upward.
Now that the handlebar dilemma has been rectified, it's time to address the original crankset/chain ring shortcomings.
The X52 comes stock with black cranks that are 170mm long and a 48-teeth chain ring that also has an inner and an outer chain-drop guard. These 2 guards are essentially chain rings without the teeth. When pedaling using this configuration, it quickly became apparent that the number of teeth(48) are woefully INADEQUATE. The best comparison is “I'm barely attaining any speed (15mph) and I have already run out of resistance. Did the damn chain fall off? Crappy doodle..” What to do, what to do??
Well, ya just have to replace one chain ring item with another: https://www.ebay.co.uk/itm/333922672489
I bought the “multi-color/56 teeth” item. By the way, this chain ring has a mirror finish-- so much so that, when it arrived, I put the magnet to it just to find out fer sure. Nope, not steel .I liked it so much that I bought another one and installed it on my white ebike beast. However, on that ebike, the 56t ring merely replaced the outer chain guard because, on a 26” tire fat tire ebike, its' original 48t chainring is perfecto-emundo..
I also purchased the following chain ring in gold/58teeth because it has a built-in chainguard. By the way, the gold matches perfectly with the X52 fonts/graphics gold: https://www.aliexpress.us/item/3256802932304280.html?
The most common sense method of replacing the original X52 components with proper usable items is too remove the right side crank arm and unscrew/install the bolts/chain rings, etc. However, to do the job properly you will need to own/buy a crank arm remover.
There is a simple Plan”b”, though. And, only the chain rings are affected.
First, loosen all the chain bolts (male) on the outer side just enough so that that tension has been eliminated.
Next, get 5 pieces of duct tape and stick each one securely to the bolt (female) on the back (inner) side. Doing so will negate those inner bolts from falling out.
Then remove completely the 5 outer bolts.
Remove the outside (smooth) chain ring.
Install the new replacement 56t/58t chain ring. Leave the original chain ring in place.
Re-install the 5 outer bolts, being sure to feel the inner bolts to make sure that they are not turning along with the outer bolts. Also, occasionally check the bolts (both sides) to be sure that they haven't loosen/backed out. This entire procedure only takes about 10 minutes.
Why, you ask, should you retain the original 48t ring? Because, you now actually have a 14-speed ebike instead of the original 7-speed component- - 48T and 56t/58t. Only YOU, the rider, are the front derailleur. Takes about 30 seconds to stop the ebike, grab the chain, and move it to the preferred front chain ring. This option is good to have just in case you do some riding in hilly areas, too. I do this occasionally just because I can. Beware of chain oil, though.
Speaking of “chain”: I did NOT need to add links/new chain. The 56t ring fit the original chain perfectly and I have yet to have the chain fall off/down.
By the way, that difference of a few additional teeth made all the difference in the world. As I stated in thread #1, I do a 50 mile pedal-assist ebike ride pretty much every day. This little 20” tire ebike , with its 56t ring, pedals EXACTLY the same as my two 26” fat tire beasts do with their 48t units. Nice.
UpDate on Jan. 17th: Today I monitored my pedaling speed and found that, even at 26mph, the 56t chainring allows a "normal" pedaling experience. That means that, unlike the 48t unit, which begins free-wheeling (chain fall off?) at 15mph, the bigger 56t unit just keeps on keeping on with normal feedback.
Purple crank/chain ring shown in photo's (165mm/44 teeth):
https://www.ebay.com/itm/124823127196?hash=item1d1009c49c:g:6wkAAOSwIWNg-1pN
This is an interesting item because, while the 44teeth are definitely too small to actually use, the 165mm long crank arms actually give a slightly higher clearance from the ground. Just the thing when dealing with 20" size wheels. I just attached (and use) the 56t multi-color chain ring, to the outside. Plus, the 44t inside chain ring shows thru the holes of the 56t unit quite nicely.
In regards to this thread, and also #1, I shouldn't have to make all the common sense alterations/improvements to this ebike to make it truly “rider worthy”, but such is the reality in this day and age. Bummer, but necessary (apparently).
YouTubers, if you want to convert my printed ideas into video's, then that is otay wit me. Just be sure to give me, SicPuppy, a quick shout-out.
Also, more threads are coming later.
Photo's:
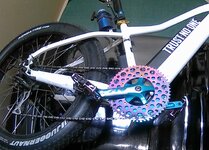
The white ebike shows the chain line following the blue inner (48tooth) chain ring. The outer chain ring is the multi-color 56t item...
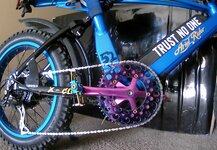
The blue X52 shows the chain line following the multi-color outer (56tooth) chain ring. The purple inner chain ring is 44teeth...
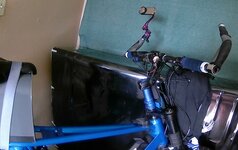
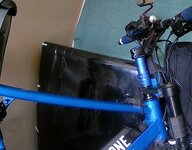
The 2 blue stem-riser photo's show the new handlebar area height in relation to the top of the seat/saddle/mailbox unit...
It is snowing today, so I will commence another thread detailing modifications that I have made to my blue 2021 X52 Lil' Mini-Beast.
It is to your advantage to first go ahead and scroll down to the end of this post and examine the photo's. That way, my info will make more sense from the git-go..
Again, my specifics are: age 70.. Height 5'9”.. Inseam 30”.. Out-the-door riding weight 200 pounds.. I include that info so that you, the reader, can make your own determinations/adjustments in regards to your world.
In thread #1, you were made aware of my improvements (at least in my situation) to the stock/original ebike set-up. I was actually able to increase the seat/saddle height from a pathetic 34” top height up to 39” (mailbox only) and/or 41.5” (cushioning device added). The additional increase enabled me to attain a perfect proper full-leg extension when pedaling. I can't tell any difference between this ebike and my other most excellent ebike beasts(there are 2 other good ones).
The trade-off is that I am now at absolute full extension when I need to sling my leg up and over said X52 beast in order to mount/dismount. But, everything is gonna be a trade-off and that particular one is worth the effort. However, if, at age 70, I should ever pull a muscle/sprain a leg joint/splode a 'roid, etc., I am gonna be a screwed pooch (more on that potential/eventual modification/remedy in a later separate thread posting).
Also, since my seat height went up, my handlebar area needed to be heightened, too-- otherwise I would be in a very uncomfortable stooped-over riding position (in thread #1, see the photo of the black toolbox/original stem configuration- - way too low). Naturally, a riders first thought is to buy a new handlebar with a 6”+ rise and install it. That, of course, entails removing every item from the original (most excellent) 2” riser handlebar, and then the handlebar itself, and then installing the replacement handlebar, and then re-installing/adjusting all of those components. Too much fun..
OR, you can do as I did and just purchase this item:
https://www.aliexpress.com/item/100...5f35-b3ee-4b16-bc46-485a3fcefac3-16&pdp_ext_f={"sku_id":"12000020822743201"}
In my situation, I ordered “7 upgraded blue” because I wanted the extra 20mm/5 spacers of height.
No components need to be dealt with at all. Loosen/remove original stem.. Install the riser.. Adjust height as preferred by repositioning the various spacers.. re-install/fasten stem.. Easy Breezy.. And it is awesome!!
I also purchased this following item because I installed one of my carbon fiber flat (no rise at all) handlebars (me likes me carbon fiber) on the X52. I wasn't sure if the stock length stem would be long enough:
https://www.aliexpress.com/item/1005001612302258.html?spm=a2g0s.9042311.0.0.4f9e4c4dZwWJfe
And, since it, too, is visible in the photo's below:
https://www.aliexpress.com/item/32993817080.html?spm=a2g0s.9042311.0.0.4f9e4c4dZwWJf
All of these items ship from across the great blue sea, so allow 3 to 4 weeks for their arrival to the good ol' A.
In regards to the stem extender: You can accomplish the entire swap-out in less than 10 minutes.. If you want to swap out the stem itself (as I did) just add another 10 minutes. Off and on.. Quick like a bunny..
By the way, the new handlebar height is PURRFECTO, baby!!
Onward and upward.
Now that the handlebar dilemma has been rectified, it's time to address the original crankset/chain ring shortcomings.
The X52 comes stock with black cranks that are 170mm long and a 48-teeth chain ring that also has an inner and an outer chain-drop guard. These 2 guards are essentially chain rings without the teeth. When pedaling using this configuration, it quickly became apparent that the number of teeth(48) are woefully INADEQUATE. The best comparison is “I'm barely attaining any speed (15mph) and I have already run out of resistance. Did the damn chain fall off? Crappy doodle..” What to do, what to do??
Well, ya just have to replace one chain ring item with another: https://www.ebay.co.uk/itm/333922672489
I bought the “multi-color/56 teeth” item. By the way, this chain ring has a mirror finish-- so much so that, when it arrived, I put the magnet to it just to find out fer sure. Nope, not steel .I liked it so much that I bought another one and installed it on my white ebike beast. However, on that ebike, the 56t ring merely replaced the outer chain guard because, on a 26” tire fat tire ebike, its' original 48t chainring is perfecto-emundo..
I also purchased the following chain ring in gold/58teeth because it has a built-in chainguard. By the way, the gold matches perfectly with the X52 fonts/graphics gold: https://www.aliexpress.us/item/3256802932304280.html?
The most common sense method of replacing the original X52 components with proper usable items is too remove the right side crank arm and unscrew/install the bolts/chain rings, etc. However, to do the job properly you will need to own/buy a crank arm remover.
There is a simple Plan”b”, though. And, only the chain rings are affected.
First, loosen all the chain bolts (male) on the outer side just enough so that that tension has been eliminated.
Next, get 5 pieces of duct tape and stick each one securely to the bolt (female) on the back (inner) side. Doing so will negate those inner bolts from falling out.
Then remove completely the 5 outer bolts.
Remove the outside (smooth) chain ring.
Install the new replacement 56t/58t chain ring. Leave the original chain ring in place.
Re-install the 5 outer bolts, being sure to feel the inner bolts to make sure that they are not turning along with the outer bolts. Also, occasionally check the bolts (both sides) to be sure that they haven't loosen/backed out. This entire procedure only takes about 10 minutes.
Why, you ask, should you retain the original 48t ring? Because, you now actually have a 14-speed ebike instead of the original 7-speed component- - 48T and 56t/58t. Only YOU, the rider, are the front derailleur. Takes about 30 seconds to stop the ebike, grab the chain, and move it to the preferred front chain ring. This option is good to have just in case you do some riding in hilly areas, too. I do this occasionally just because I can. Beware of chain oil, though.
Speaking of “chain”: I did NOT need to add links/new chain. The 56t ring fit the original chain perfectly and I have yet to have the chain fall off/down.
By the way, that difference of a few additional teeth made all the difference in the world. As I stated in thread #1, I do a 50 mile pedal-assist ebike ride pretty much every day. This little 20” tire ebike , with its 56t ring, pedals EXACTLY the same as my two 26” fat tire beasts do with their 48t units. Nice.
UpDate on Jan. 17th: Today I monitored my pedaling speed and found that, even at 26mph, the 56t chainring allows a "normal" pedaling experience. That means that, unlike the 48t unit, which begins free-wheeling (chain fall off?) at 15mph, the bigger 56t unit just keeps on keeping on with normal feedback.
Purple crank/chain ring shown in photo's (165mm/44 teeth):
https://www.ebay.com/itm/124823127196?hash=item1d1009c49c:g:6wkAAOSwIWNg-1pN
This is an interesting item because, while the 44teeth are definitely too small to actually use, the 165mm long crank arms actually give a slightly higher clearance from the ground. Just the thing when dealing with 20" size wheels. I just attached (and use) the 56t multi-color chain ring, to the outside. Plus, the 44t inside chain ring shows thru the holes of the 56t unit quite nicely.
In regards to this thread, and also #1, I shouldn't have to make all the common sense alterations/improvements to this ebike to make it truly “rider worthy”, but such is the reality in this day and age. Bummer, but necessary (apparently).
YouTubers, if you want to convert my printed ideas into video's, then that is otay wit me. Just be sure to give me, SicPuppy, a quick shout-out.
Also, more threads are coming later.
Photo's:
The white ebike shows the chain line following the blue inner (48tooth) chain ring. The outer chain ring is the multi-color 56t item...
The blue X52 shows the chain line following the multi-color outer (56tooth) chain ring. The purple inner chain ring is 44teeth...
The 2 blue stem-riser photo's show the new handlebar area height in relation to the top of the seat/saddle/mailbox unit...
Attachments
Last edited:

